Beeper is a universal messaging app designed to consolidate multiple chat platforms into a single, streamlined interface.Developed by Beeper Inc. and acquired by Automattic in April 2024, Beeper aims to simplify digital communication by integrating various messaging services.
Key Features
Unified Messaging Hub
Beeper supports integration with numerous chat networks, including:
WhatsApp
Facebook Messenger
Instagram
Telegram
Signal
Slack
Discord
LinkedIn
Twitter (X)
Google Messages (SMS/RCS)
IRC (Libera Chat)
Matrix
Google Chat
Skype
This extensive compatibility allows users to manage conversations from multiple platforms within a single application.
Cross-Platform Availability
Beeper is accessible on various operating systems, including:
iOS
Android
macOS
Windows
Linux
ChromeOS
This ensures seamless synchronization across devices, allowing users to switch between platforms without losing access to their messages.
Security and Privacy
Beeper emphasizes user privacy with features such as:
End-to-end encryption for messages
Zero-access encrypted chat backups
Use of unique tokens instead of storing passwords
These measures aim to protect user data and ensure secure communication across integrated platforms.
A self-hosting option, allowing users to run Beeper on their own servers for enhanced privacy and customization
This flexibility caters to both casual users and those with advanced technical requirements.
✅ Pros
Comprehensive Integration: Consolidates multiple messaging platforms into one interface, reducing the need to switch between apps.
Cross-Platform Support: Available on major operating systems, ensuring accessibility across devices.
Privacy-Focused: Implements robust security measures to protect user data.
Customizable: Offers tools for organizing chats and the option for self-hosting.
Active Development: Regular updates and improvements, with a roadmap for future features.
❌ Cons
Limited Feature Parity: Some integrated platforms may lack full functionality (e.g., stickers, typing indicators).
iMessage Integration Challenges: Attempts to integrate iMessage have faced obstacles due to Apple’s restrictions, leading to limited or no support.
Occasional Sync Issues: Users have reported difficulties syncing accounts across devices, particularly during initial setup.
Learning Curve: Managing multiple platforms within a single app may require an adjustment period for some users.
Final Verdict
Beeper presents a compelling solution for users seeking to unify their messaging experiences across various platforms.Its emphasis on privacy, cross-platform support, and customization makes it a strong contender in the messaging app landscape.However, potential users should be aware of its limitations, particularly regarding feature parity and iMessage integration.Overall, Beeper is well-suited for individuals looking to streamline their communication channels while maintaining control over their data.
Posted in Uncategorized | Comments Off on Beeper App – Universal Messenger
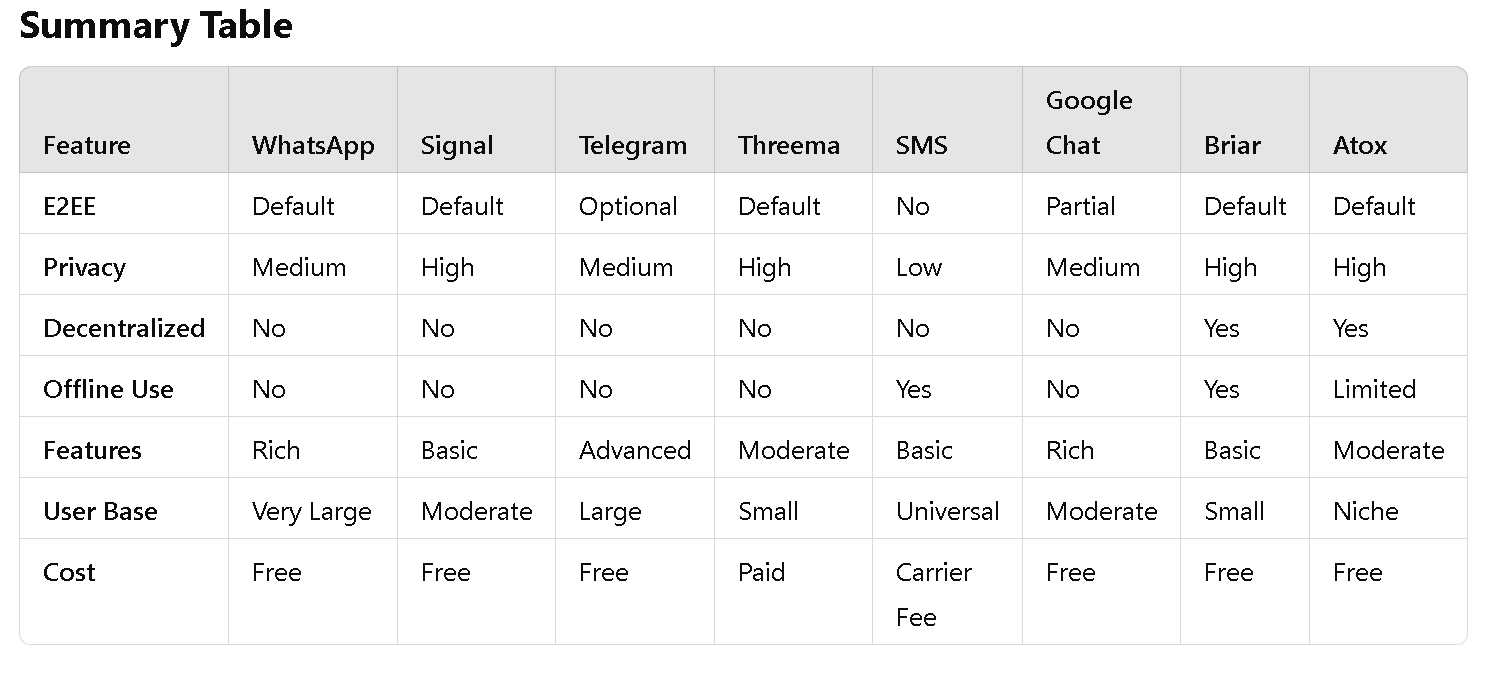
Comparing Messaging Platforms: WhatsApp, Signal, Telegram, Threema, SMS, Google Chat, Briar, and Atox
In an increasingly connected world, messaging platforms have become essential for personal and professional communication. With numerous options available, it’s crucial to understand their features, privacy implications, and unique benefits. Here’s a detailed comparison of eight popular messaging services: WhatsApp, Signal, Telegram, Threema, SMS, Google Chat, Briar, and Atox.
Overview: Owned by Meta, WhatsApp is a global leader in messaging, offering features such as voice/video calls, file sharing, and group chats.
Pros:
End-to-end encryption (E2EE) by default for all chats. Massive user base ensures wide accessibility. Features like disappearing messages and business integration.
Cons:
Metadata is collected, raising privacy concerns. Heavily linked to the Meta ecosystem.
Best For: Casual users looking for a feature-rich, widely used app.
Overview: Built on the decentralized Tox protocol, Atox offers P2P encrypted messaging and VoIP without relying on centralized servers.
Pros:
E2EE by default. Decentralized network, resilient to server outages. Supports multimedia and voice communication.
Cons:
Requires manual updates and troubleshooting. Limited user base and documentation.
Best For: Tech-savvy users favouring decentralized, secure communication. Excellent for unmatched security for company internal communication even across borders and continents.
Conclusion
Choosing the right messenger depends on your priorities:
For privacy: Signal, Threema, or Briar are excellent choices. For features and group dynamics: Telegram or WhatsApp shine. For decentralized or offline communication: Briar and Atox stand out. For universal reach: SMS remains unmatched.
Understanding these differences ensures you can pick the platform that aligns with your communication needs.
Posted in Uncategorized | Comments Off on Messaging App Comparison
In this article I will try to explain in reference to privacy the differences between various instant messengers (SMS, Facebook Messenger, Whatsapp, Signal, Telegram, Threema, Tox, Briar etc) and how their application of encryption (or non-encryption) can affect your privacy.
Why is encryption important?
Generally we don’t like others to read our messages. You might say that is not important to you, because you have nothing to hide. And while this is a valid opinion it disregards, that corporations and other third parties could be interested in what you have to say, how often you say it, how much you say etc. basically analysing your behaviour. That knowledge they can use to derive a profit or influence you (and others, if they have a significant number of people’s behaviour on file). I personally also don’t do anything illegal, but I think my personal business is nobody’s business but my own. So I choose to keep my private things private as much as possible and use encryption whereever viable.
Many people don’t know, that when we send messages without encryption (like Facebook Messenger. Telegram when not using secure messages and SMS) anyone (network operators, service providers and in turn their managements and governments), through whose infratructure your message is transported, could read it. If it is encrypted they cannot read it unless they have the encryption keys.
So the encryption keys are important. In order to assess who might possibly have access to the keys and thus could read your messages we need to look at how those keys are handled, where the messages are transported and who is in charge of the messenger platform in use.
Not all messenger services are equal
SMS – your phone network provider supplies you with the ability to send and receive SMS. They may apply a weak encryption along the way, but too weak to consider this secure. So this is unsecure, which doesn’t mean it is unusable, but certainly an awareness of this suggest you shouldn’t send credit card details or any other sensitive personal data via SMS.
Facebook Messenger – Not encrypted and Facebook’s T&C even say they will read and have the right to assess and use your messages for their purposes.
Whatsapp – While one of the largest services and widely used with an excellent set of functions and is End-to-End encrypted, I have some concerns about the security. Whatsapp is not open source. So the coding cannot be independly assessed. So we have to believe, that they are not doing anything untowards with our messages.
In addtion they say the encryption keys are only on your own phone and that of the person you communicate with, the keys and all messages are still going via their servers. Also Facebook (now Meta, owner of Whatsapp) are based in the USA and could be obligated to give access to your messages to their legal system. So they must be able to do this. The easiest way is to keep your keys somewhere on their systems. We like to believe them, but they certainly have the technical ability to do otherwise. And they require your phone number. Thus making you identifyable.
Signal – A competing messenger service to Whatsapp, but it is open source and indeed an non-profit organisation. So somewhat that might instill more trust, that they will do the right thing, but they are also based in the USA. Thus the same obligation to their legal system is present. And also all keys and messages are going via their servers. They also require your phone number. Thus making you identifyable.
Telegram – Another open source messenger service. They are based in Dubai, a kingdom where the non-elected king takes an active role in governing the country. Telegram offers encrytion, but you need to select to send secure messages. The default is to send NOT secure (like SMS and Facebook Messenger). All keys and messages are also sent via their servers and a phone number is also required to sign up.
Threema – A messenger service based in Switzerland. So you would be covered by Switzerland’s stringent privacy laws. It is not free, but the once off cost of US3.00 is small. It is open source and no phone number is required for sign up. They say they are not keeping your messages, but all keys and messages are going via their servers until they are delivered to your device.
Briar – A messenger service using the Tox protocol harnessing the TOR network and not relying on a central server or needing a phone number. It can also utilise Wifi without internet connection and Bluetooth to transmit messages. “…designed for activists, journalists, and anyone else who needs a safe, easy and robust way to communicate…..”. This is possibly a more convenient solution, but usually with more convenience may come less security.
Tox – A messenger service, that is open source and free, no phone number is required for sign up. So it can be totally anoymous. Since keys are truely only kept locally on your phone or computer and indeed if you want to connect with someone else on this service you would have to find your own way to give them your key so they can communicate with you. So the keys are not going through their servers. The messages are also not going via their servers, but directly from your device to the device of the person you commuicate with. Therefore they and you would have to be online at the same time in order for messages to be delivered between you. You could have the messenger software running in the background (much like all the other messenger services) and messages will be delivered and received (if your communication partner also has it runnning in the background). In addtion you can use the TOR network with the messenger, which is another layer of protection to keep your location anonymous.
I will now describe how to set up a Tox client on Android and on Windows and how to add the TOR network function to the Windows installation. There are clients for Apple MacOS, but unfortunately not for iPhone. The reason for this is possibly, that iPhone’s systems are too restrictive to add the secure Tox client.
Posted in Uncategorized | Comments Off on Instant Messengers, Encryption and Privacy
I am not going to discuss here why you should use Mastodon over anything else. There are plenty of discussions everywhere. You are here because you already know you want an account and need a quick start:
Go here: https://mastodon.au/ You will get a username like @something@mastodon.au
Click on “Create Account”
Agree to the terms
Fill in 3 fields
Confirm your email address
Done. Start posting.
If you want more details read on:
There is a lot of talk about the apparent (but not real) difficulty of choosing the “right” server for yourself. Before you launch into that consider these points:
An account with ANY of the many Mastodon servers will:
make your posts visible to ANY users on all Mastodon servers in the “Multiverse”
enable you to see posts from all accounts on all Mastodon servers
allow you to change easily to another server at any time. Including your followers
Notwithstanding this you may want to consider, that the choice of your server somewhat fits with your interests. For example if you are not Australian, in Australia or have an interest with Australia perhaps another server would be wise. Simply so your values and interests fit with those of the other users on your server.
The following sites will make the choice of another server easier:
Setting up an IMAP account on any phone, pad or computer will result in your email to be replicated on the server and all other devices setup with this IMAP account. There are several issues with this: A. You are occupying ever more space on the server, which could result in extra costs. B. You are occupying every more space on all your other devices as well. You could run out of space. C. All your email is sitting on the server and anyone (with appropriate access rights) can see all your mail. The alternative is to set up the POP3 access method, which will retrieve messages from the server every time you check your mail.
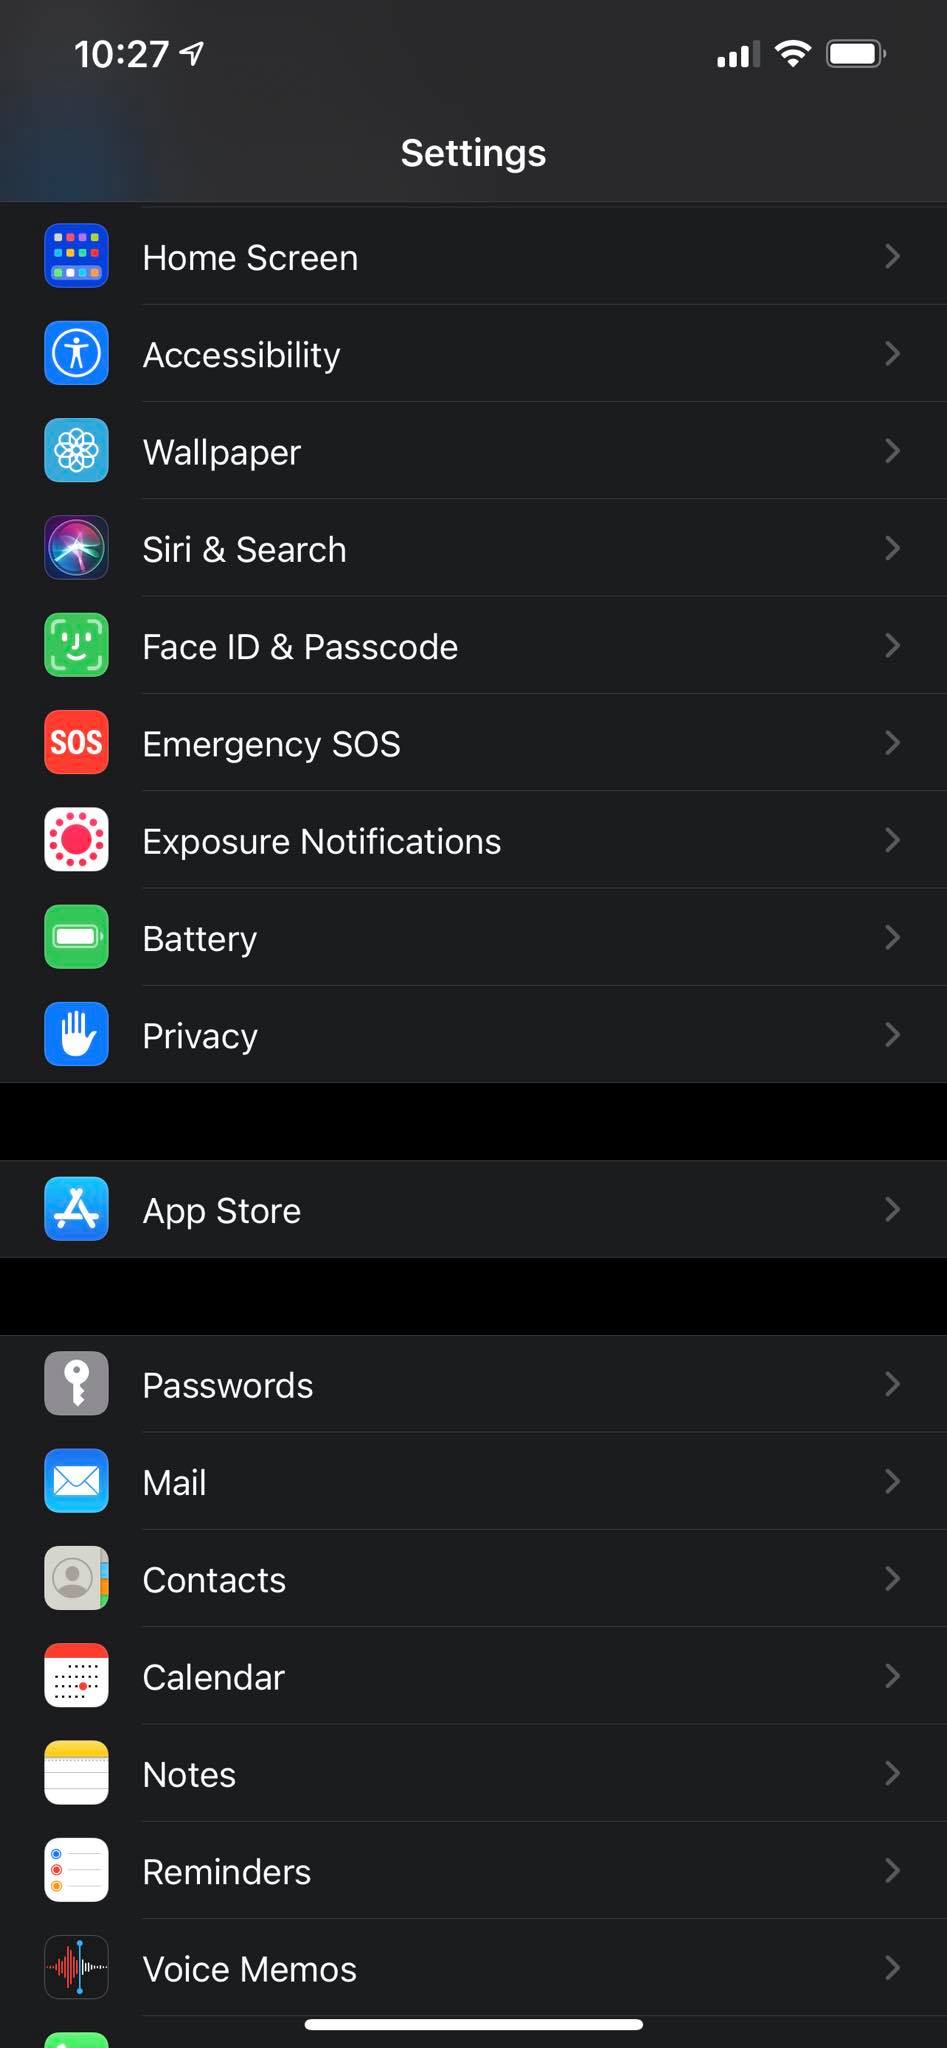
Go to Settings > Mail
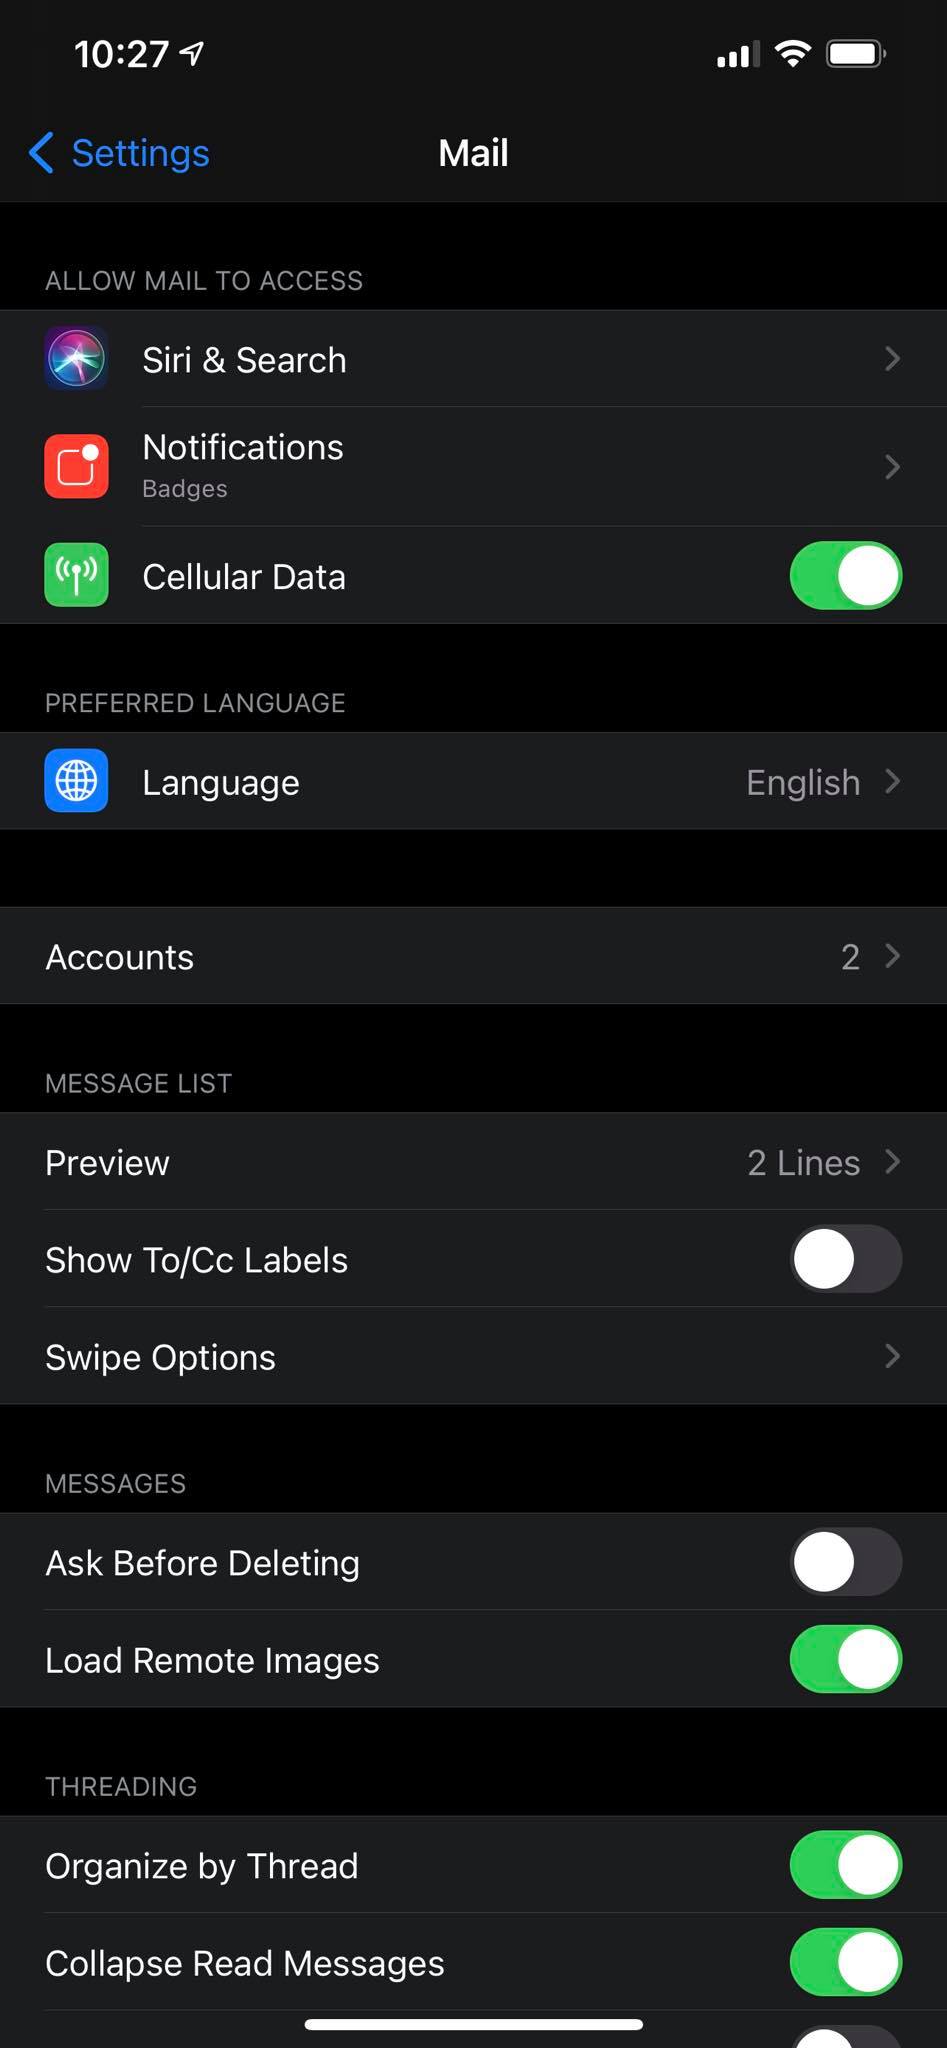
Go to Accounts
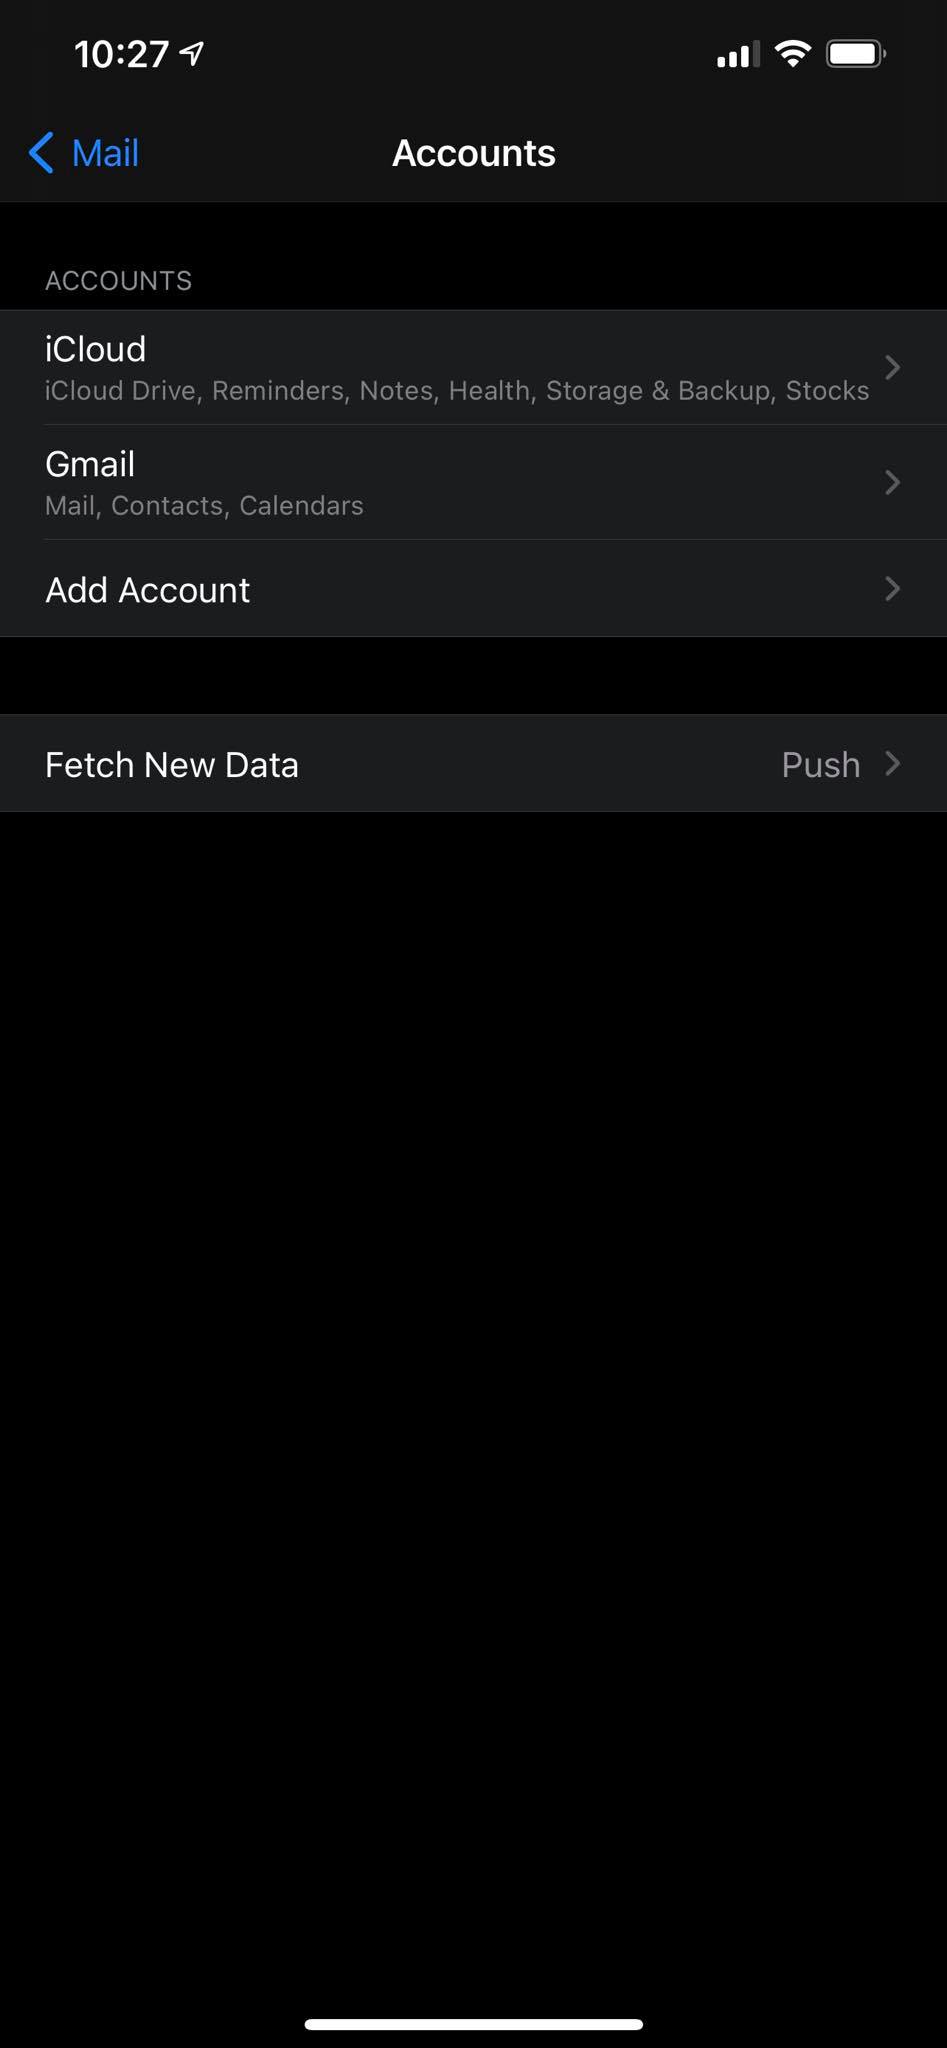
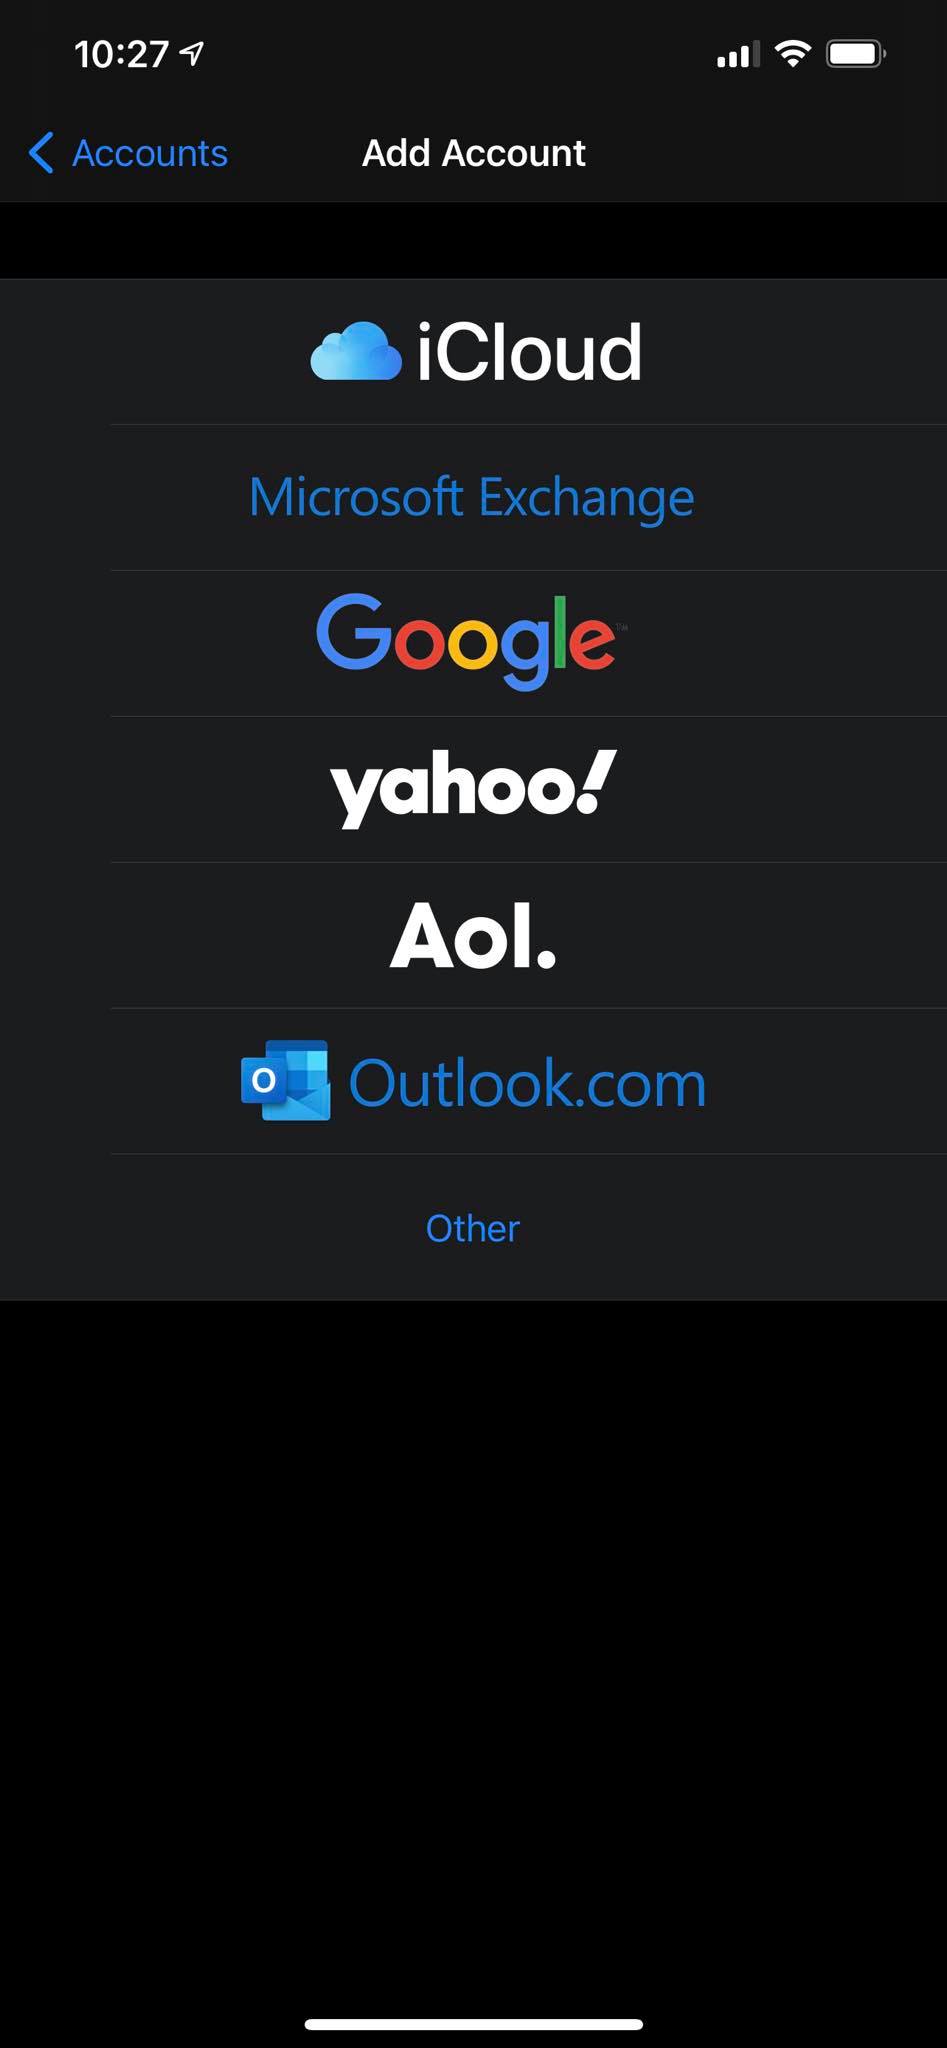
Click Add Account
Select Other
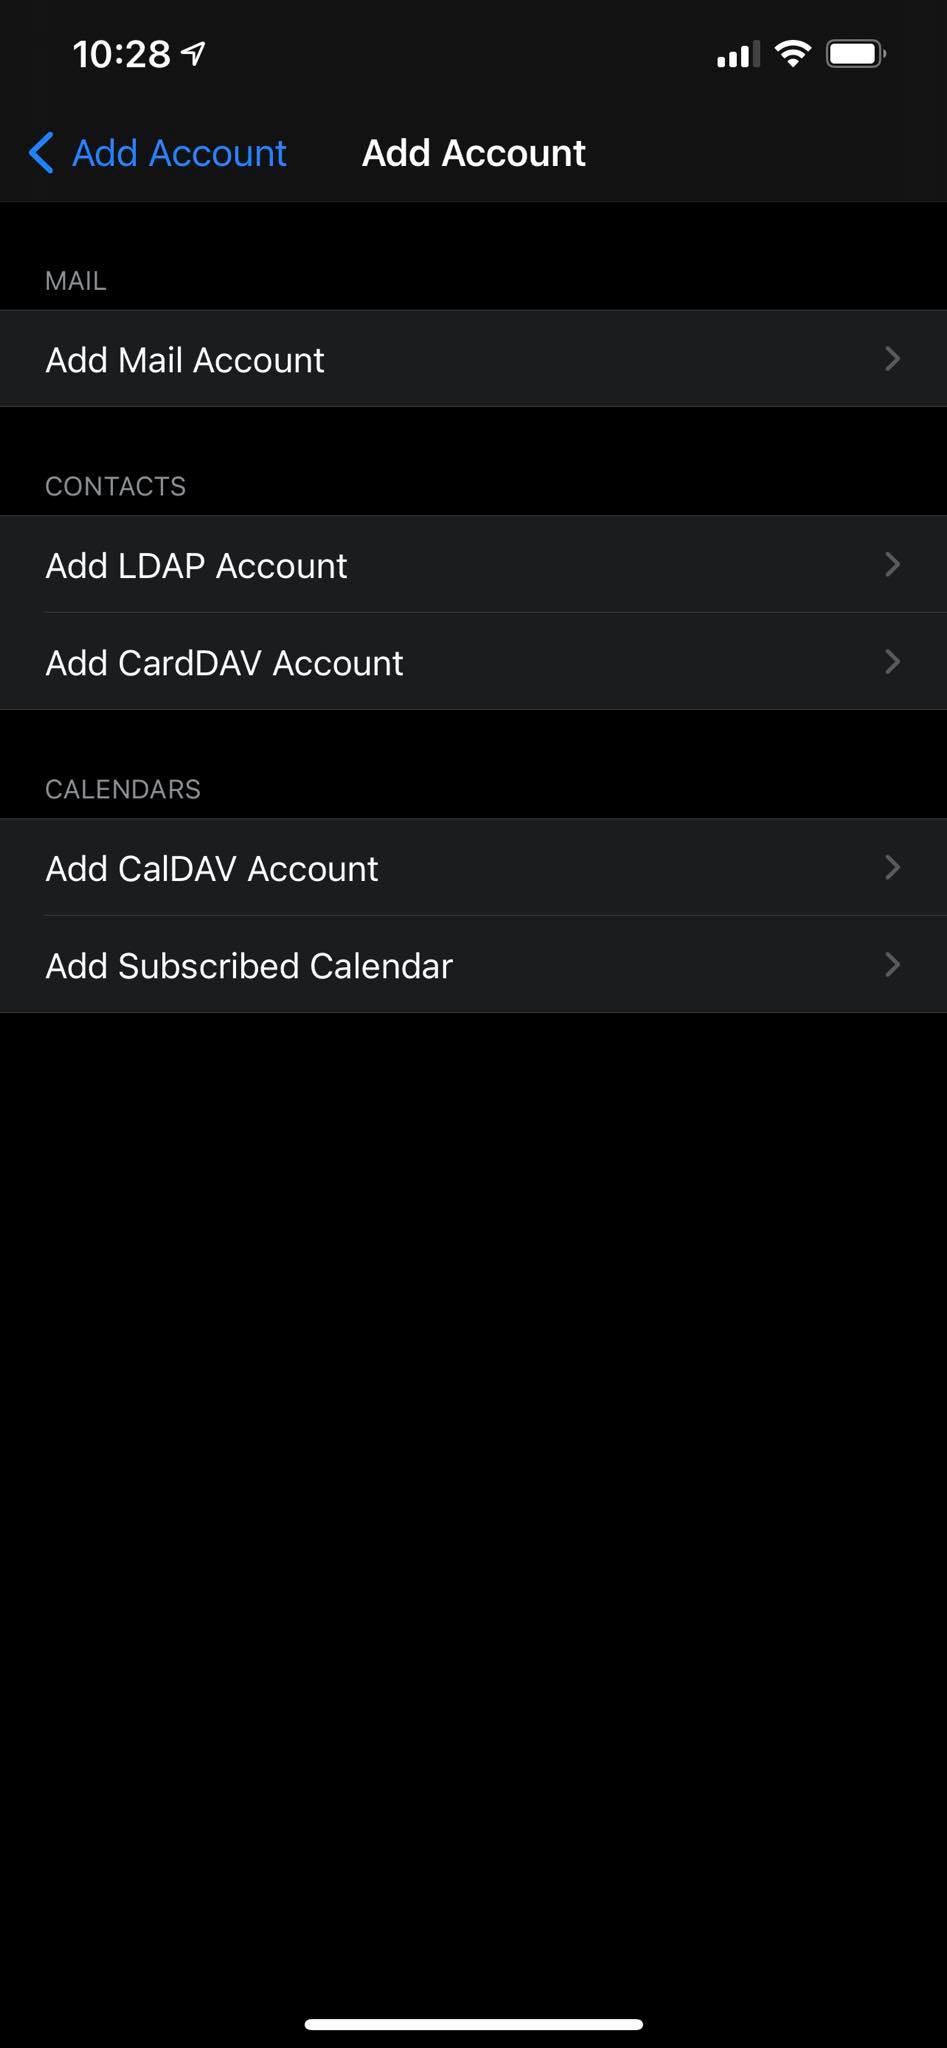
Select Add Mail Account
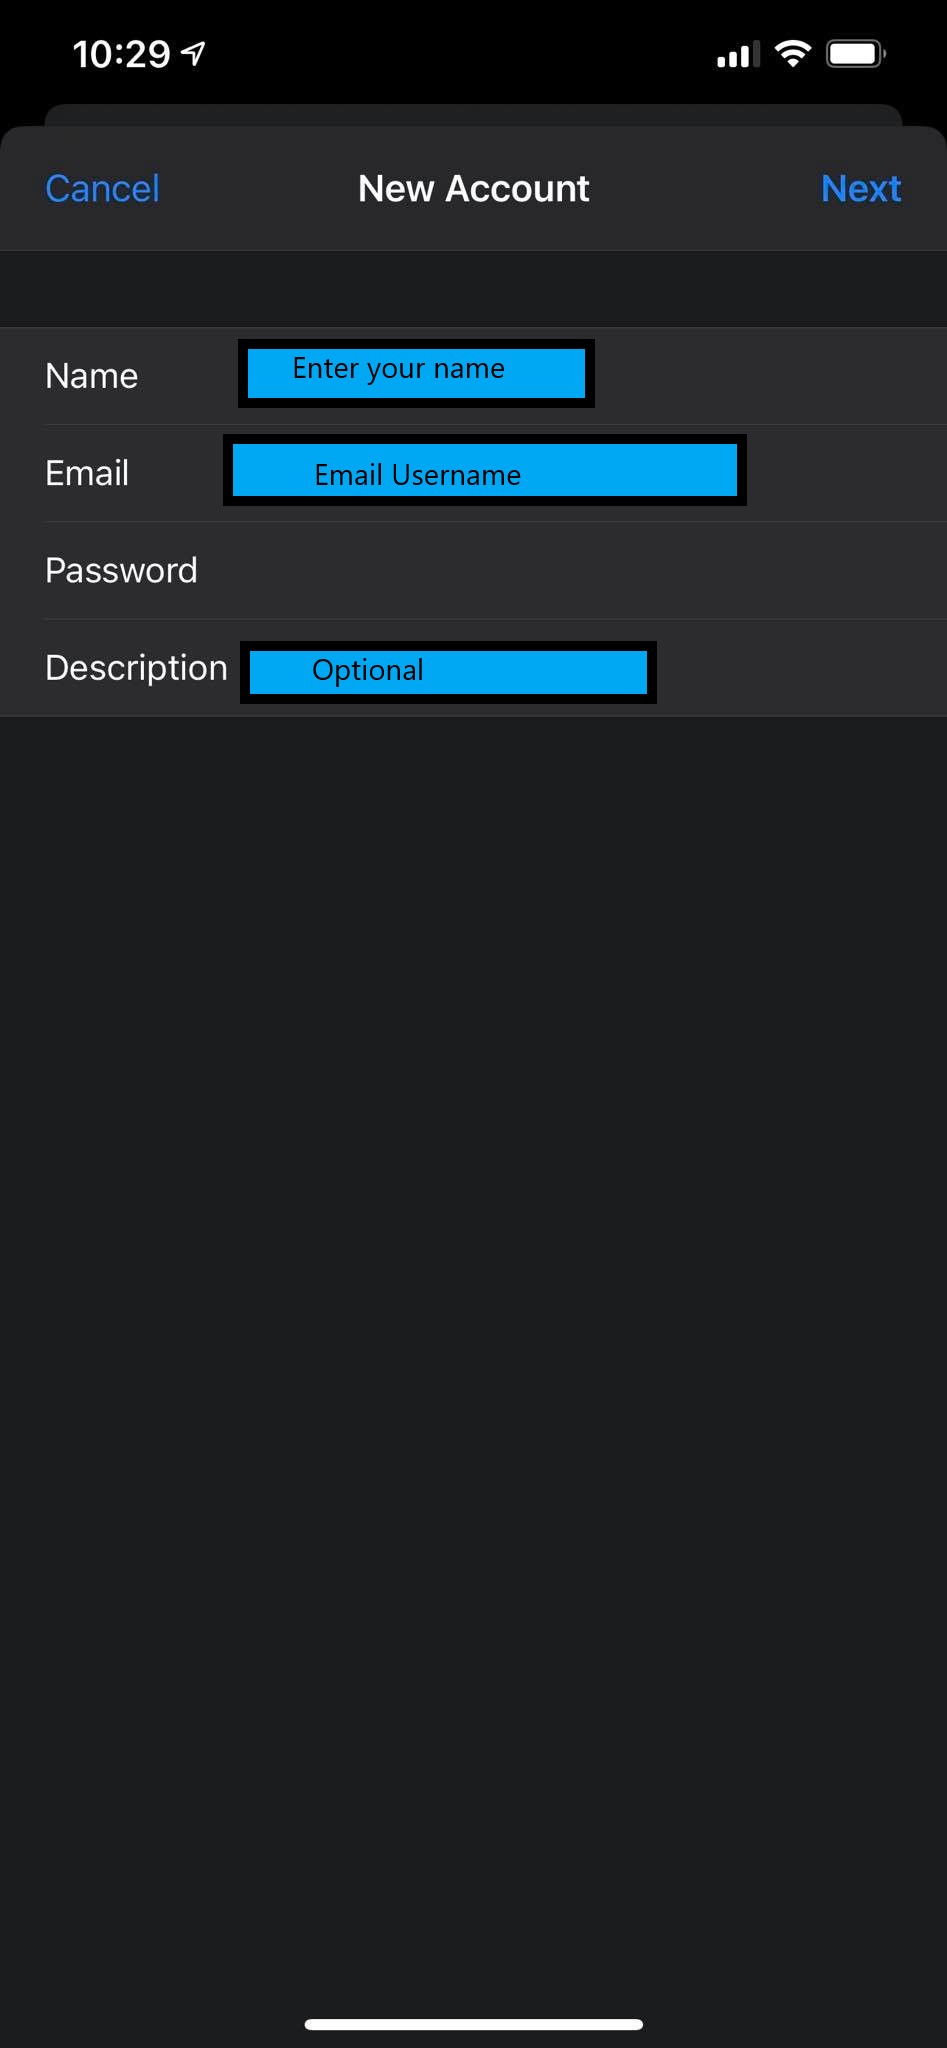
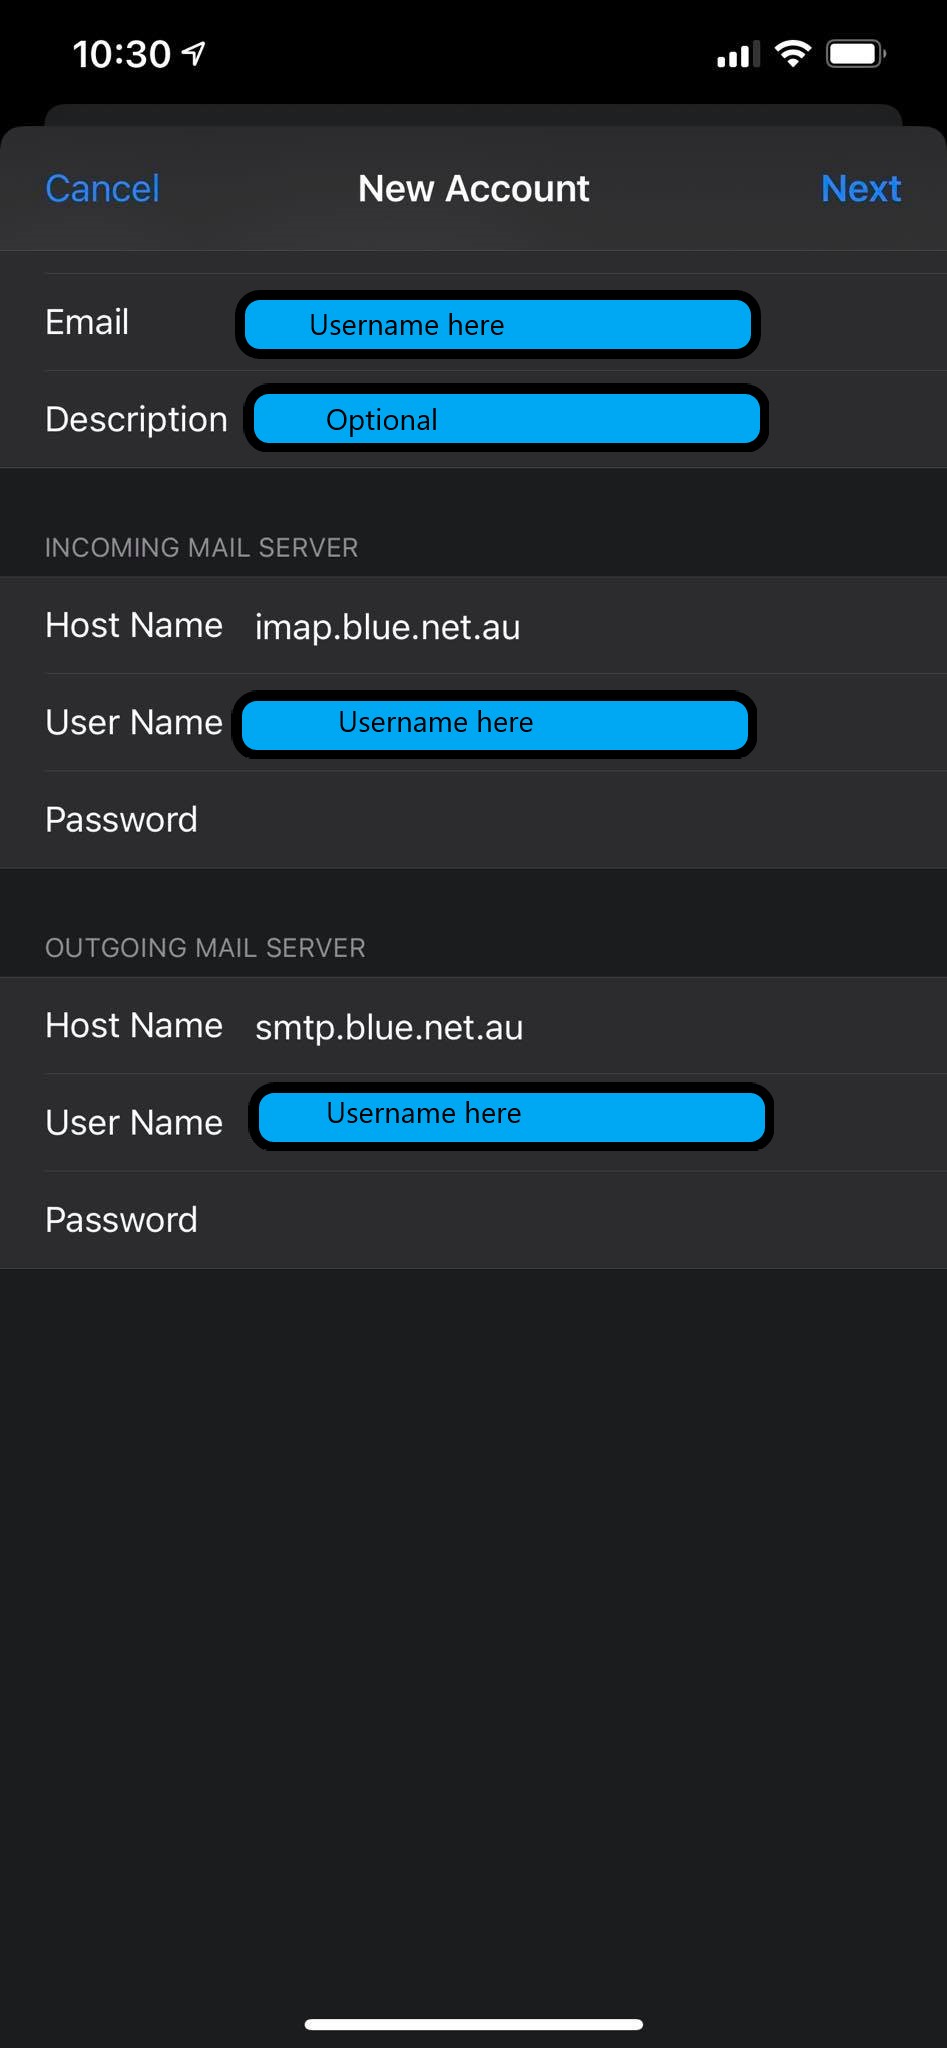
Type your name, email and password
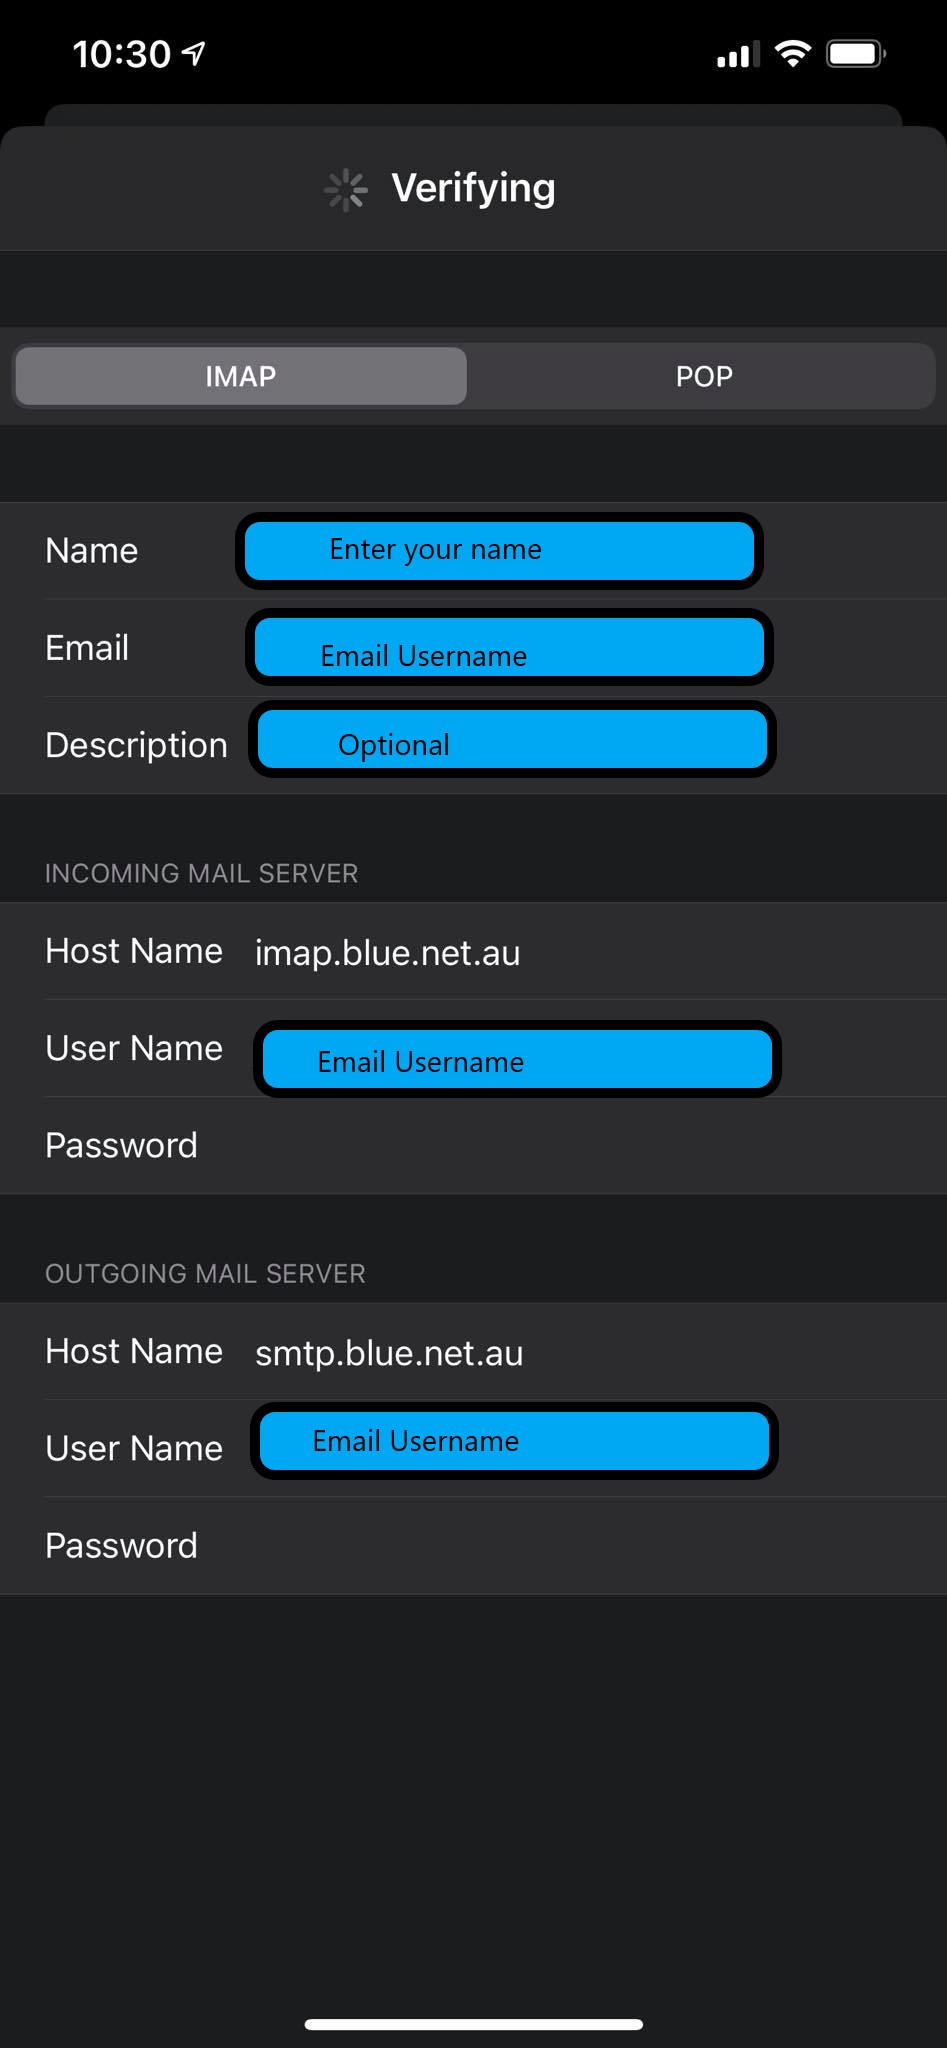
IMAP tab must be highlighted. Copy the server host information below and fill in with your account details
This is just a preview, so hit Next
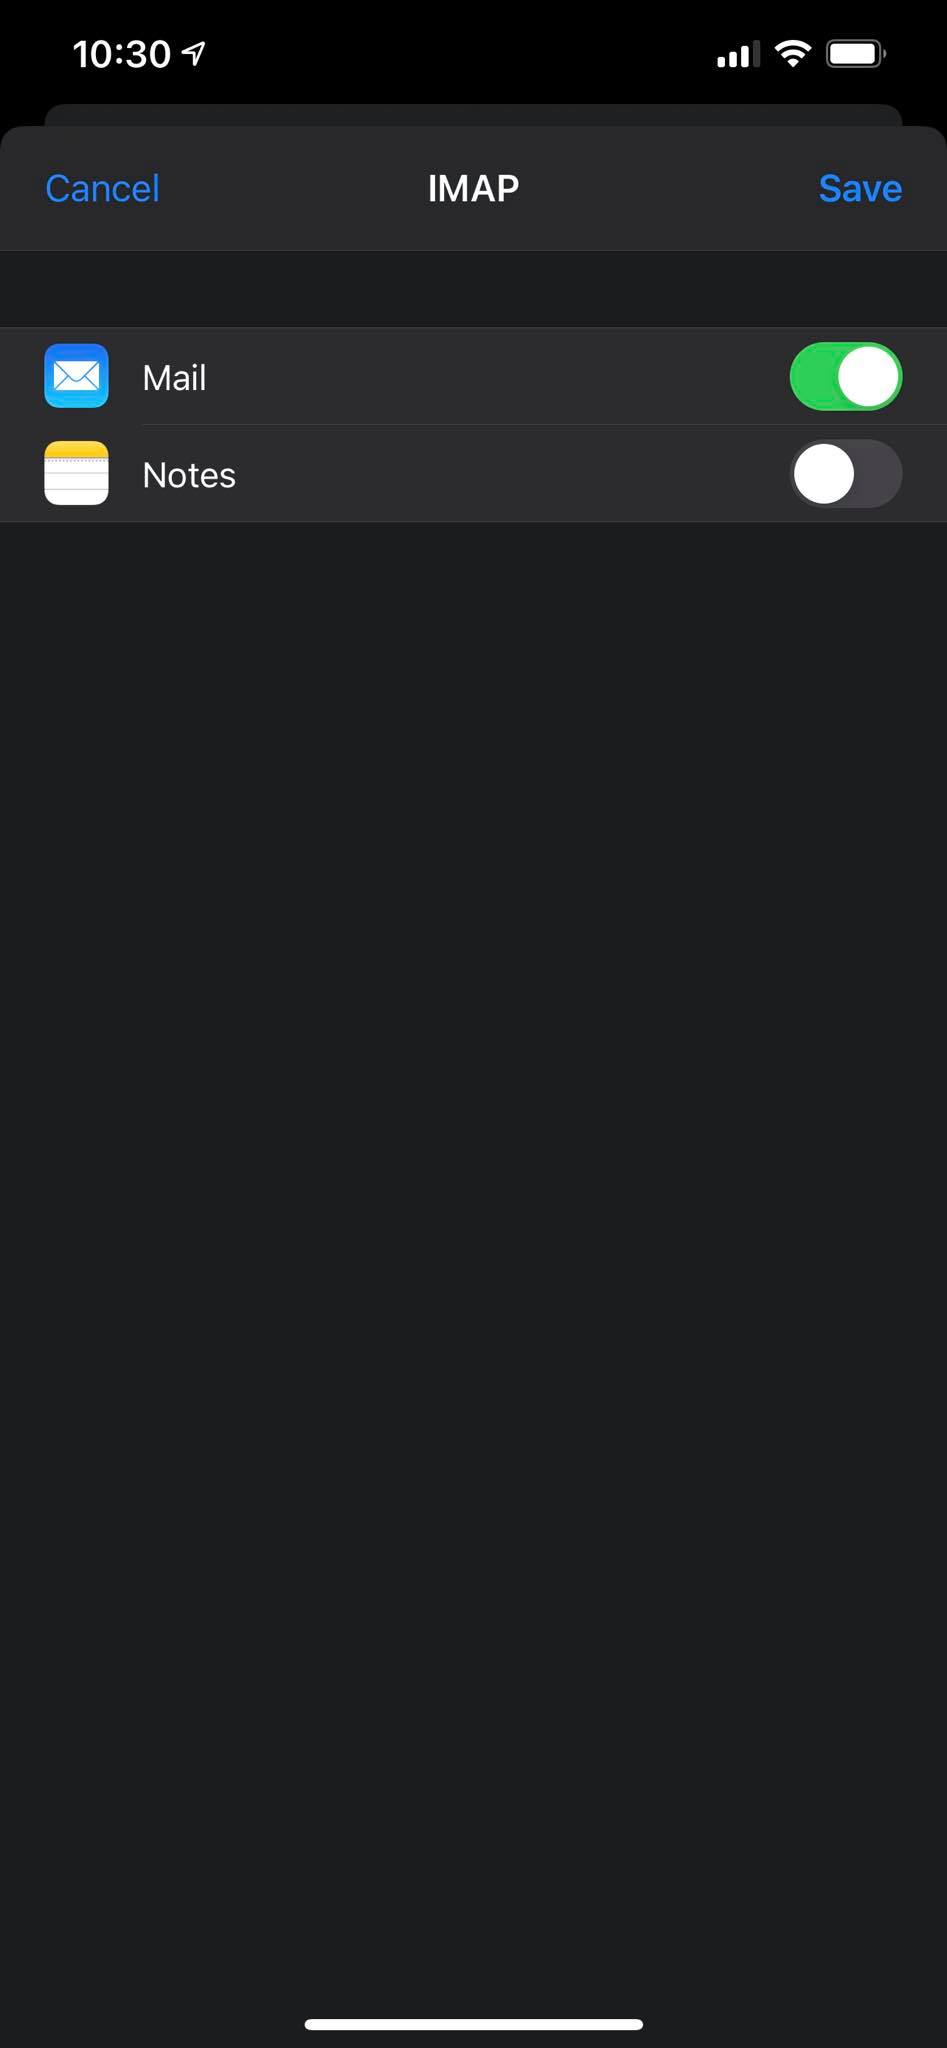
Make sure Mail is Enabled (Green)
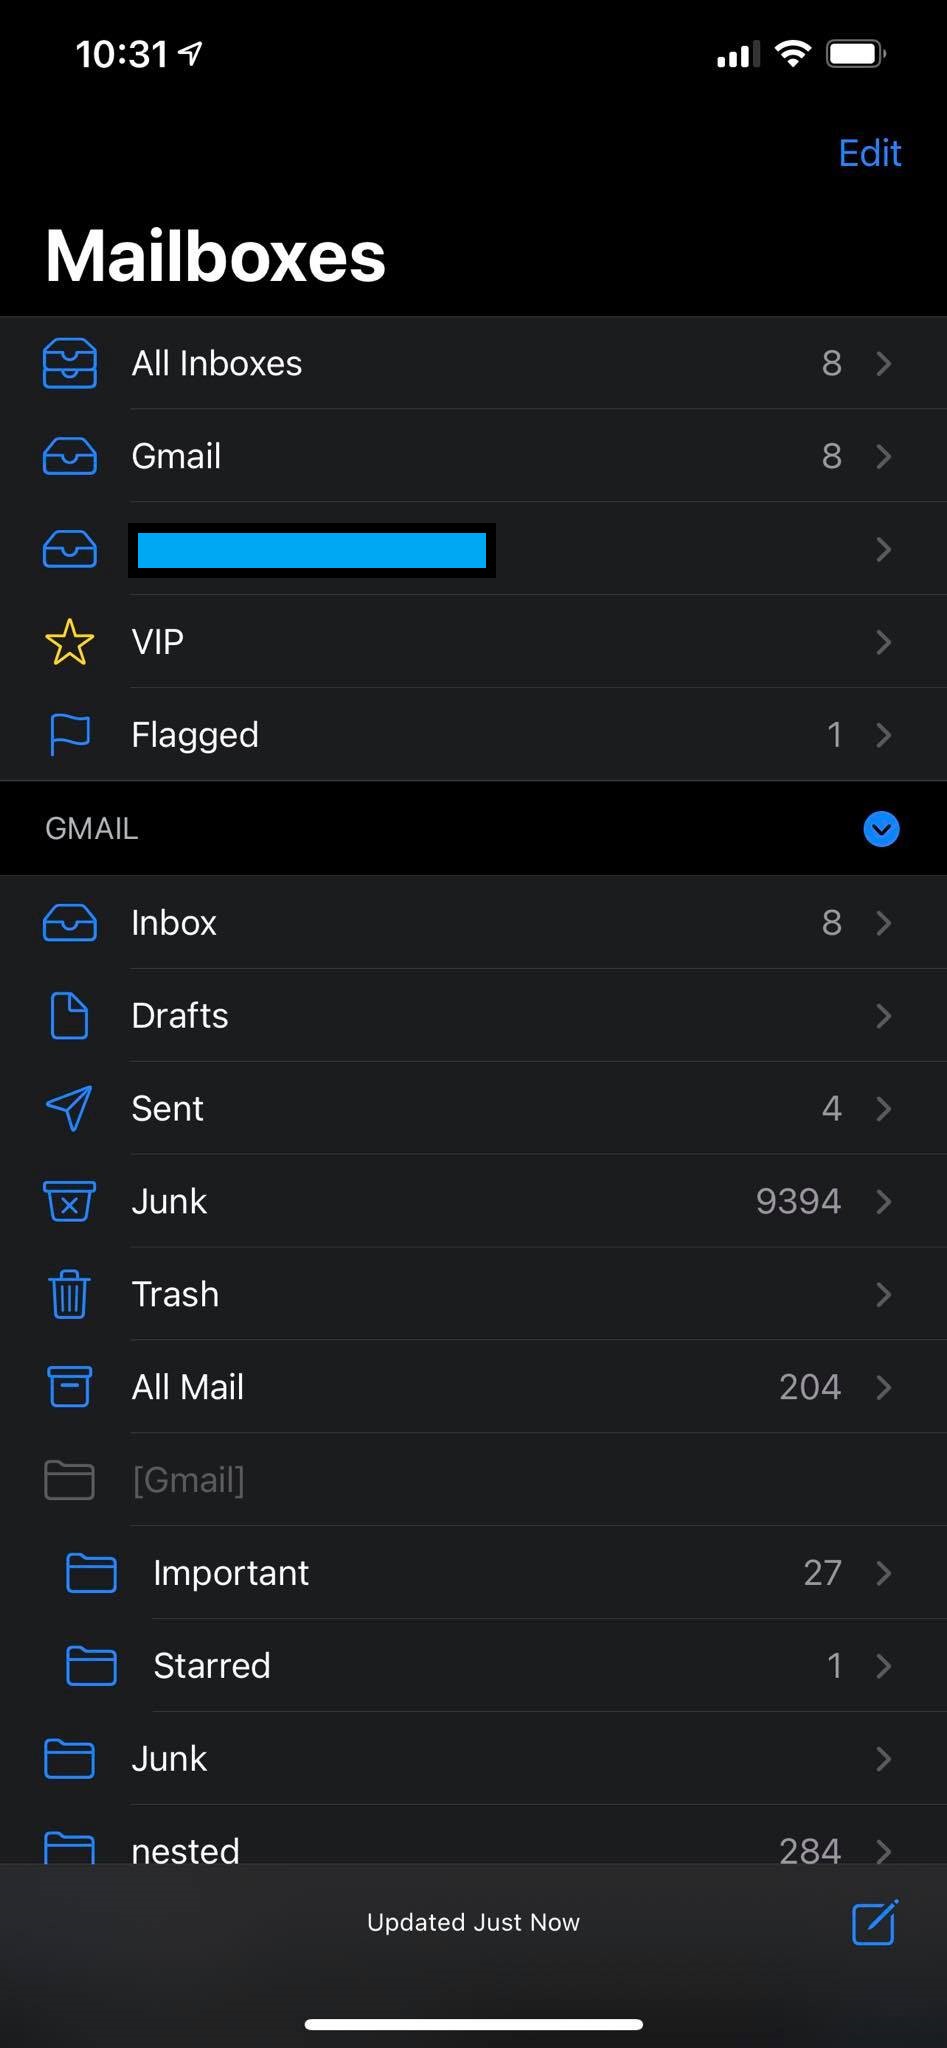
Open the Mail app and confirm your emails are downloading and folders are showing
Posted in Uncategorized | Comments Off on Set up IMAP account in iPhone
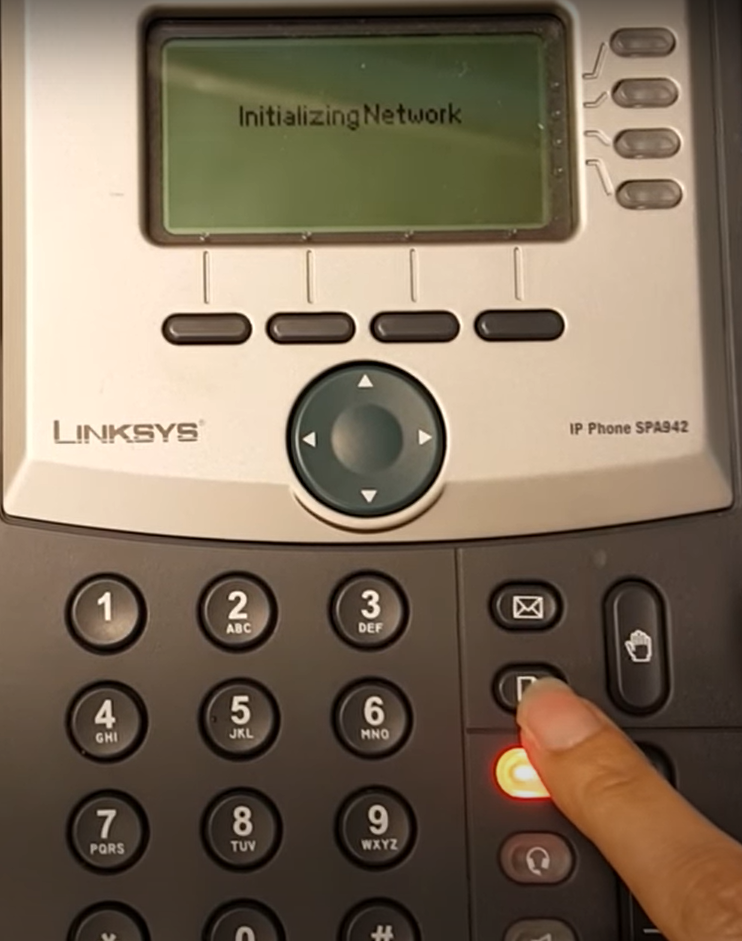
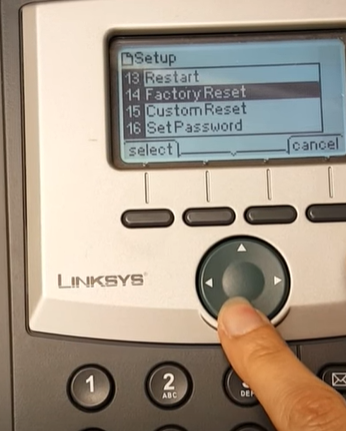
Please do this only if instructed by your sysadmin or you know what you are doing. THIS WILL ERASE ALL YOUR CONFIGUARTION DATA and YOUR PHONE WILL STOP WORKING. You would only want to do this if your want to completely reconfigure your phone.
Press the button under the button with the envelope (the button above the lit button in this picture – may not be lit on your phone)
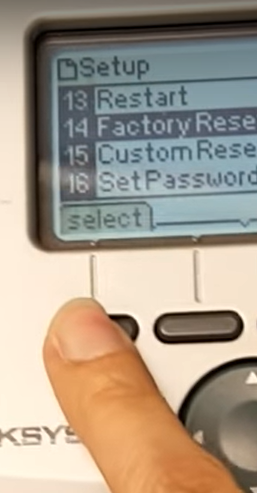
2. Scroll down with the bottom of the scroll key to number 14
3. Press the Select button
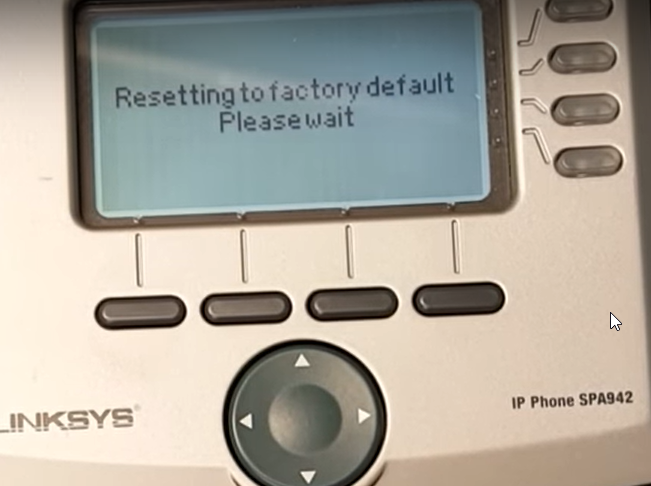
4. Press OK to confirm the factory reset – ALL CONFIGURATION DATA WILL BE DELTETED. YOUR PHONE WILL STOP WORKING.
5. This is what you see during the reset process.
When complete you can reconfigure the phone.
Posted in Uncategorized | Comments Off on Factory reset LinkSys SPA942 from handset
Microsoft Outlook’s mobile app is popular nowadays to configure your email, however, it only accepts IMAP so it is not possible to use for your email provided by Blue Net. Your best option is to use Android’s native MAIL application which should be more than enough to utilize for your email access on your Android mobile phone / tablet.
Below are the step by step instructions in adding your POP email to Android’s MAIL app. Please note that the outline of the settings may differ depending on the version of your Android OS, but should almost be the same. The device used for this guide is Samsung Galaxy Note 4.
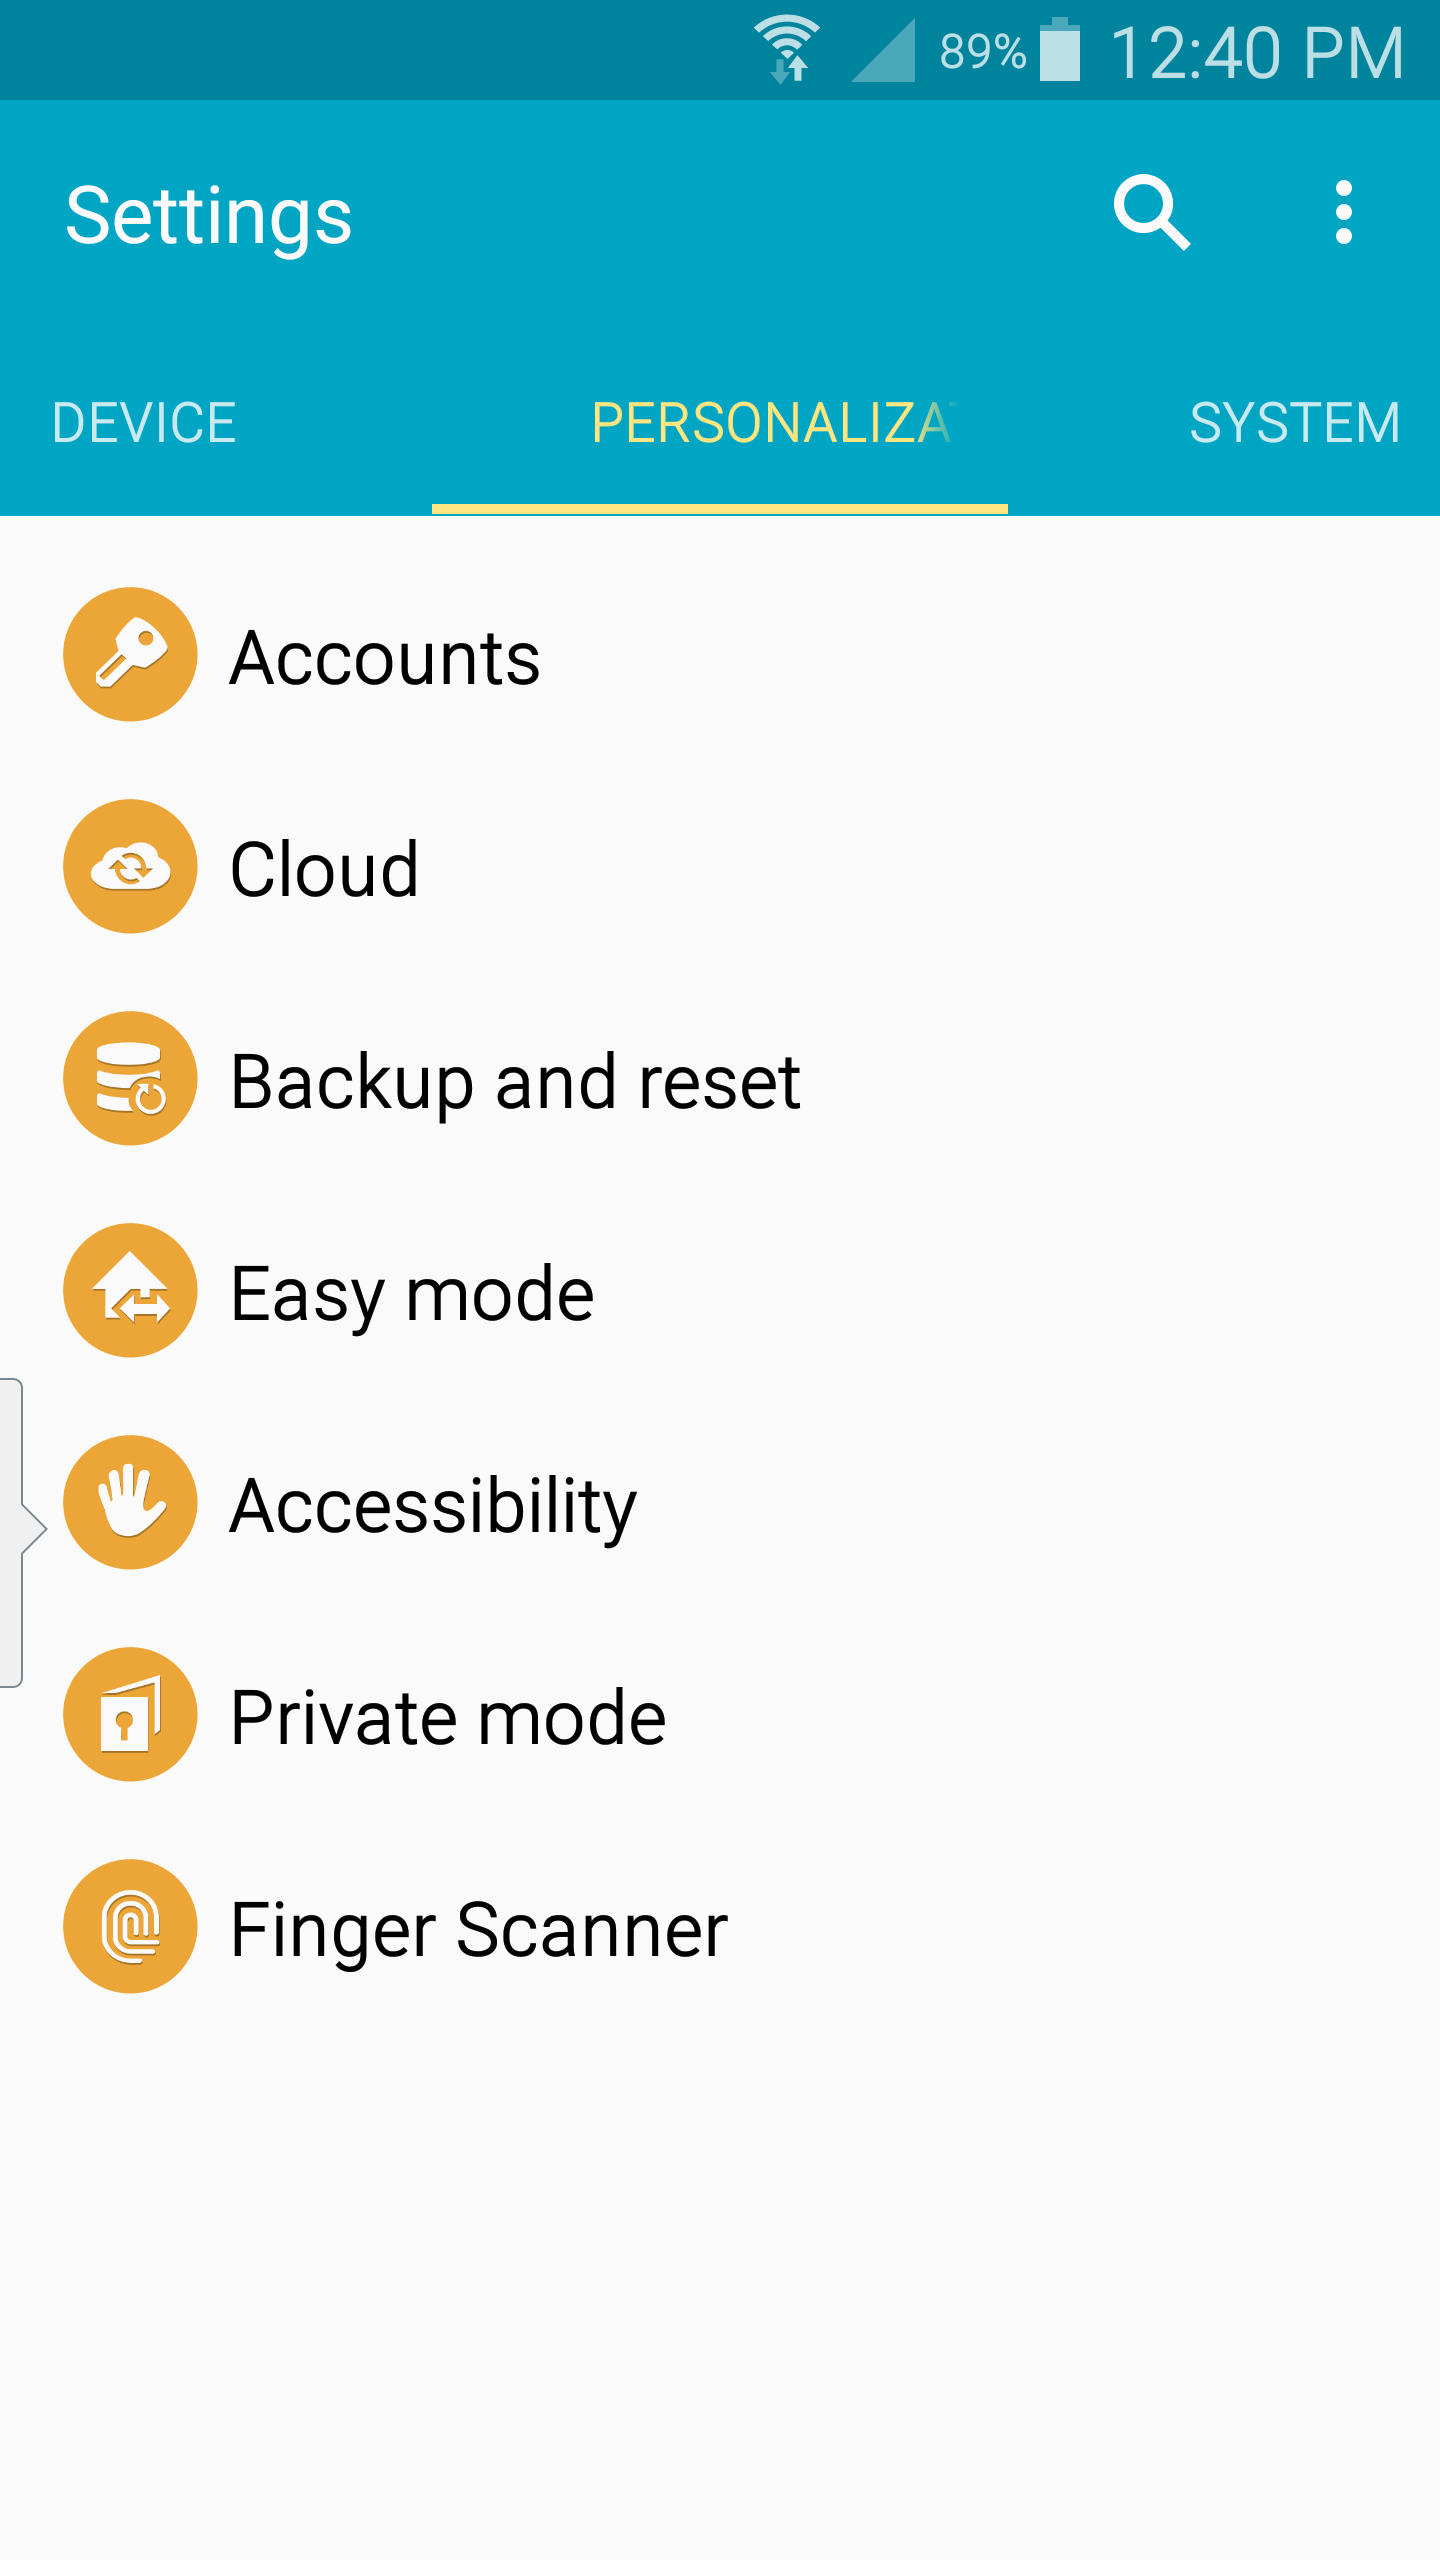
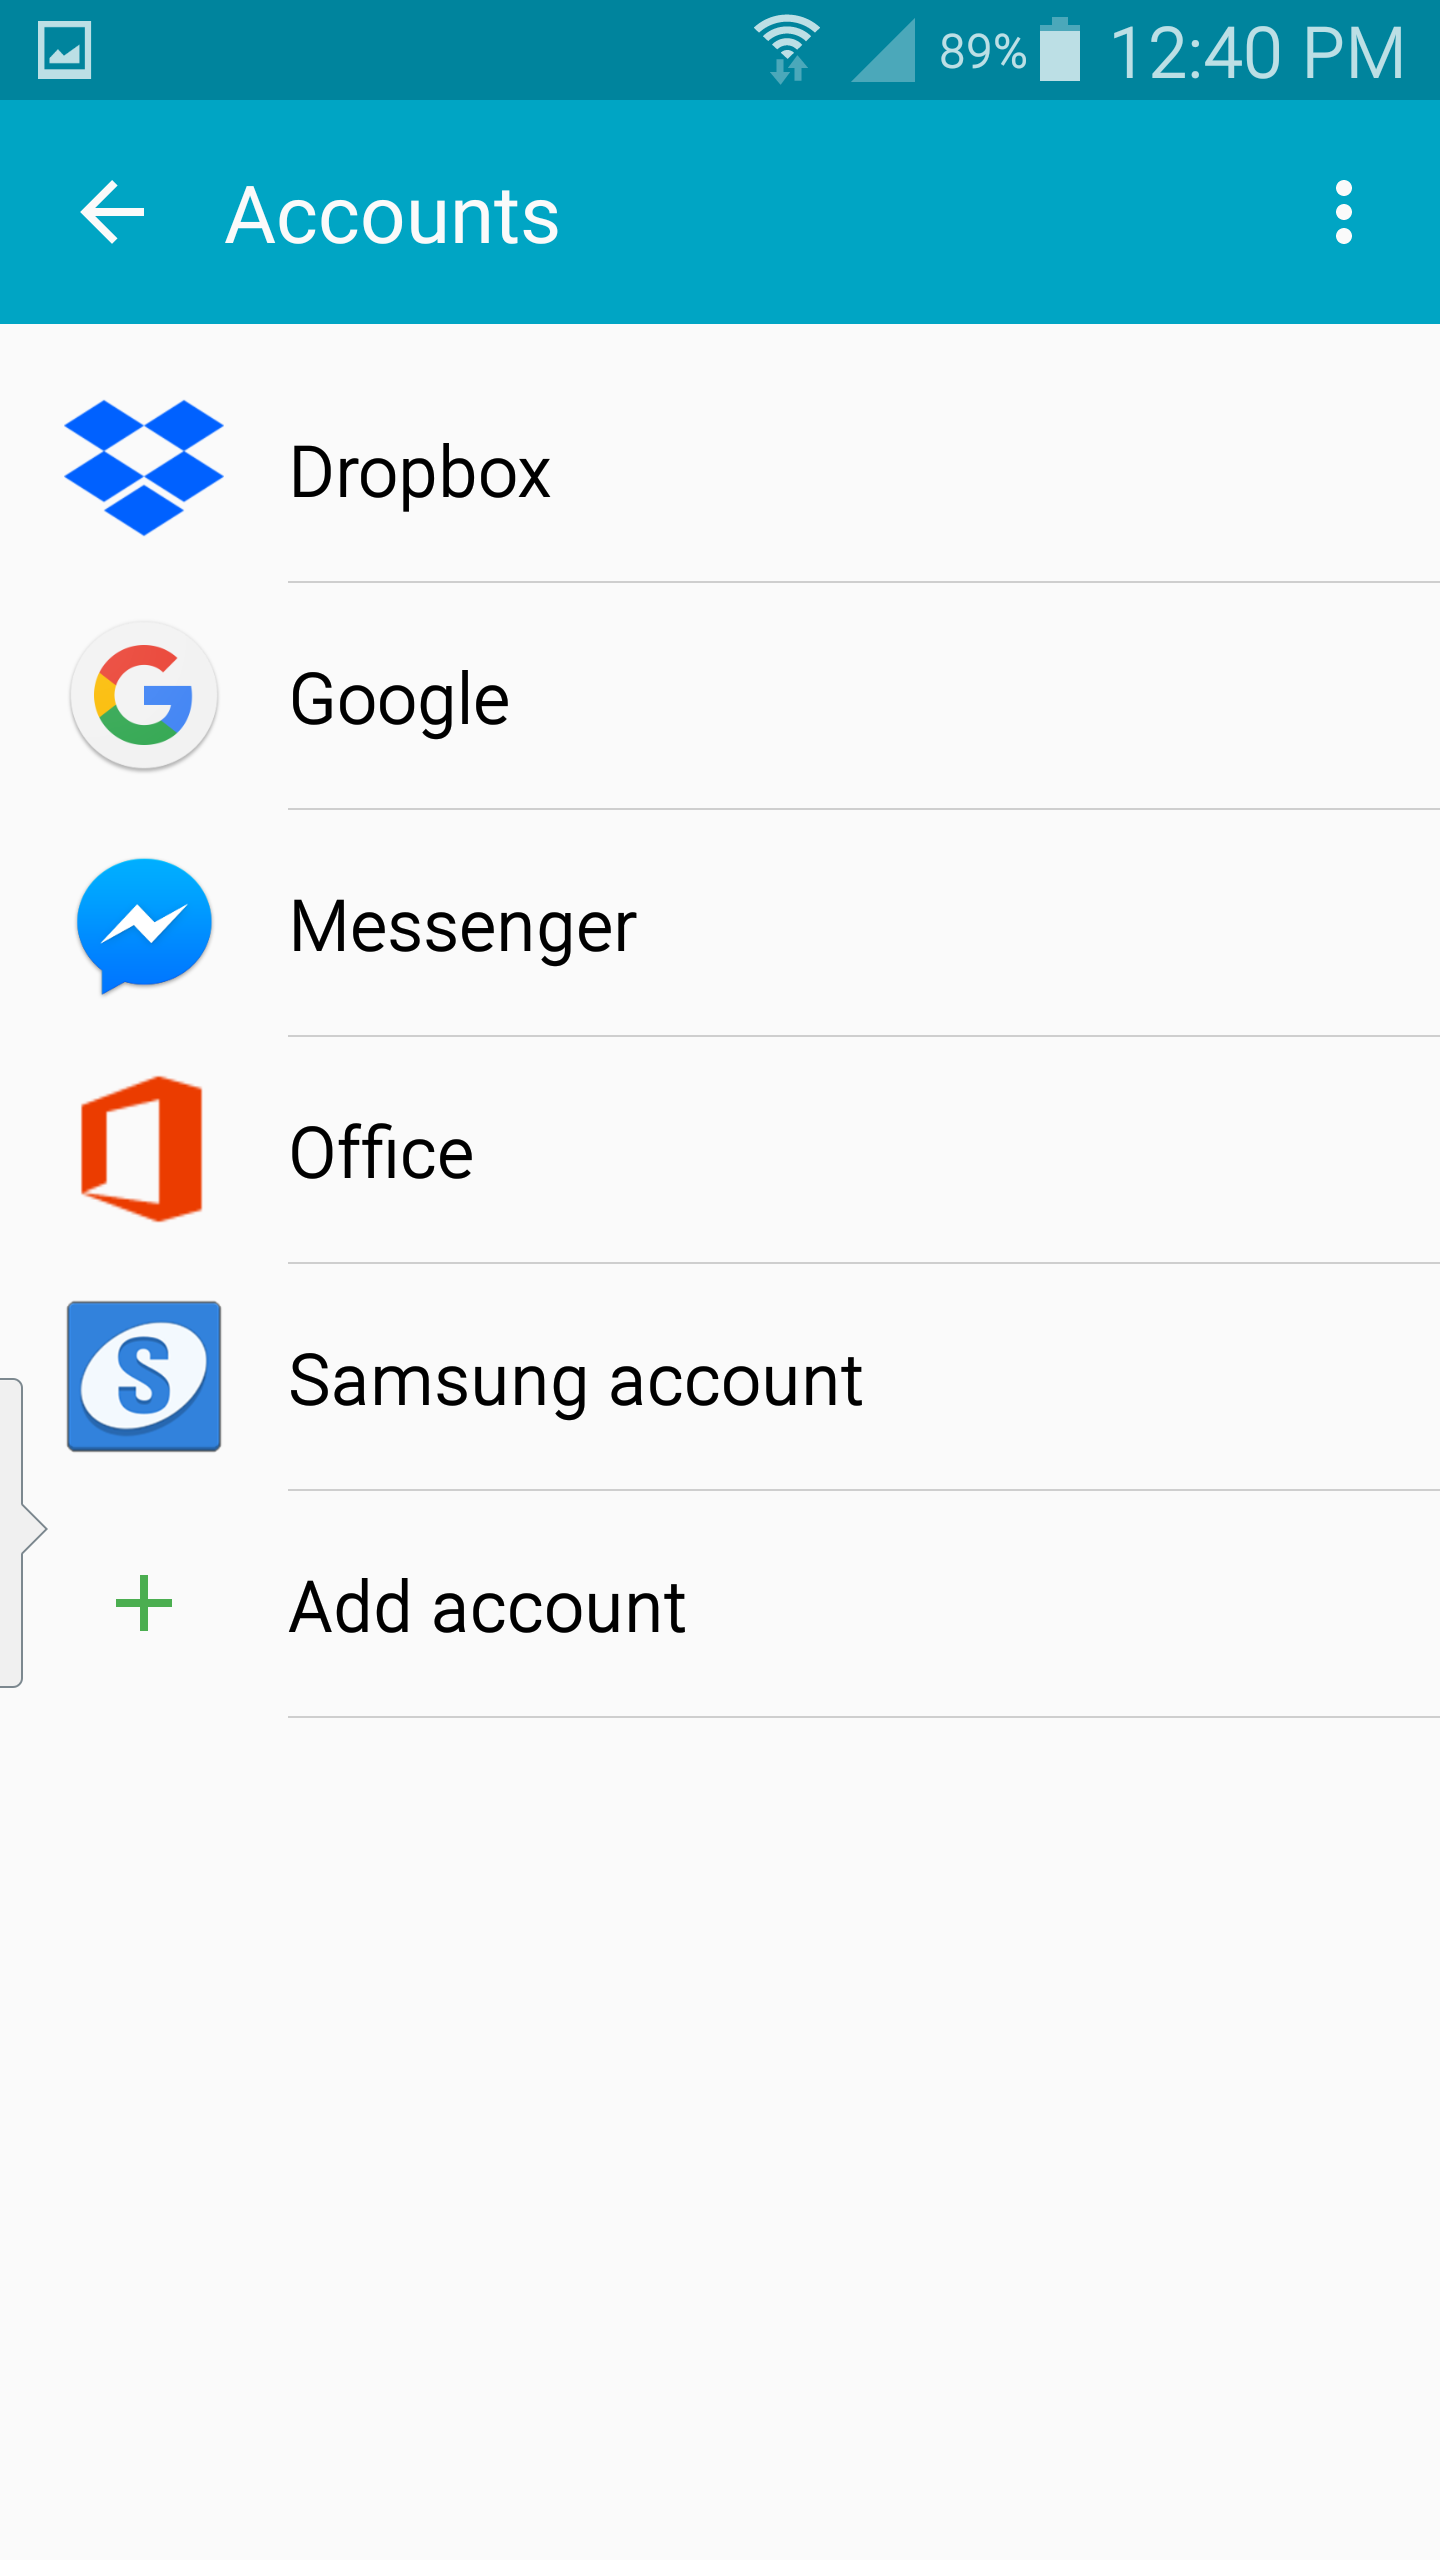
Go to Settings > Accounts
Click on Add Account
Select Email
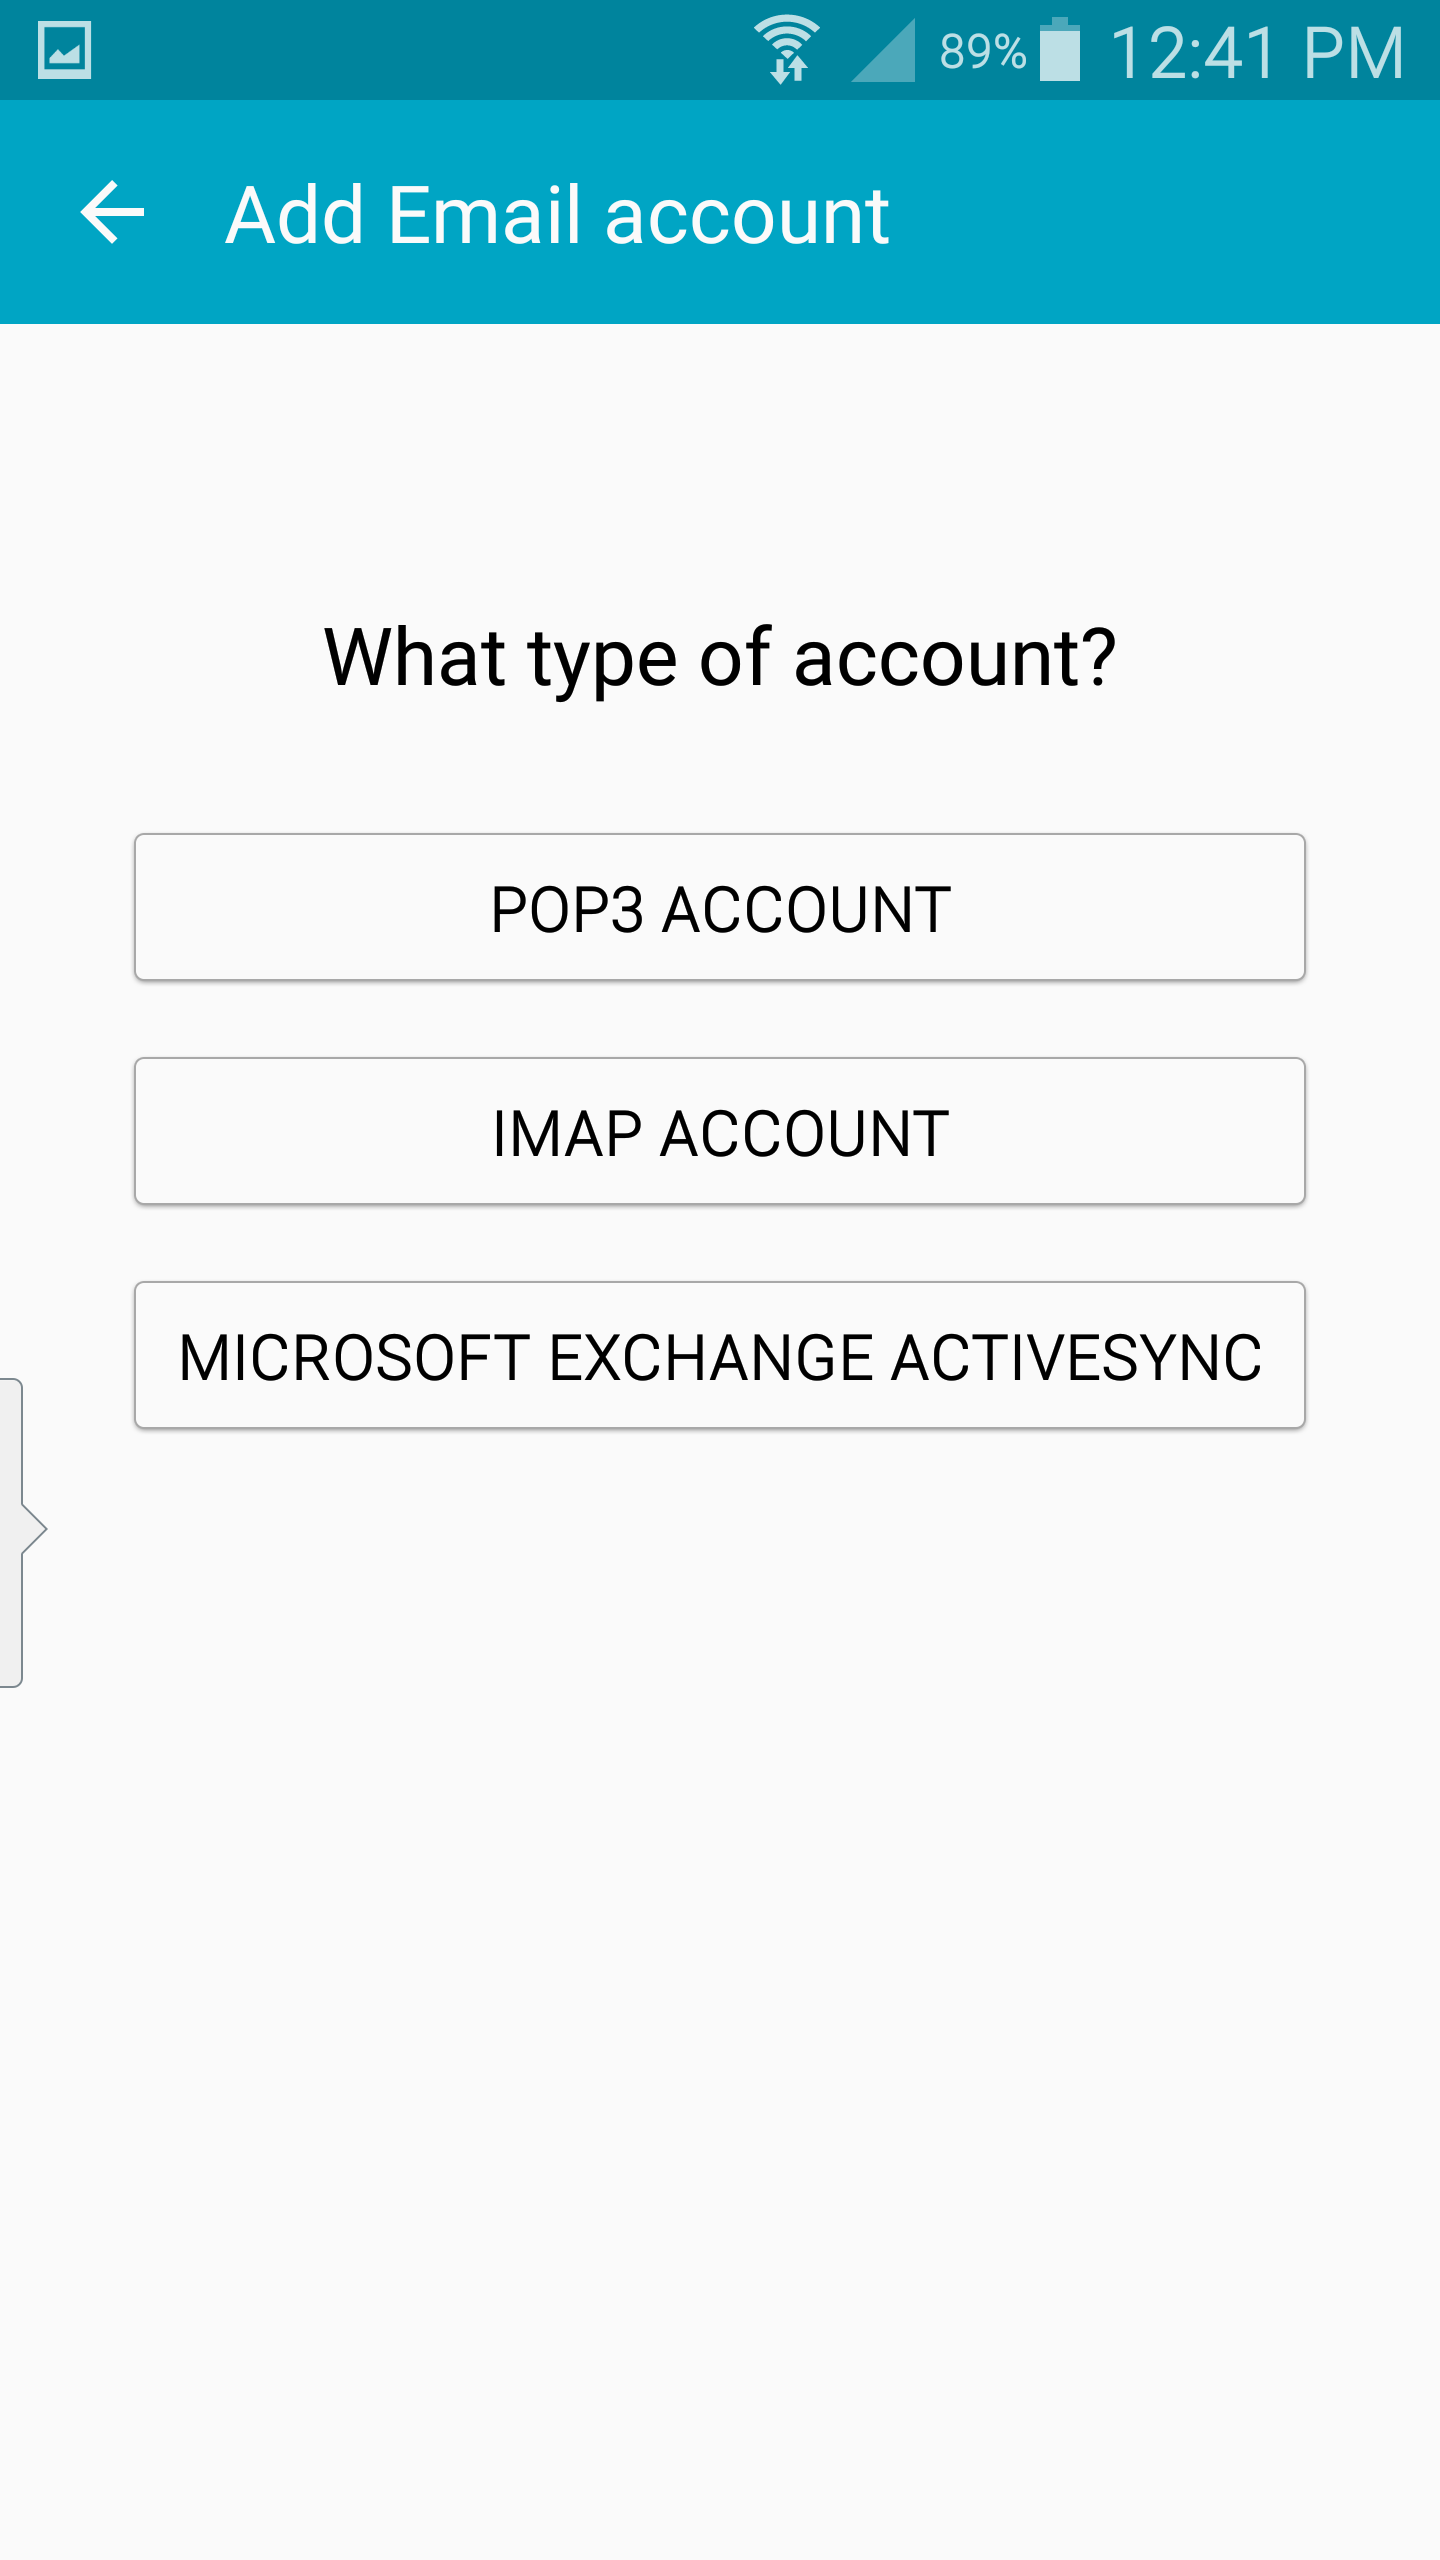
Choose POP
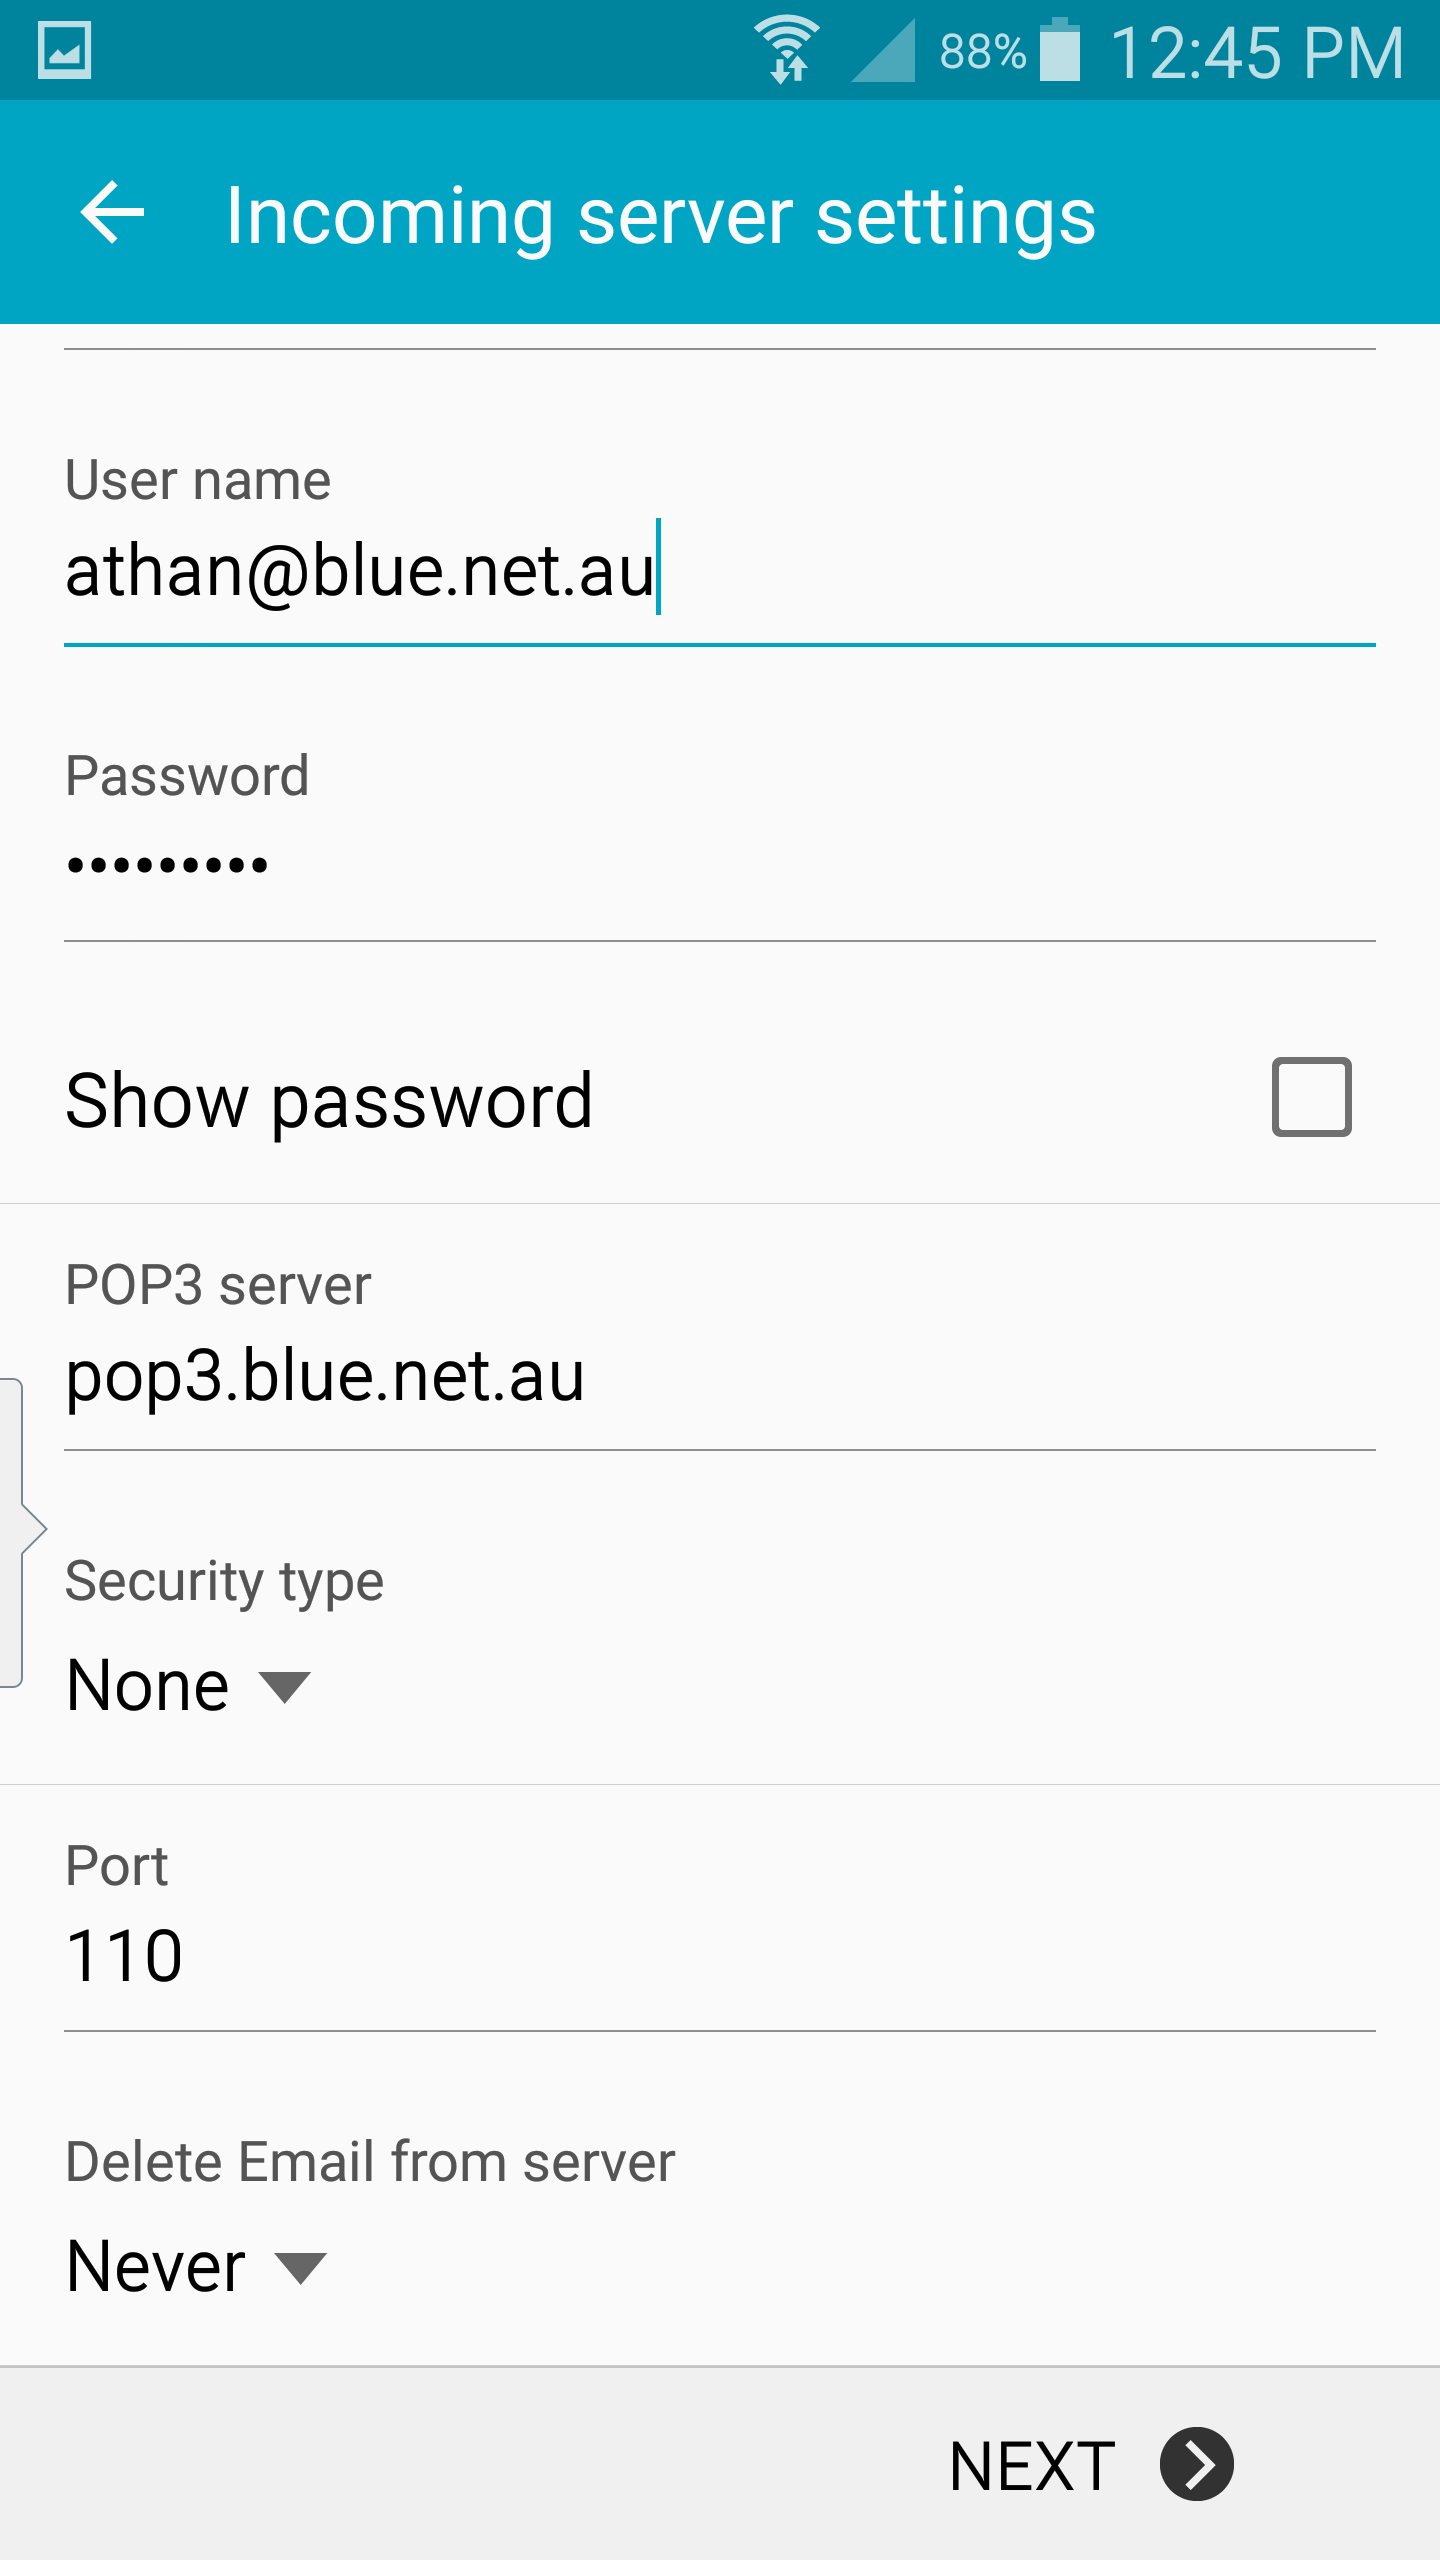
Copy the settings below. Please note that your username should be your complete email address.
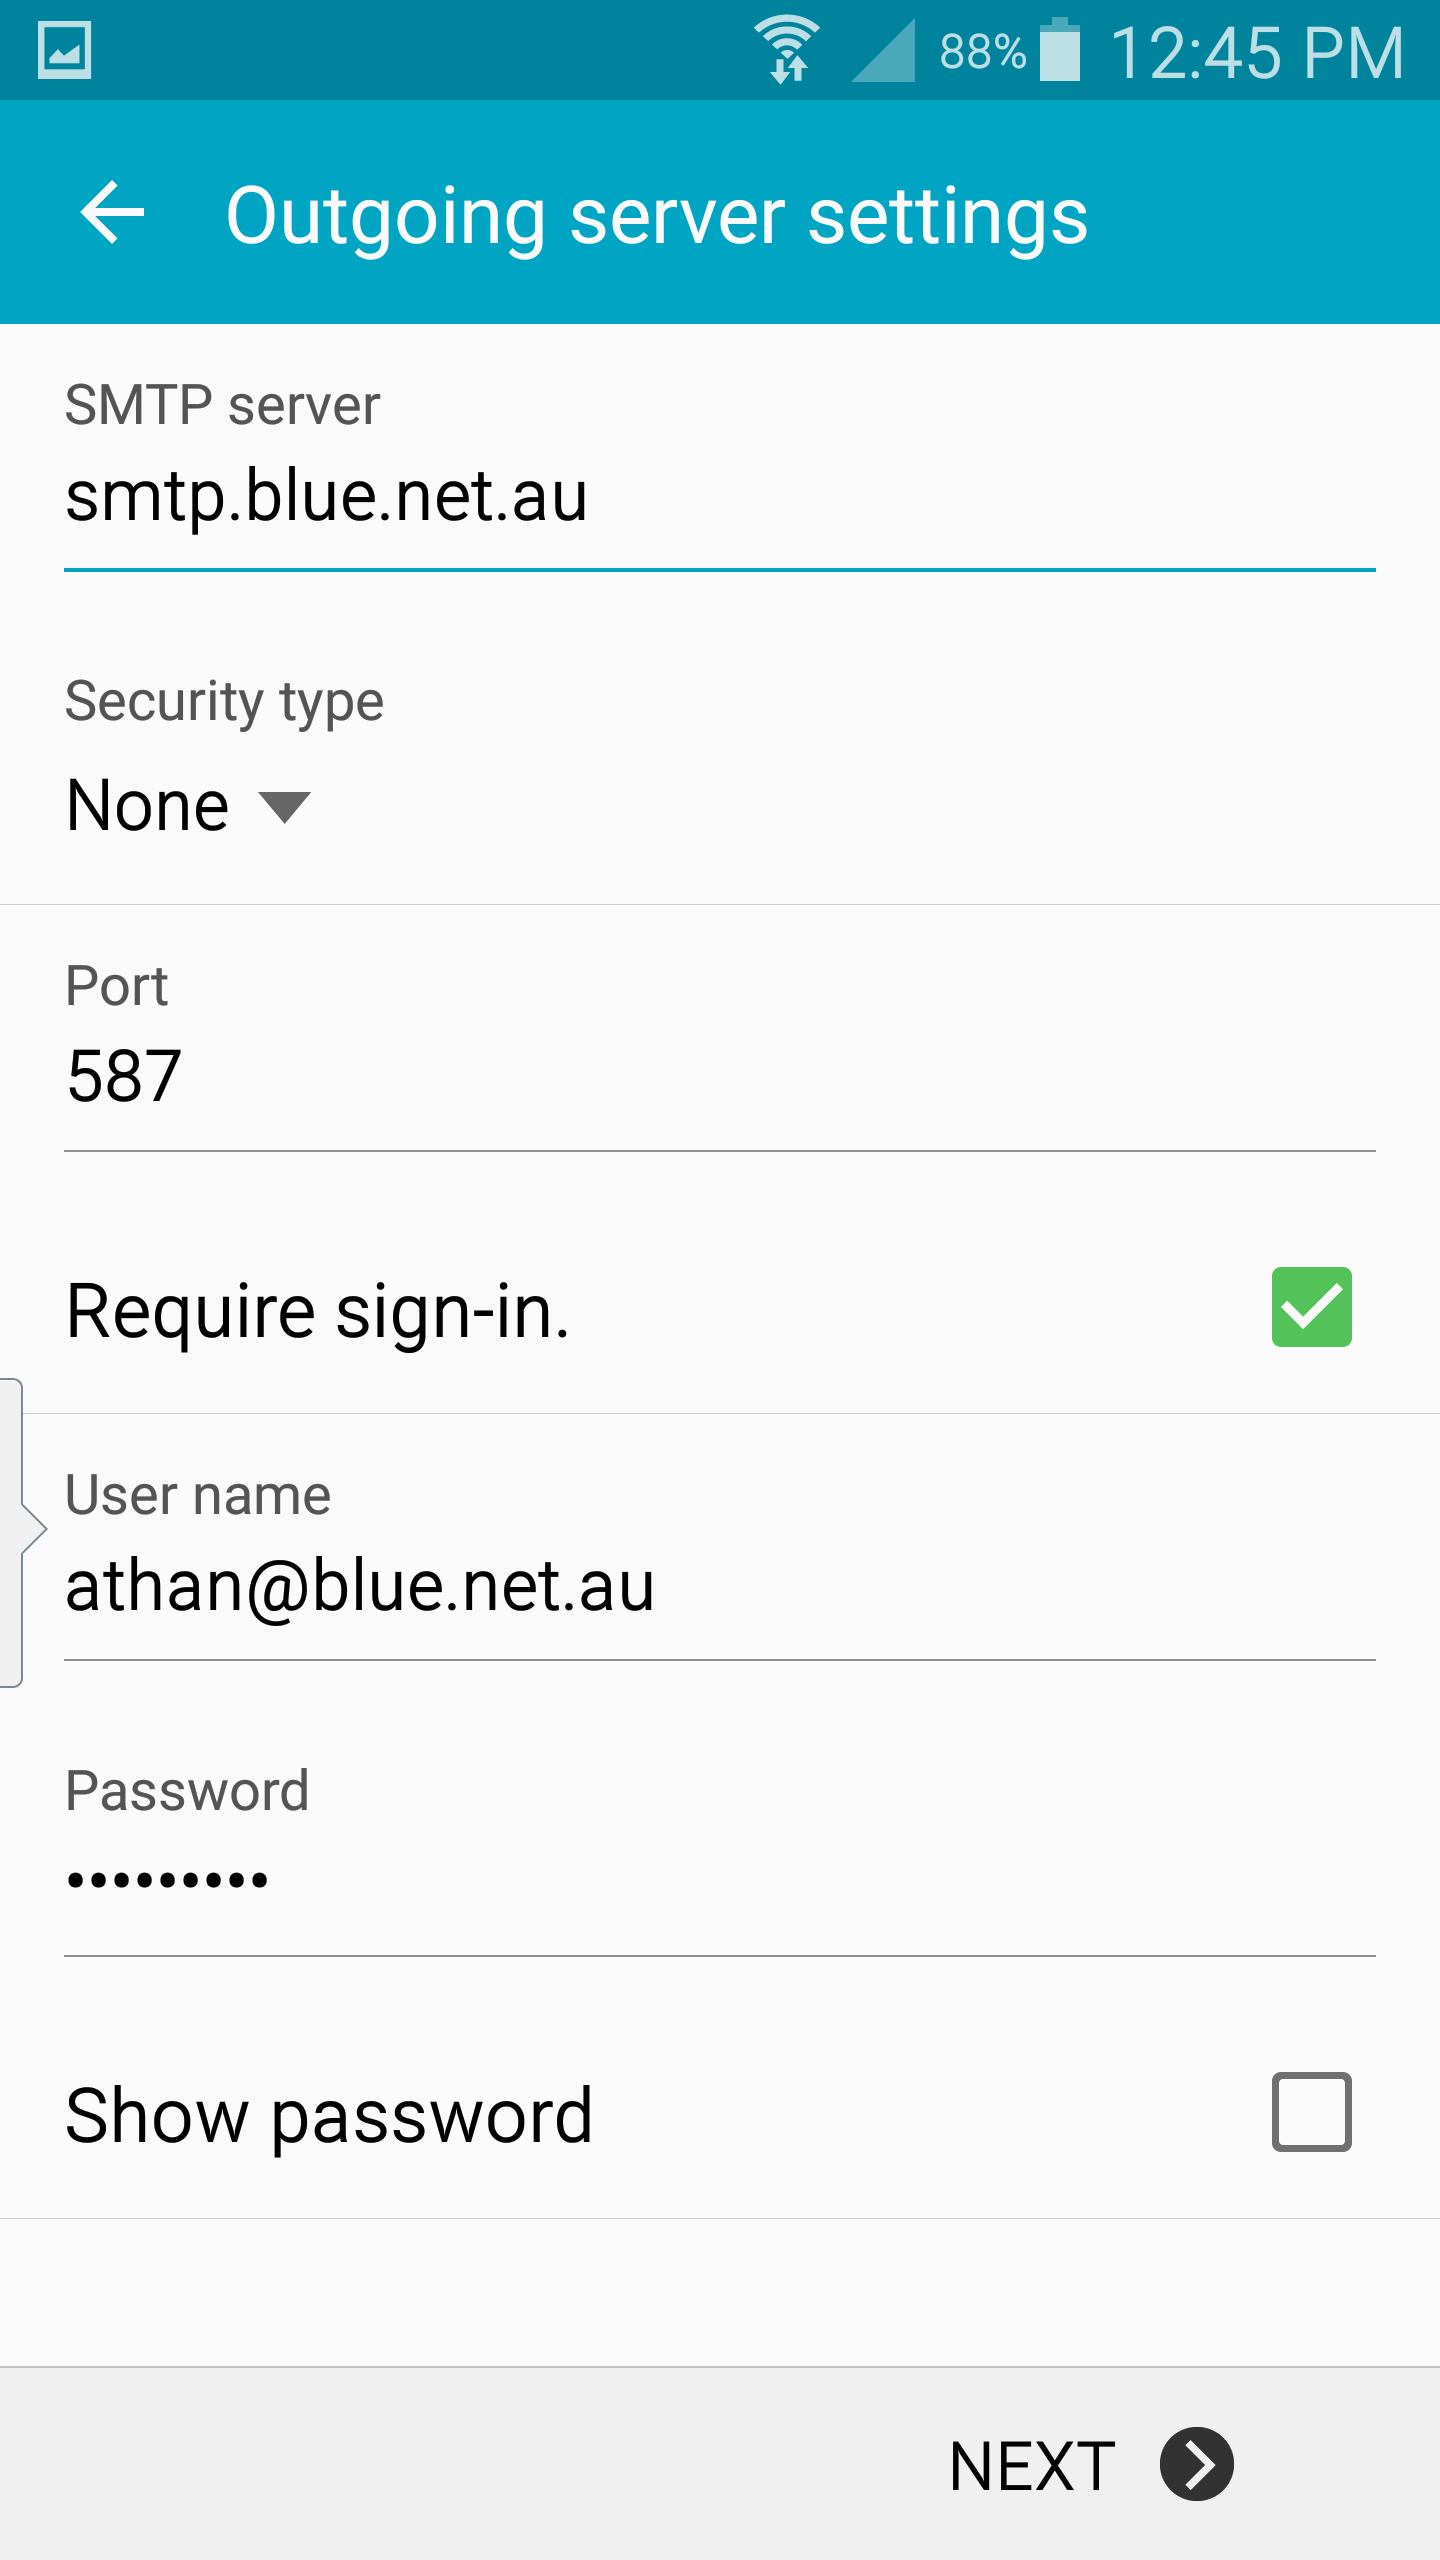
This should be your Outgoing settings.
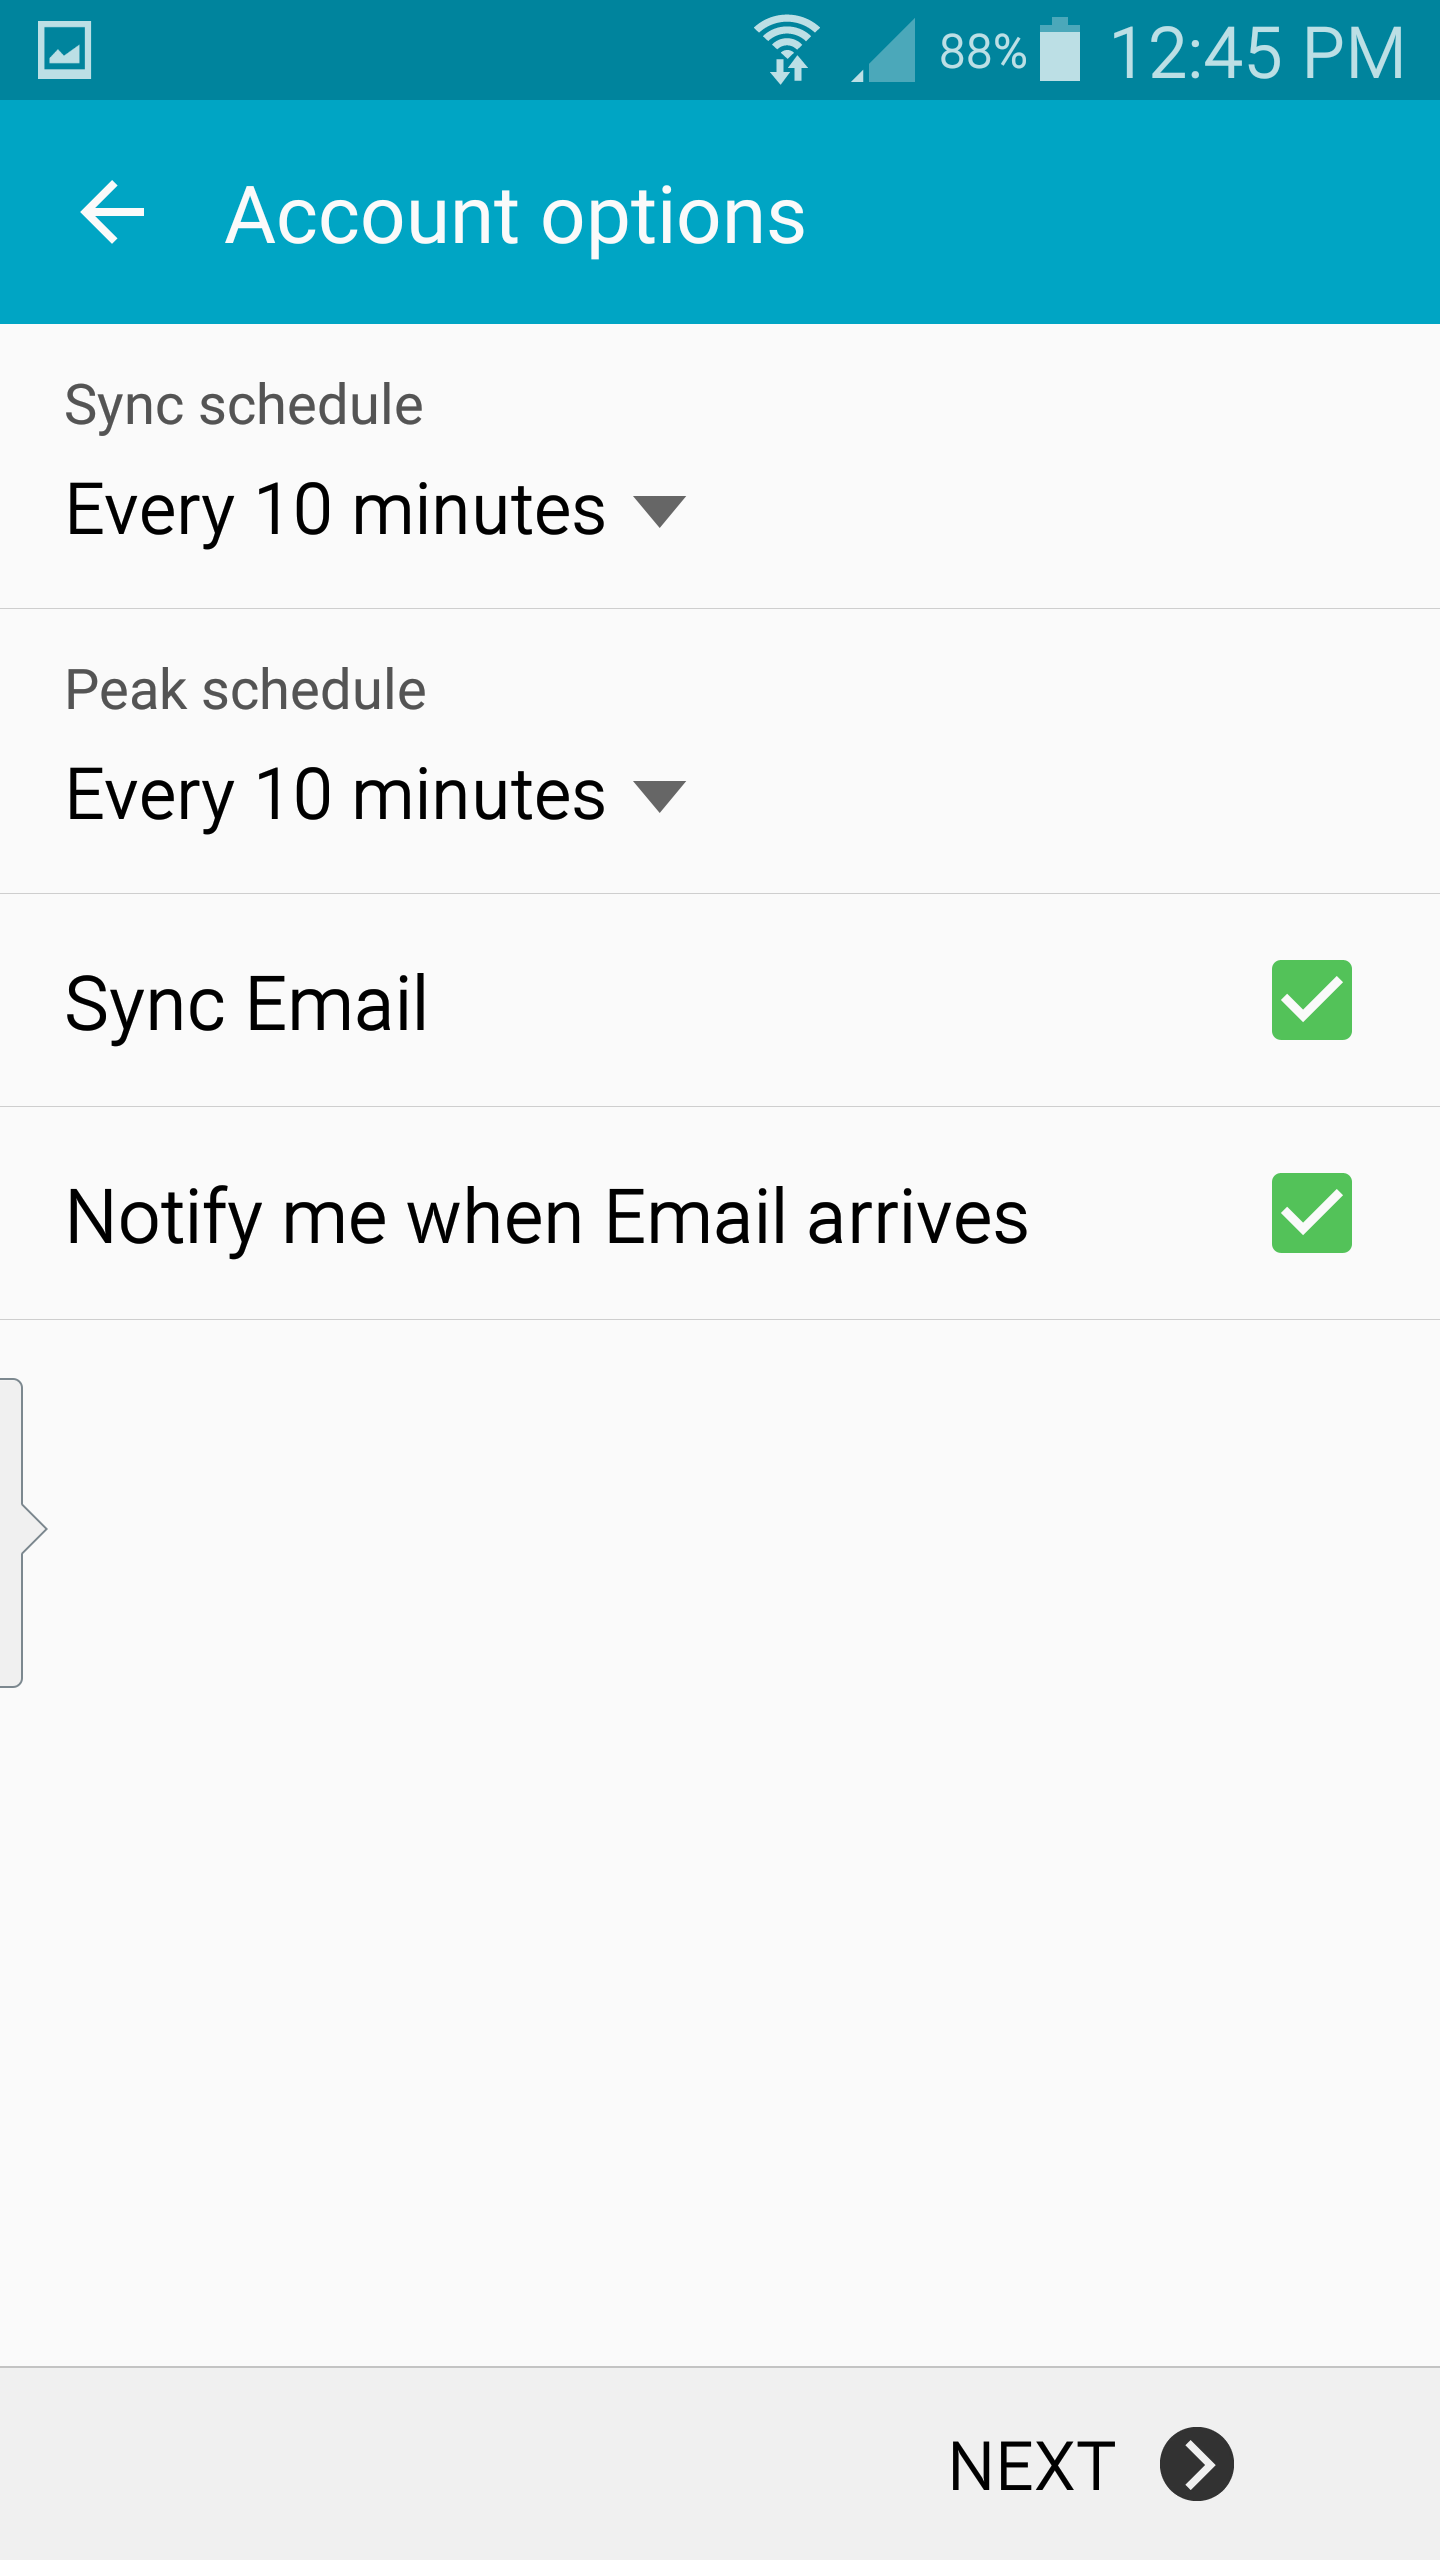
You may select your sync schedule and peak schedule. Make sure Sync Email is checked.
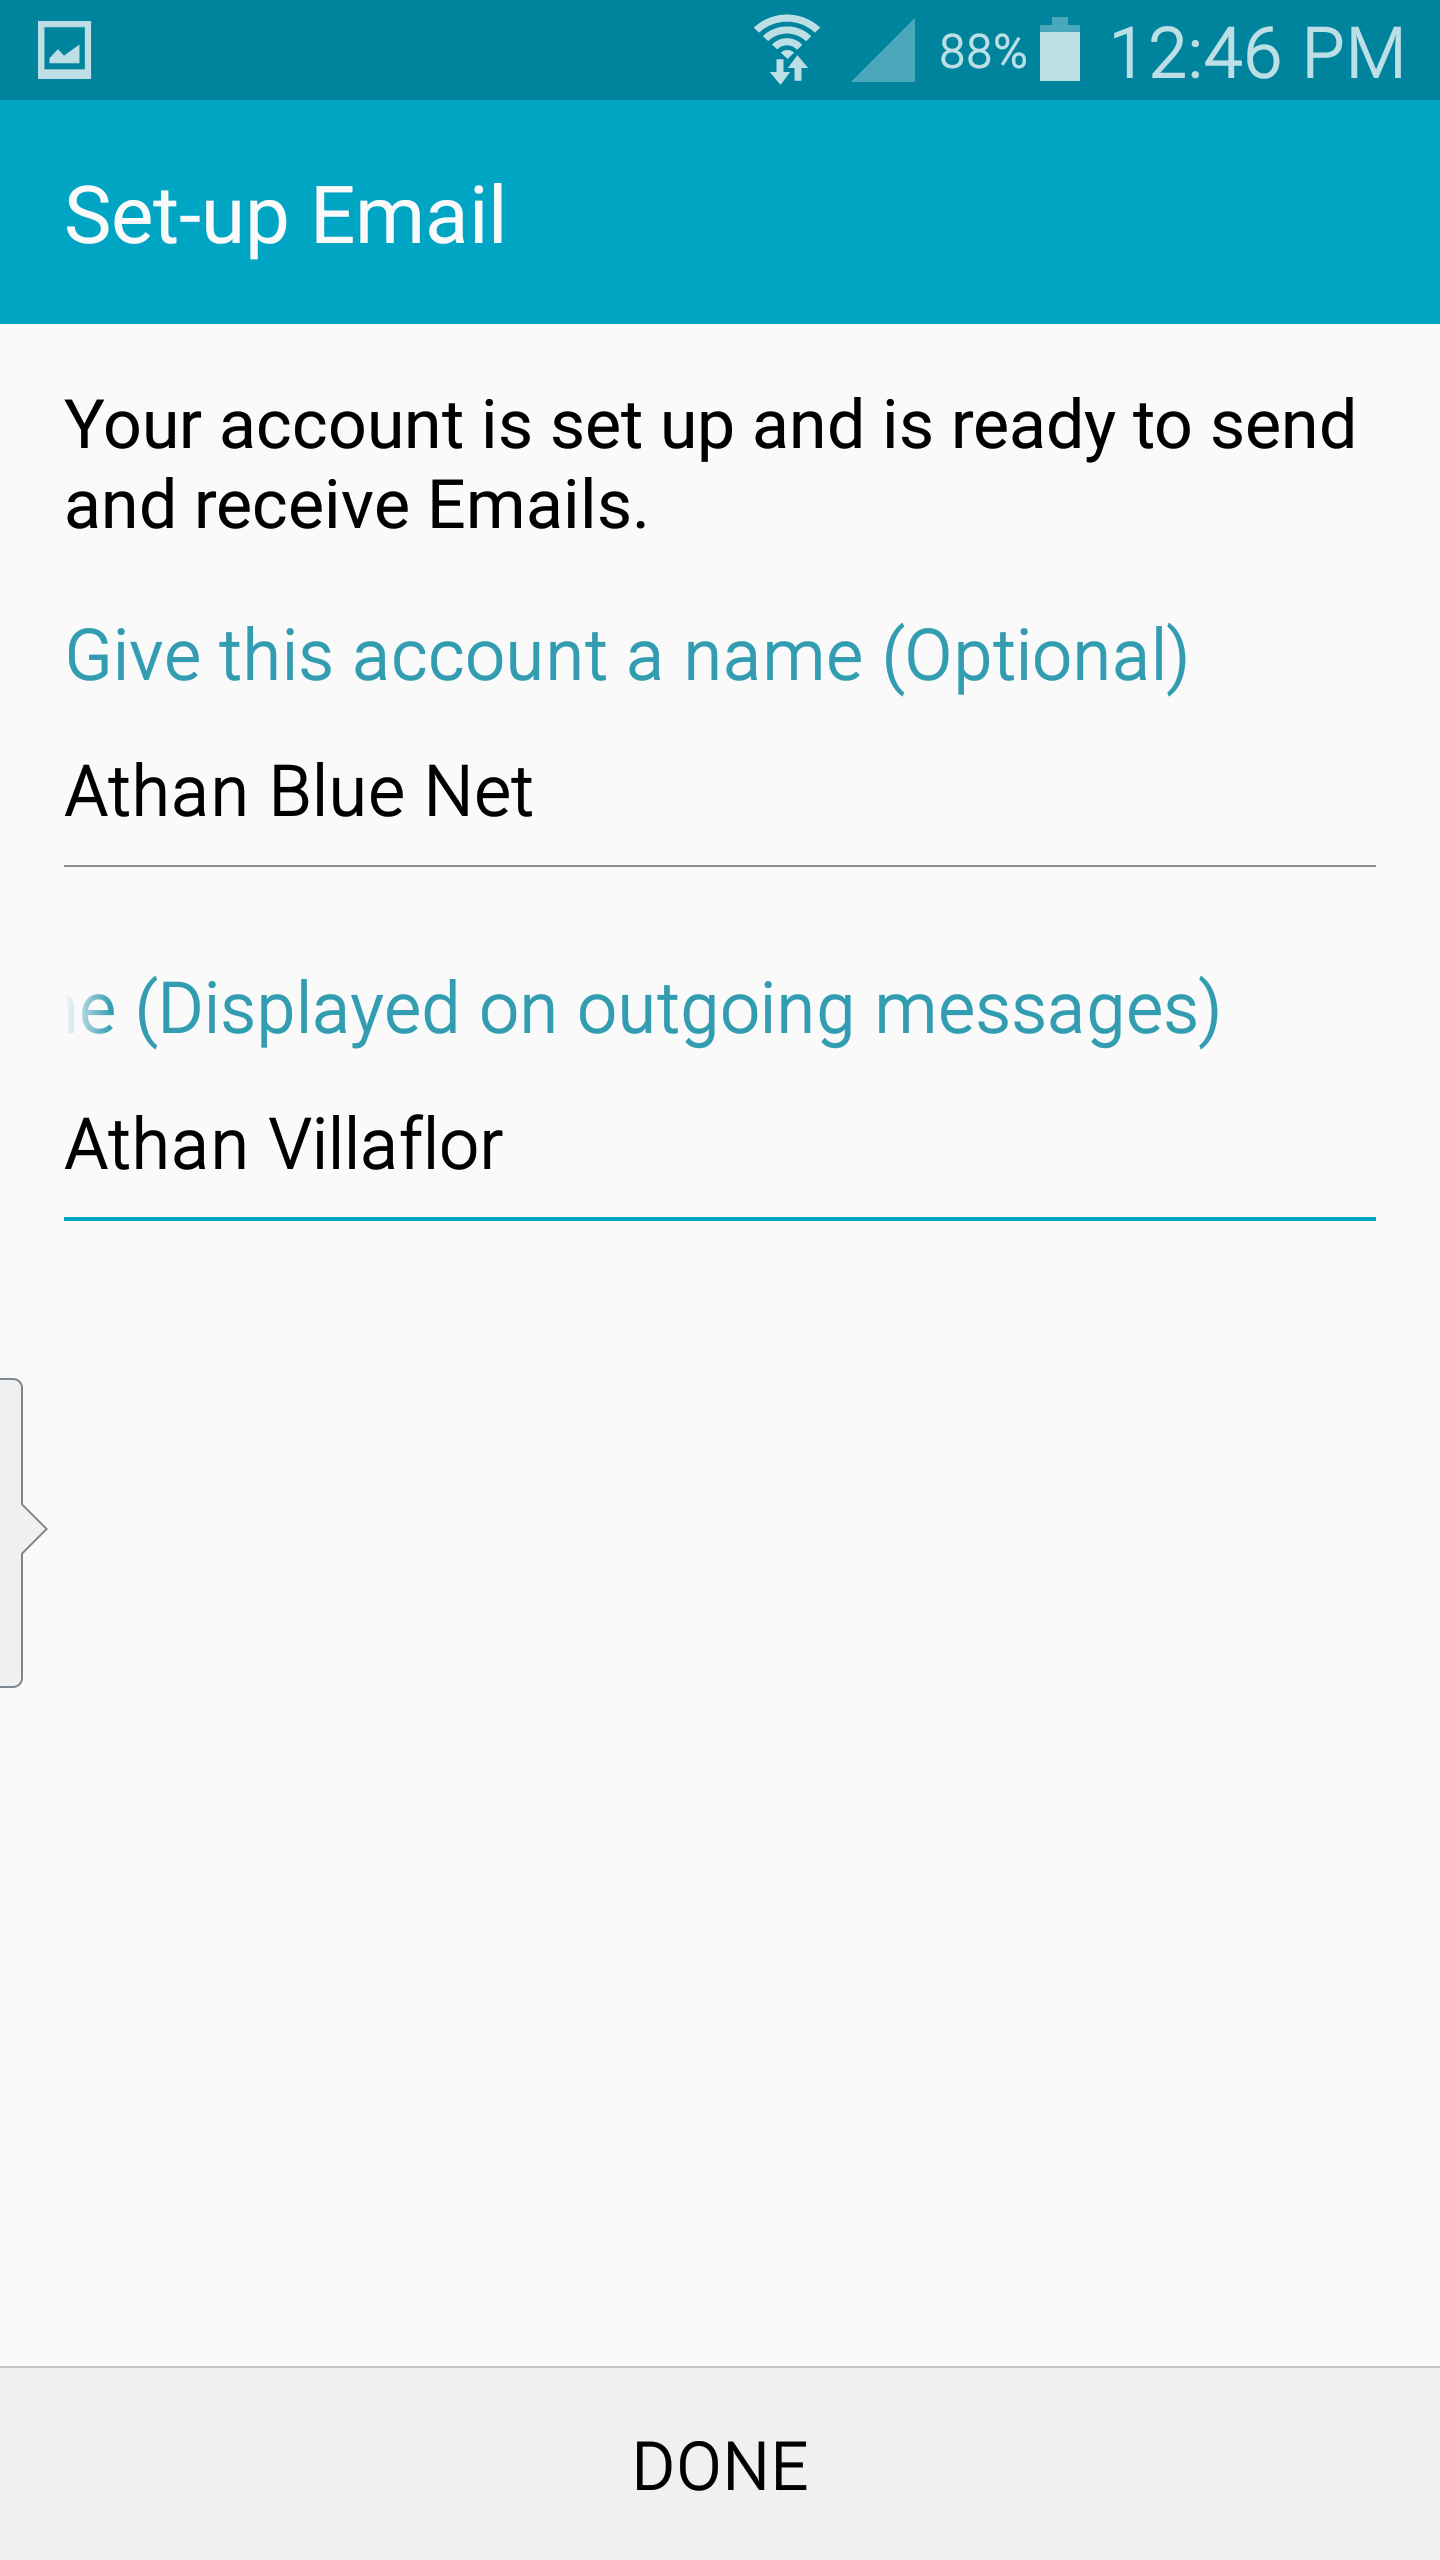
Last window should be the account name (Optional) and your display name.
Click Done when finished. You should now be able to open your email. Wait for a few minutes and it should start syncing. If you will encounter any issues, please let us know by emailing support@blue.net.au
Posted in Uncategorized | Comments Off on Setting up your POP email on Android