December 2nd, 2014 admin
Please note that the screenshots below are taken from an iPad device, but the interface of an iPhone should look almost the same. Contact our support team for further assistance.
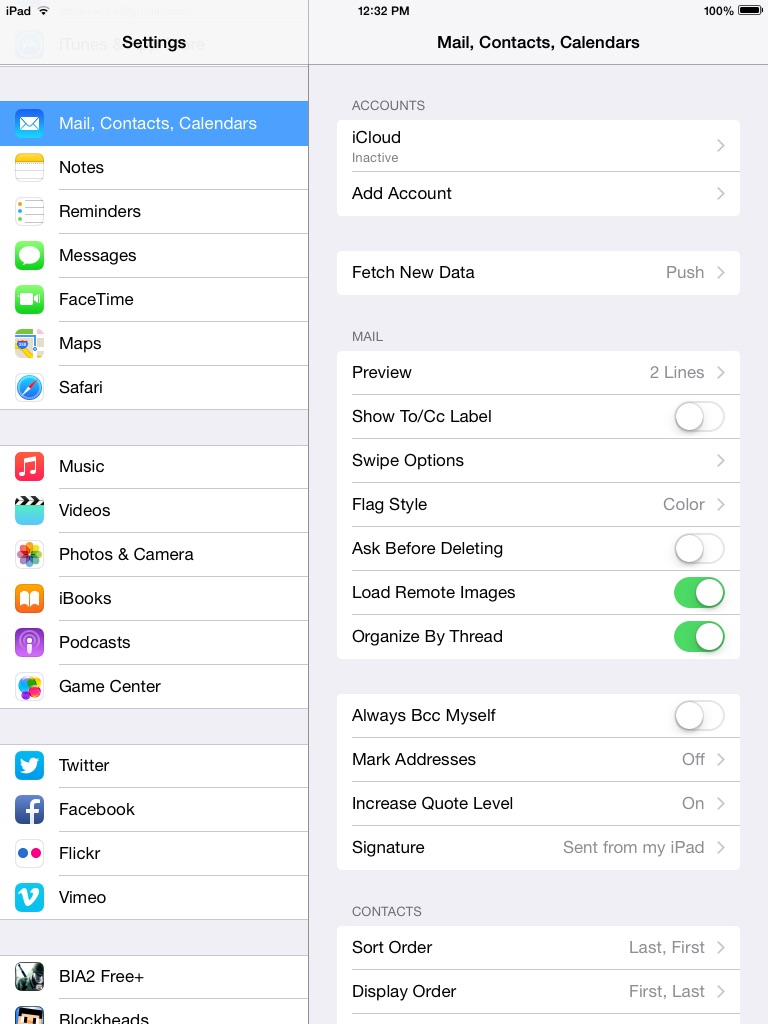
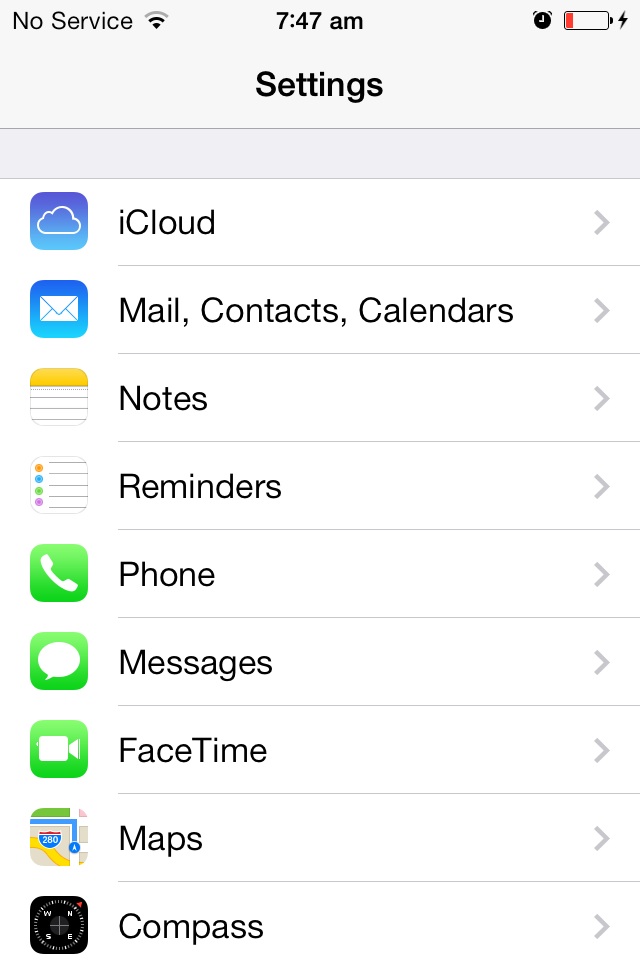
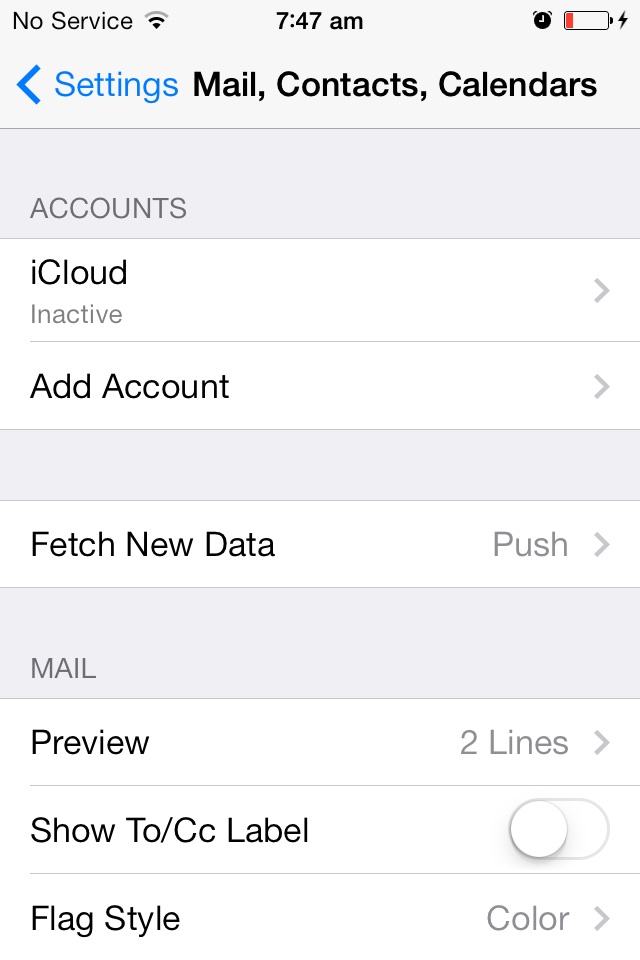
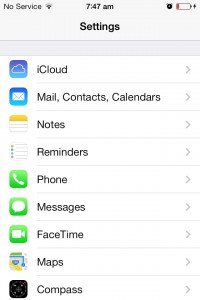
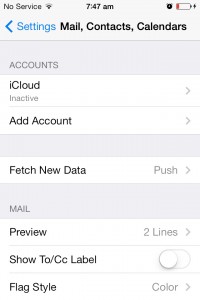
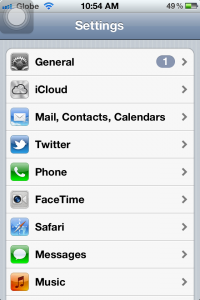
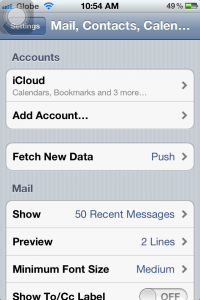
1. On your iOS device, click on Settings, then Mail, Contacts, Calendars, then Add Account.

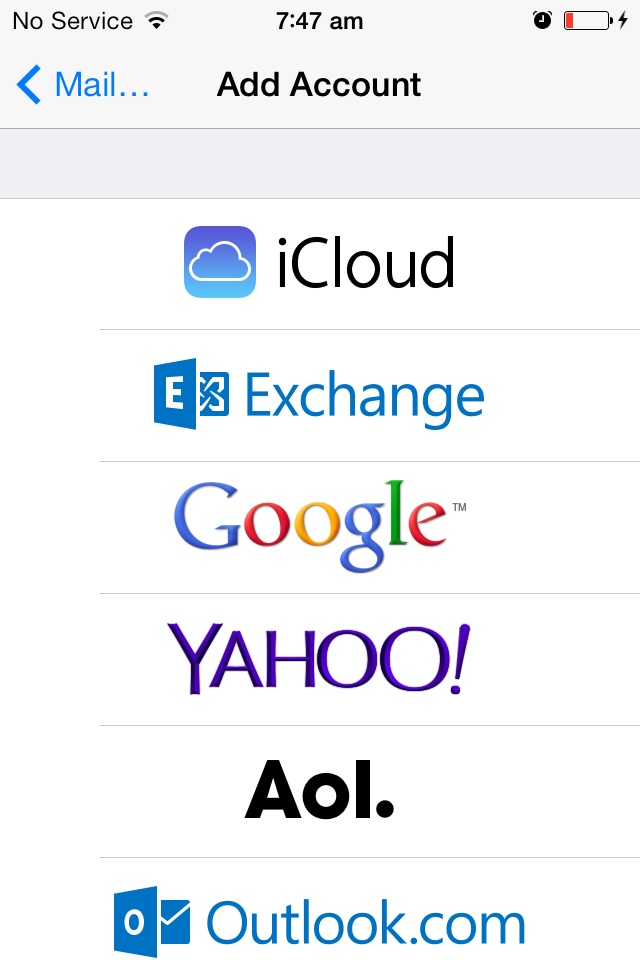
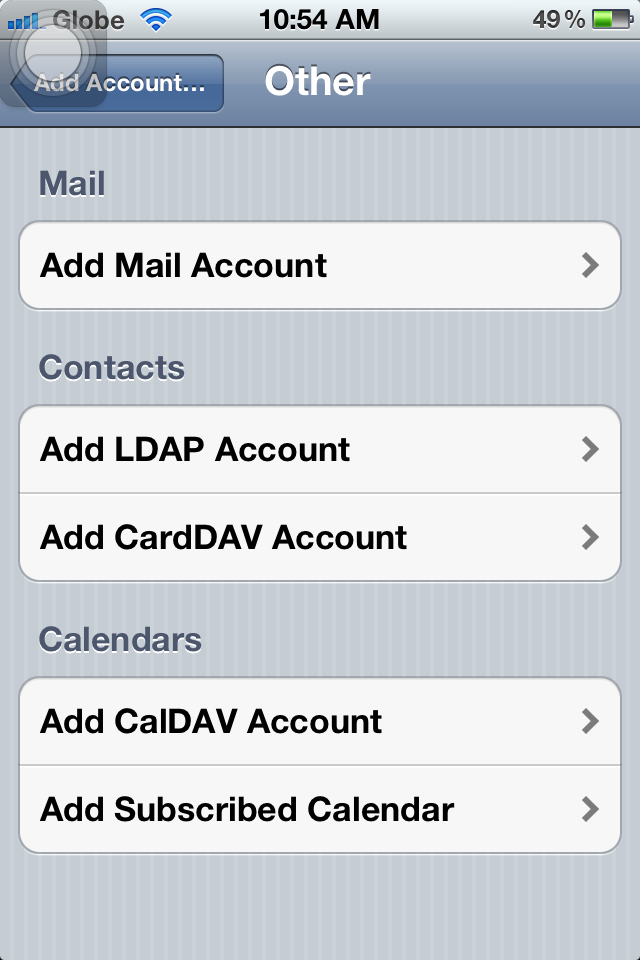
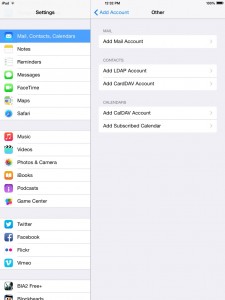
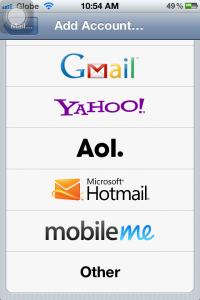
2. Select Other.
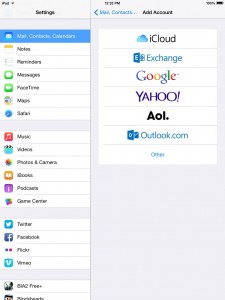
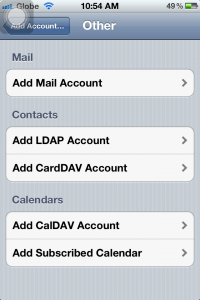
4. Select Add mail account.
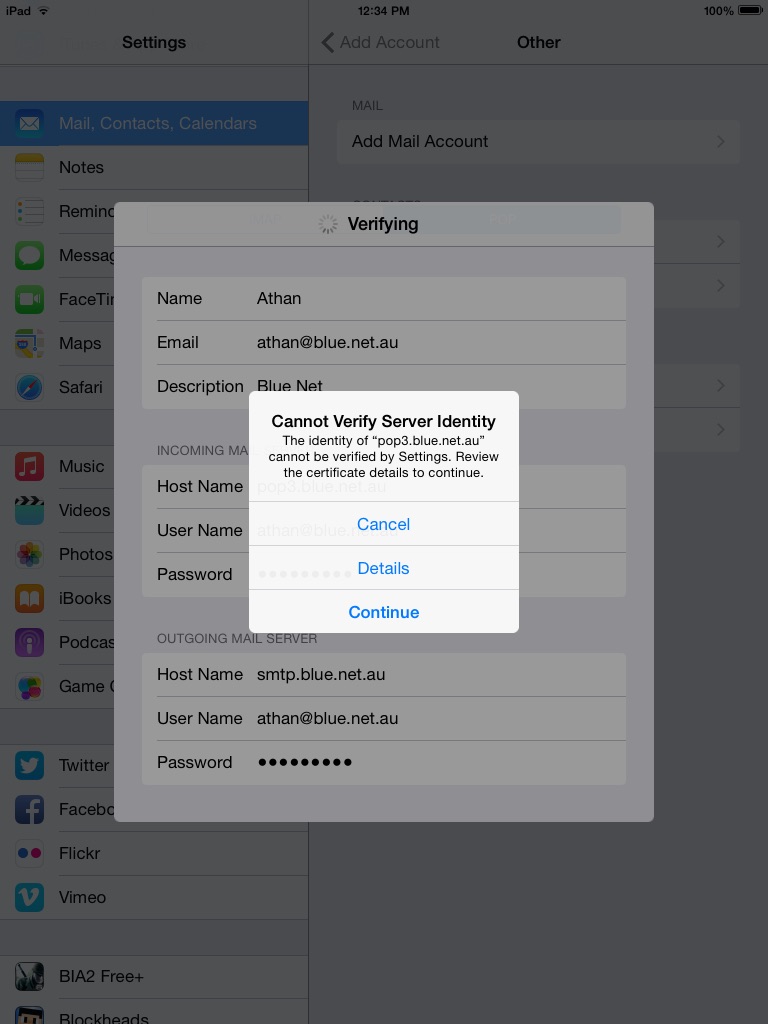
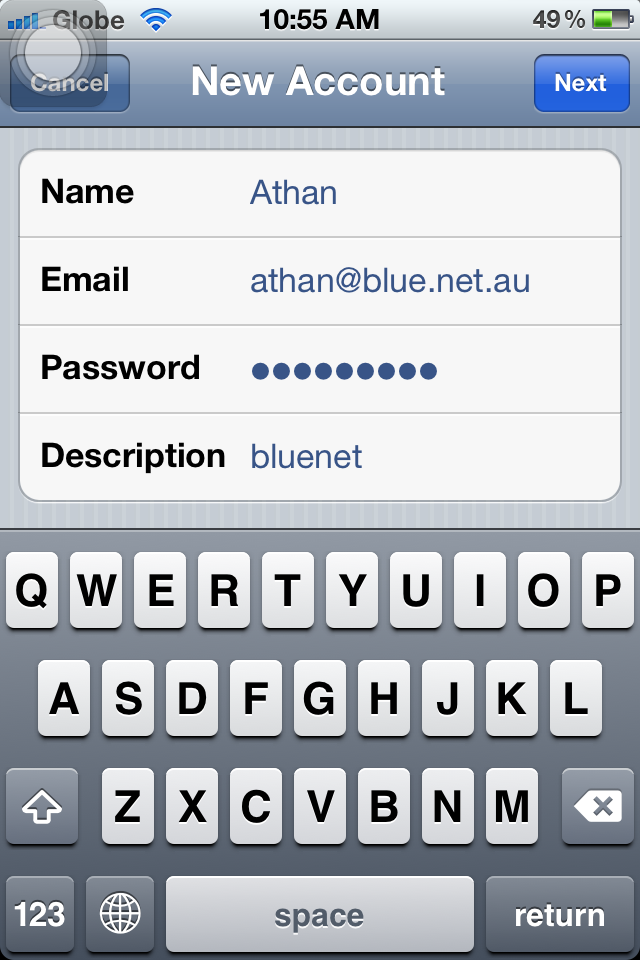
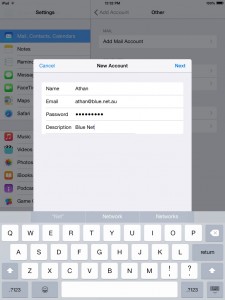
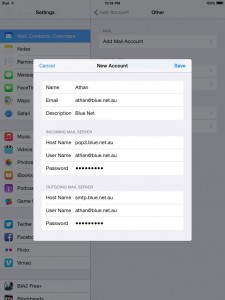
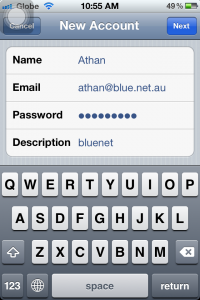
5. Type your email address and password. You can put anything on the Description box. The Next button should be available upon entering the required details. Tap Next when done.
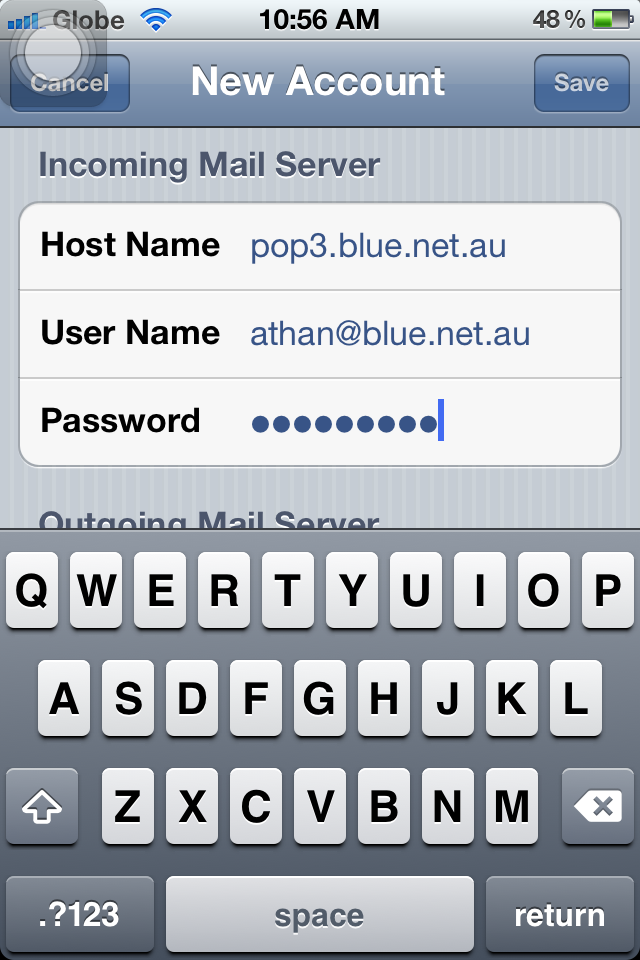
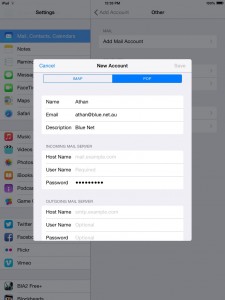
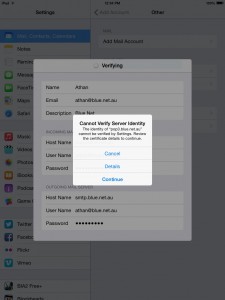
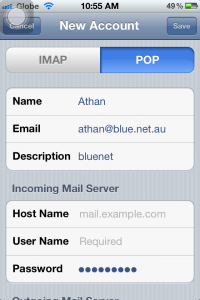
6. You might encounter an error message (mostly for iPhones), just select Continue to move on to the next window, otherwise, select POP then fill in the required details as shown on the screenshots.
7. You will encounter an error message, just select Continue to move on to the next window.
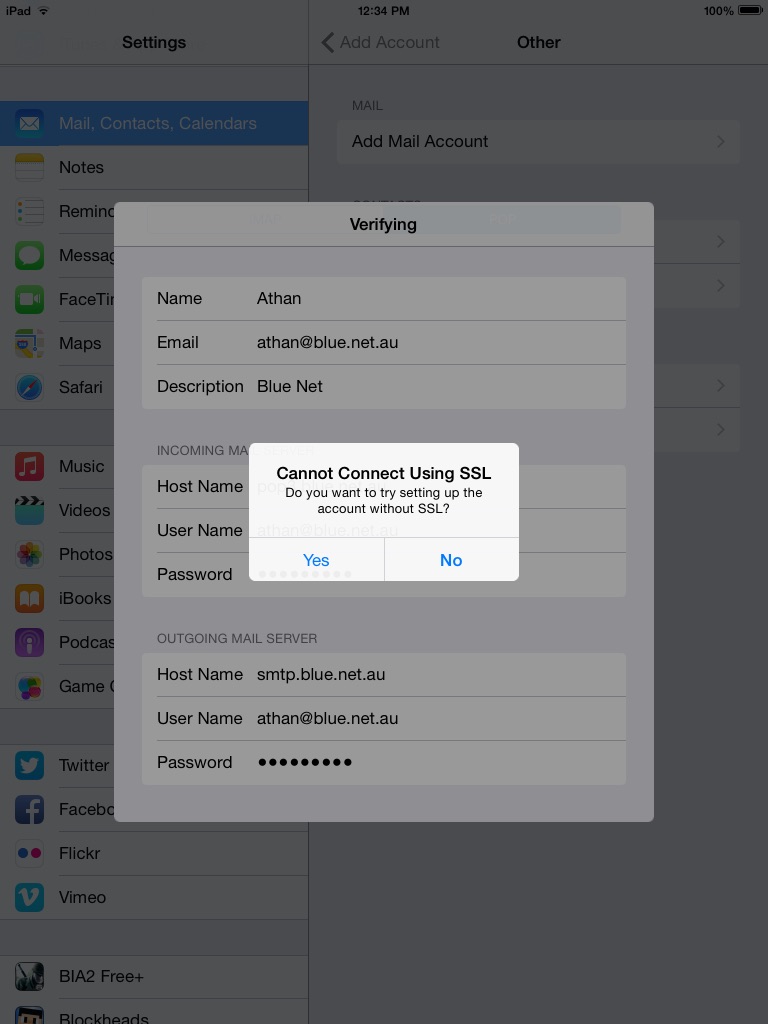
8. You will get this message, Cannot connect using SSL. Choose No.

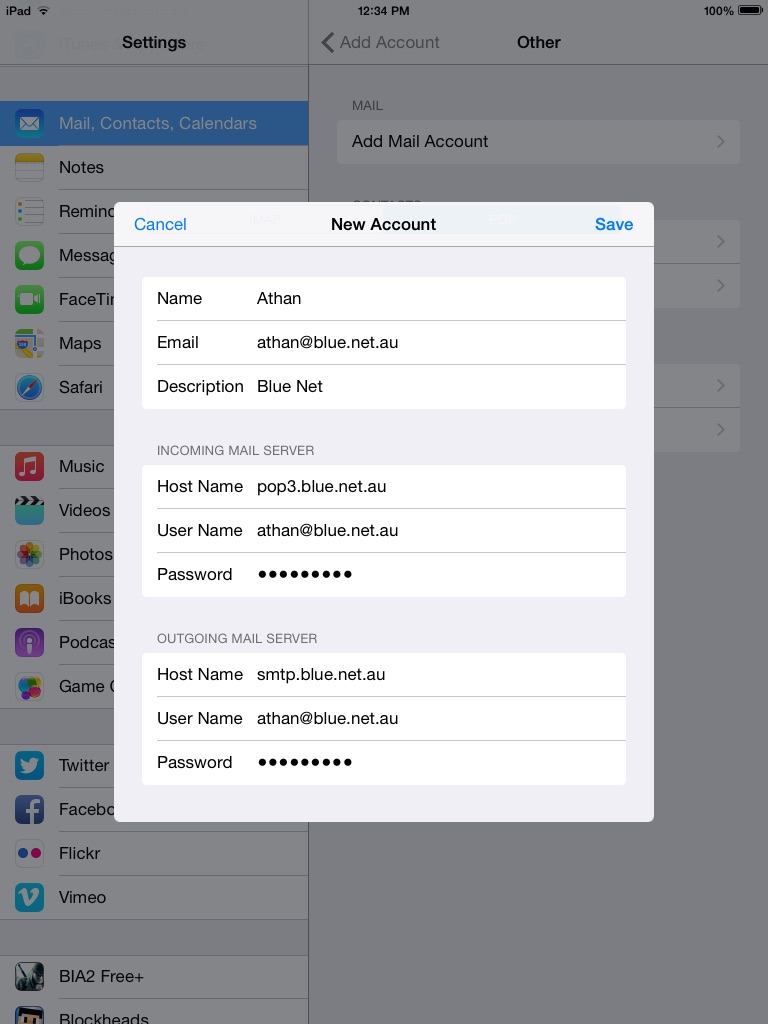
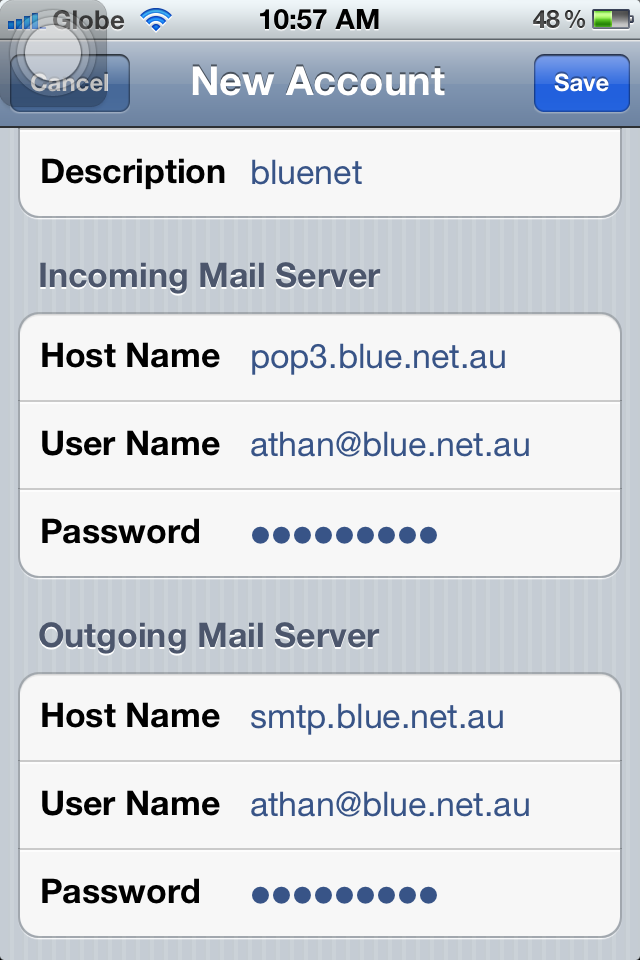
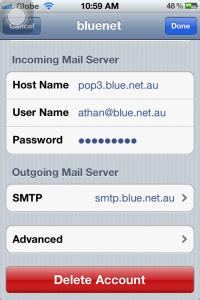
9. You will now have an overview of your account details. Tap Save to continue.
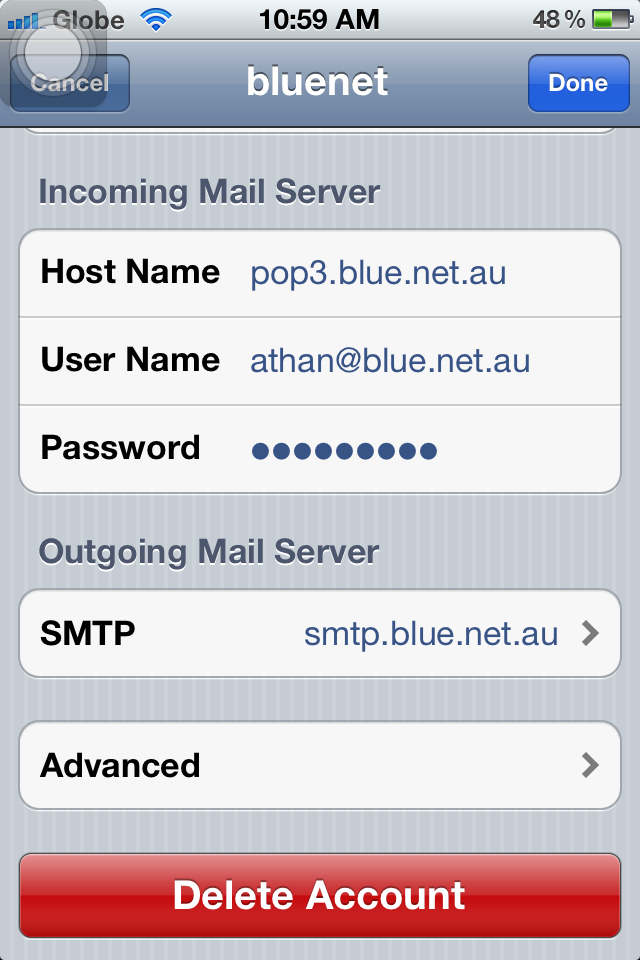
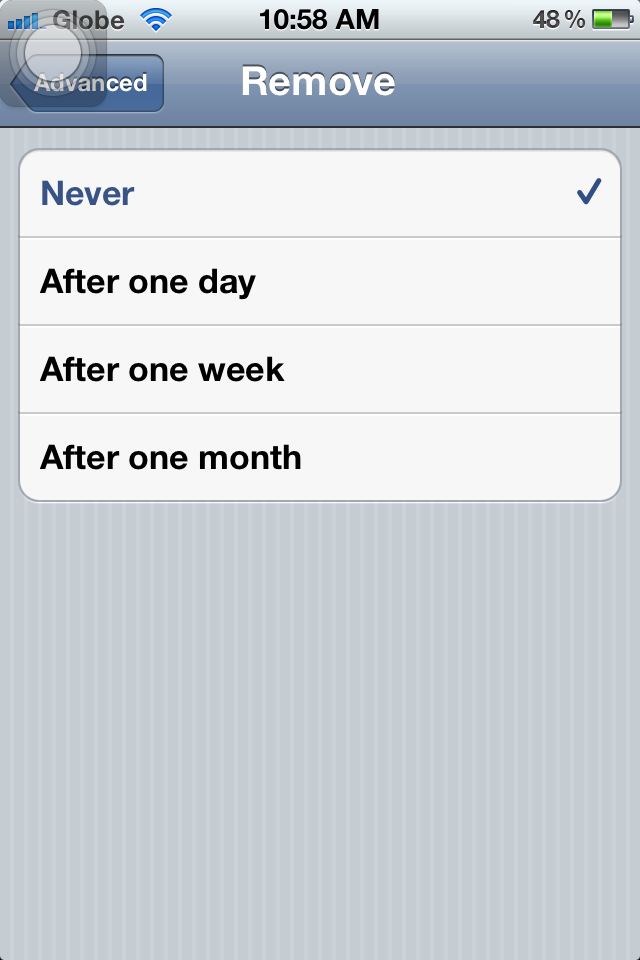
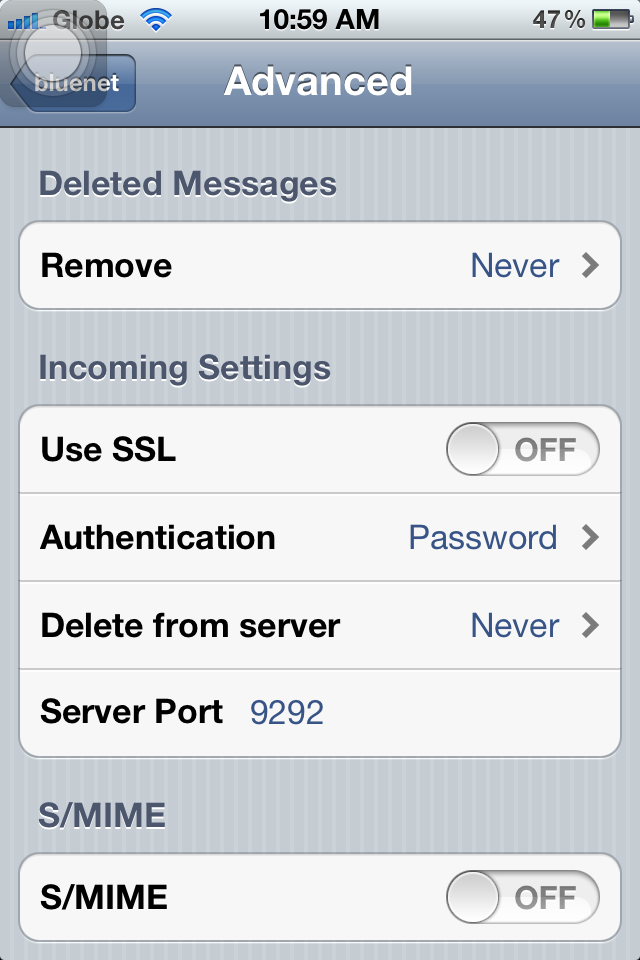
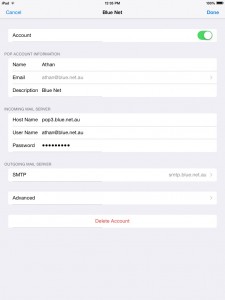
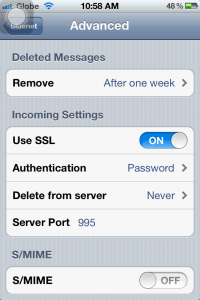
10. Go back to the settings window, then select Advanced.
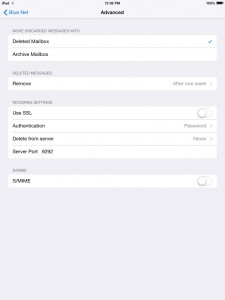
11. Make sure you have the same settings as the screenshot below.
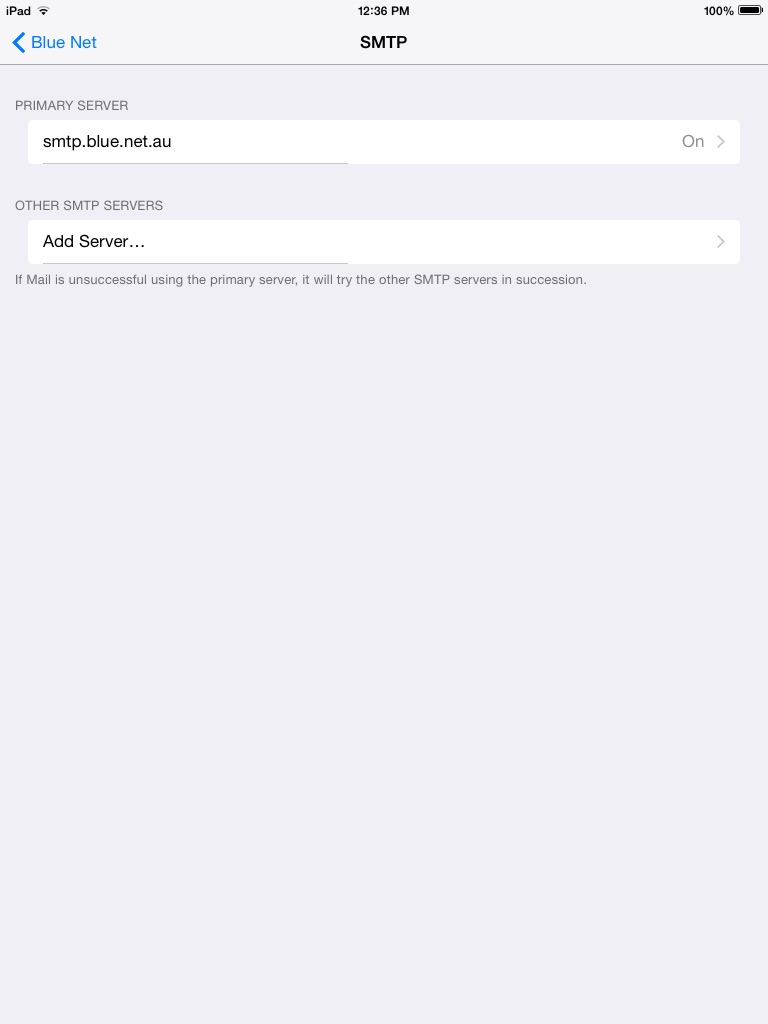
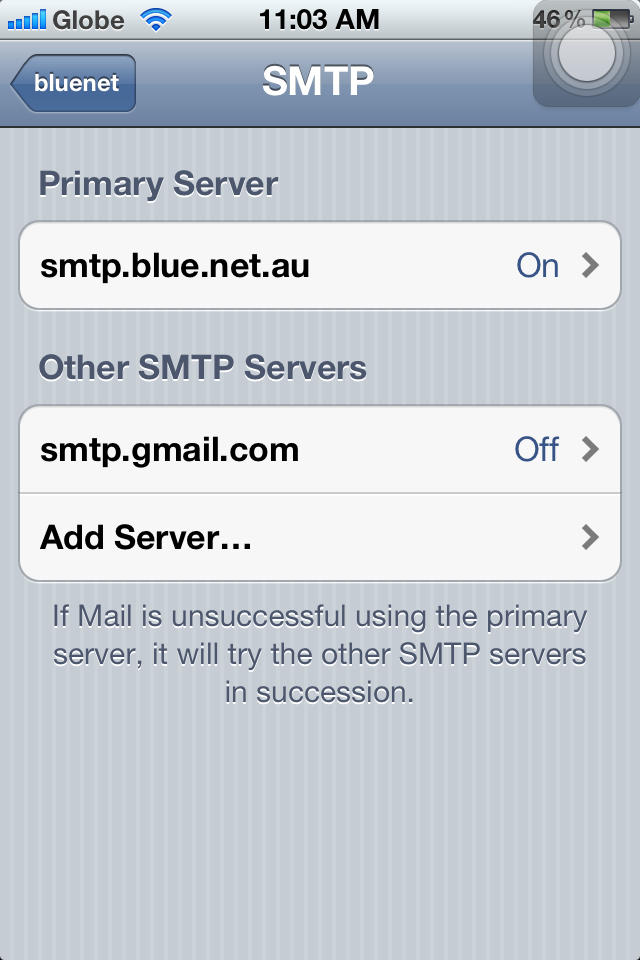
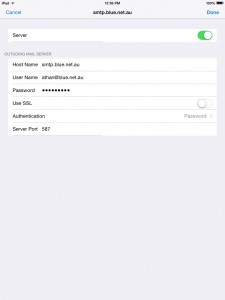
12. Go back to the settings window, then select SMTP, then select your Primary Server.
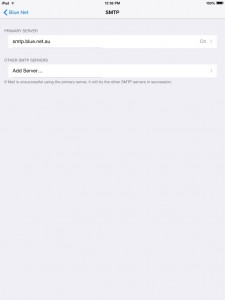
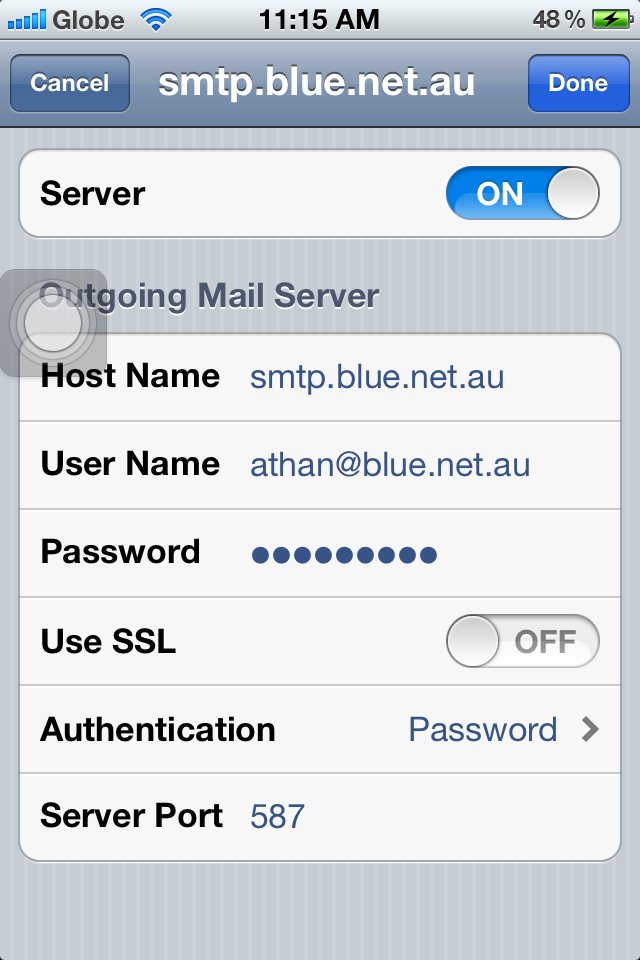
13. Make sure you have the same settings as below.
14. When you are finished, tap Done and open your email through the Mail App. You might get the same security message (see step 7), just tap Continue, and you should be able to download your messages and send as well.
Posted in Settings | Comments Off on Set up your POP3 account on iPhone or iPad running iOS7 and above
June 3rd, 2014 admin
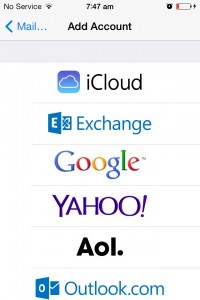
1. On your IOS device, click on Settings, then Mail, Contacts, Calendars (see below).
2. Select Add account.
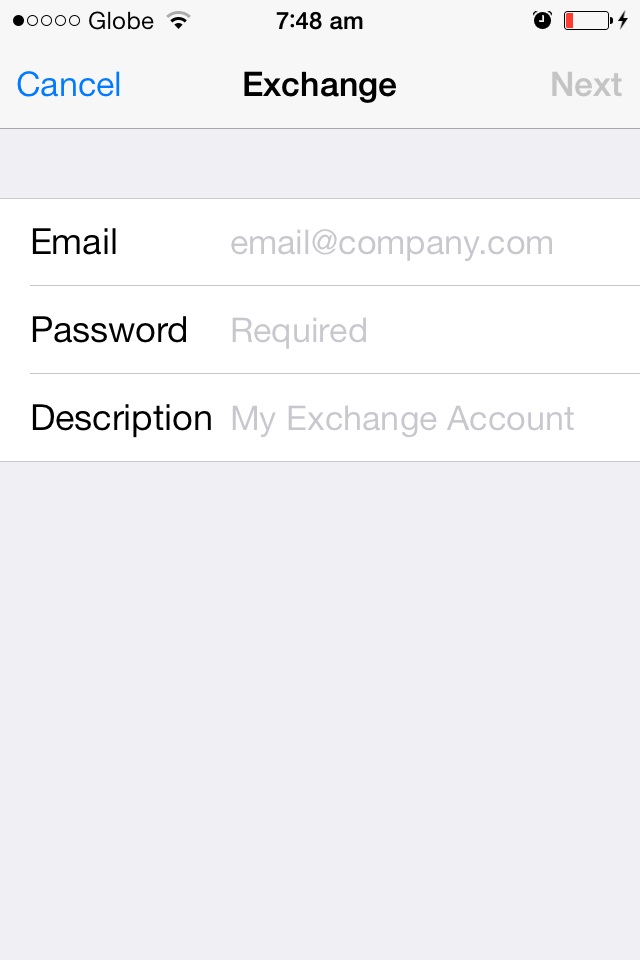
3. Select Exchange.
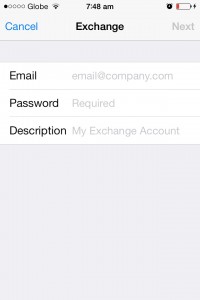
4. Type your email address and password. You can put anything on the Description box (Exchange, work email, etc…). The Next button should be available upon entering the required details. Tap Next when done.
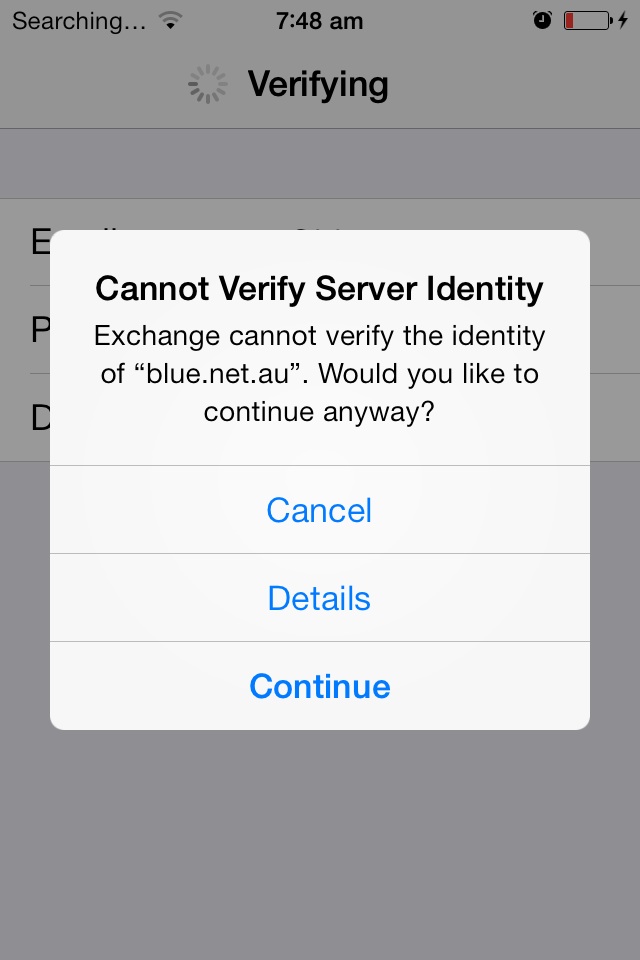
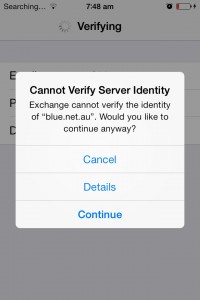
5. You might encounter an error message, just select Continue to move on to the next window.
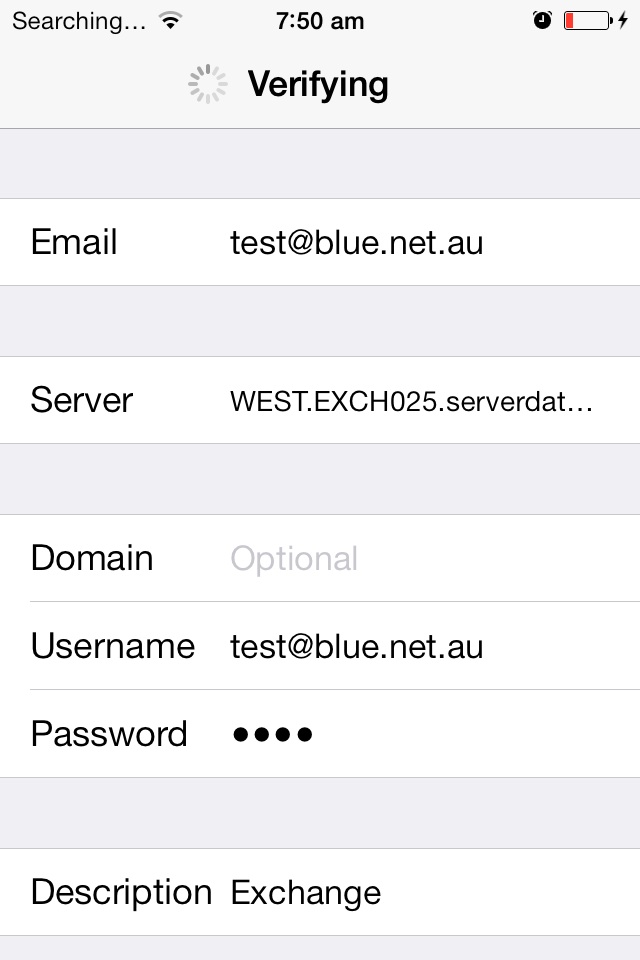
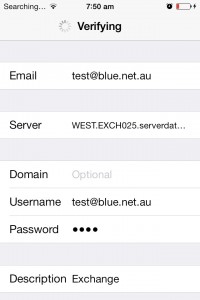
6.Type the required details.
> Replace test@blue.net.au with your own email address.
> Type WEST.EXCH025.serverdata.net on Server.
> Domain is optional. You can leave this blank.
> Type your email address on username, retype password, then tap Next.
Your Exchange email account is now ready. You may close the settings window, then select Mail from the list of your apps.
Posted in Settings | Comments Off on Set up exchange account on Iphone running iOS6 and below
April 12th, 2013 admin
These settings apply in iPhone, iPhone 3/3g, iPhone 4/4s, and iPhone 5. I will be using my Bluenet account for this guide, just change it into your corresponding emails and passwords.
1. Go to Settings, select Mail, Contacts, Calendars.
2. Tap Add Account…
3. Select Other
4. Tap Add Mail Account
5. On this screen, please fill in your details (Description can be your name, or company name, or anything you’d like to put). Tap Next when you are done.
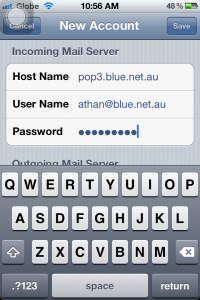
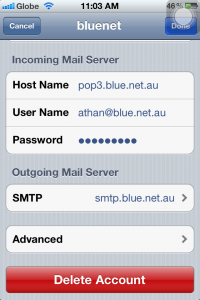
6. Select POP, then proceed with typing the Incoming Mail Server settings.
6a. Host name should always be “pop3.blue.net.au” and do not forget to type your username, which is your complete email address, and your password.
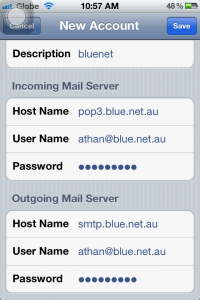
6b. Now for the outgoing, it should be “smtp.blue.net.au”, then proceed with your email and password. Tap Save (upper-right) when you’re done.
7. Upon saving the settings, it should normally give you an error. You will be back on the “Other” window, simply tap on your email account to change the settings. From there, go to “Advanced”.
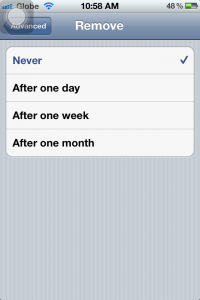
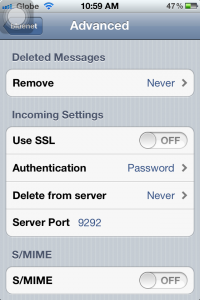
7a. Make sure Deleted Messages are set to “Never” as seen below. You can always delete the messages on your computer in case you need to retrieve important emails that were deleted.
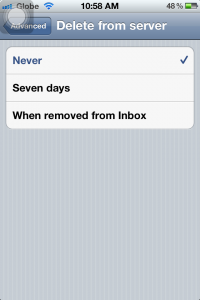
7b. On this window, set the option “Delete from server” to “Never” so you can download the messages also on your computer and other devices. If not, you will only be able to download this on your iPhone but not on other devices.
7c. SSL should be turned OFF under Incoming Settings, leave Authentication to Password. Server port should be set to “9292”.
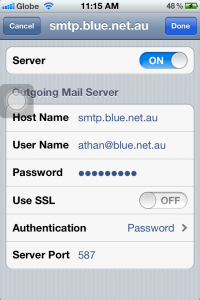
8. Tap SMTP to change its settings.
8a. Tap “smtp.blue.net.au” to change its settings.

8b. Server should be ON. Check the host name (should be smtp.blue.net.au), and your username and password as well. SSL should also be OFF, Authentication to Password, and Server Port should be 587. Click Done.
You can exit Settings and open your Mail to start downloading the messages.
Posted in Settings | Comments Off on Setting up a Blue Net Pop account in iPhone
March 20th, 2010 admin
Using FTPeS or FTP over Explicit TLS is fairly simple and straightforward. It doesn’t change anything that you do in regards to how you perform FTP actions. The only change is changing your Server Type from regular FTP to FTPeS.
What is FTPeS?
FTPeS is short for FTP over explicit TLS/SSL. TLS and SSL is a means of encrypting data, using a public/private key combination set. This is the same technology that is used to bring secure web browsing (HTTPS) on the web. Note that when you go to purchase an item from a website on the Internet, when you check out most of the time you are taken to a secure website, noted by the HTTPS in the browser’s location bar and by the padlock icon in the bottom status bar of your browser. FTPeS is basically the same thing. FTPeS using the same type of technology to encrypt your login credentials as you log into the FTP server. This prevents anything that might be listening on your connection from reading your username and password. Regular FTP will pass this information across your connection in plain text, so if someone was sniffing your connection, they could easily attain your username and password.
To enable FTPeS for your FTP connection using FileZilla you can follow the instructions given below:
Start FileZilla.
If you are already using FileZilla as your FTP application then you may already have your FTP account stored in FileZilla’s Site Manager.
Click on File and select Site Manager… This will bring up the Site Manager dialog box.
If you are already using FileZilla then you may see your site already listed here. If so, just select it and the information for the account will show up in the right side of the Site Manager dialog box. Otherwise, click on New Site to add your account to FileZilla’s site manager.
You would fill out the corresponding information accordingly or if you are modifying an account that already existed in the Site Manager, just leave everything as is. The one thing to change is where it says Servertype click the drop down box beside it and notice the options. You will want to select the option for FTPES – FTP over explicit TLS/SSL.
That is really the only change you have to make. Once this is selected and all of your other information is filled in, click on OK or Connect if you want to connect to your FTP account.
Concerning Logontype
I would highly recommend that you use a Logontype of Ask for password. This does not store your account’s password in the Site Manager. Instead you will have to type in your password every time you connect. The reason for this, is that there have been some viruses and trojans in the past that users have gotten on their computers. These trojans/viruses scan your computer for valid username and passwords and many times it will look in the data storage areas for popular FTP Site Managers. Storing your password here means that you would be vulnerable to attack from this method. If hackers or malicious users gain access to your account’s username and password, then your account can be compromised.
Now when you connect to your FTP account using FTPeS, you may be presented with a dialog box concerning the security certificate being used for the connection. We mostly use self-signed certificates for FTP. Self-signed certificates offer the exact same protection, encryption-wise, that a authoritative-signed certificate does. It is completely safe to accept this certificate.
Near the bottom of the warning dialog you will see an option to always accept this certificate.
If you are going to be connecting to FTP very often, you may want to select this option so that you are not bothered with this warning.
After you have connected you can review the FTP transaction log, near the top of the FTP client. Scroll back up and you can see that TLS was indeed used when passing your username and password information to the server.
Now you can continue to use FTP as you normally would. You can just feel a little bit safer knowing that your login information is not easily viewable by hackers or other malicious users that may be listening to your connection.
Free ftp clients:
http://filezilla-project.org/
http://winscp.net/eng/index.php
Posted in Settings | Comments Off on Accessing FTP with FTP over TLS
November 14th, 2008 admin
Suppose you’re at an open wireless hotspot and wish to connect the Samba server from your Windows laptop, but you don’t want to send data (documents, authentication hashes etc.) over the air in plain text.
Using SSH tunnels, you can encrypt all your network traffic and redirect it through a trusted computer when you’re connected to an untrusted network. The goal of this hack is to enable Windows users securely access shared files on any Samba server.
So, what are SSH Tunnels? In addition to providing remote shell access and command execution, SSH servers can forward ports to the other end of your connection. This can be extremely useful to protect any traffic that you need to keep private. In a nutshell, it is accomplished by binding to a local port, encrypting the traffic, sending the encrypted data to the remote machine, and then decrypting it and sending it to the remote host and port you specify.
Samba and Windows use port 139 for file sharing. At first glance, it seems that the easy solution is to tunnel connections from port 139 on your Windows computer to the Samba server. Then you can easily connect to the remote share by connecting to “localhost”. But since Windows always uses port 139 for file sharing, you must disable local file sharing to make the port forwarding.
So, how do we tunnel SMB over SSH and keep local file sharing working? We’re going to use a virtual network adapter. Basically, a virtual network adapter is a software application that allows a computer to connect to a network. We’re going to add a virtual adapter to our Windows computer and create a SSH tunnel over the virtual interface.
To add a virtual network adapter in Windows, use the following steps:
- In the Control Panel click on Add Hardware.
- In the Add Hardware Wizard, select “Yes, I have already connected the hardware” and click Next. Scroll down the list and click on “Add a new hardware device”.
- Select “Install the hardware that I manually select from a list”. From the hardware types, select Network Adapters and choose Microsoft Loopback Adapter.
- Go through the installation procedure.
The next step is to configure the new virtual adapter.
- Go to Network Connections configuration panel.
- Right click on the Microsoft Loopback Adapter and select Properties.
- Select Internet Protocol (TCP/IP) and click on the Properties button.
- Check “Use the following IP address” option and enter the chosen IP address (e.g. 10.0.0.1) and the subnet mask (255.255.255.0). If you have a gateway and DNS servers in your network, enter them too.
- Click on the Advanced button and in the WINS tab, select “Disable NetBIOS over TCP/IP”.
Setup the SSH Tunnel
Now that you have a properly configured virtual adapter, it’s time to setup the SSH tunnel between the Samba server and your computer. We assume that OpenSSH is already running on the Samba server. For the SSH client software we’re going to use Putty, a free SSH client that supports port forwarding.
Fire up Putty on your computer and enter the host name or IP address of your Samba server (e.g. 192.168.0.104). In the Tunnels options, in the “Source port” type 10.0.0.1:139 (the IP we used in our example) and in the “Destination” type 127.0.0.1:139. Click on “Add” and then “Open”. Once you authenticate, you’re ready to access the Samba server over the virtual adapter.
To test your SSH tunnel, just navigate from Windows explorer to \\10.0.0.1. If everything goes well, you’d prompted to enter a username and password to access the shares. Enjoy!

When things go wrong
If things don’t work, make sure that both Samba and Putty are running and properly configured. If you’re running Windows XP SP2 in a closed environment (no access to the Internet for updates), make sure to install KB884020.
Posted in Linux, Settings | Comments Off on Tunneling SMB over SSH: Secure file sharing
February 8th, 2008 admin
The document describes how you can manage your Blue Net MySQL database.
Note:
Database structure and design are outside the scope of this document and are not covered.
To manage your database you require the following information:
Database server:
mysql01.blue.net.au
Database user name and password are allocated upon signup with Blue Net hosting
You can then either use the built-in manager at:
http://support.blue.net.au/phpmyadmin
For instructions on how to use PHPmyAdmin please refer to: http://www.phpmyadmin.net/home_page/docs.php
Alternatively we recommend the excellent, free OpenSource HeidiSQL:
http://www.heidisql.com
Please refer to their extensive user forum for support and instructions for this product.
Posted in Settings | Comments Off on Managing the Blue Net MySQL database
January 9th, 2008 admin
DNS servers:
NEW high availability servers with phishing protection (powered by Open DNS)
208.67.222.222
208.67.220.220
How to set up on your computer, server, router etc?

Alternative public DNS servers:
1.1.1.1
8.8.8.8
8.8.4.4
209.244.0.3
209.244.0.4
4.2.2.1
4.2.2.2
4.2.2.3
4.2.2.4
EMAIL
Incoming POP3 server:
pop3.blue.net.au
Incoming ports:
110 – POP3 (non SSL)
or
995 – POP3 (SSL)
Outgoing SMTP server:
smtp.blue.net.au
Outgoing ports:
25 (Non-SSL or STARTTLS)
or
2525 (Non-SSL or STARTTLS)
or
587 (Non-SSL or STARTTLS)
or
465 (SSL)
IMAP & IMAPS special settings and conditions required
Blue Net POP3 & SMTP mail services require authentication with your email user name (email address) and password to send and receive email.
Webmail
Basic webmail interface: https://webmail.blue.net.au/rainloop
Advanced webmail interface: https://webmail.blue.net.au/
Other than checking your email you can also change your password (under settings) and set up filters redirecting email to others etc.
User Administration
http://webmail.blue.net.au:2222 – Instructions
Posted in Settings | Comments Off on General settings for Blue Net services