February 26th, 2011 admin
Open a .pst file
If you created a .pst file that does not appear in the Navigation Pane, add the .pst file to Outlook so that you can work with the items in it.
1. On the File menu, point to Open, and then click Outlook Data File.
2. Browse to the location of your wanted PST file.
3. Click the .pst file that you want to open, and then click OK.
The name of the folder that is associated with the data file appears in the Folder List. To view the Folder List, on the Go menu, click Folder List. By default, the folder will be called Personal Folders.
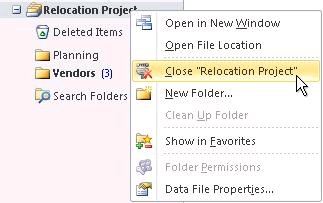
Close an Outlook Data File (.pst)
When you no longer need frequent access to an Outlook Data File (.pst), you can close the file. A closed file no longer appears in the Navigation Pane, but is not deleted from your computer.
* Right-click the name of the Outlook Data File (.pst) that you want to remove from the Navigation Pane, and then click Close name.
Close Outlook Data File (.pst) command
Posted in Exchange Hosting | Comments Off on Handling Outlook PST files
December 8th, 2010 admin
Download fuse & ntfs-3g.
Use Yum:
Prompt>yum install -y fuse ntfs-3g
Mount the partition:
[root@server1~]# mount.ntfs-3g /dev/sda9 /mnt/temp
This assumes /dev/sda9 is the NTFS partition and /mnt/temp is the place to mount it to.
Posted in Linux | Comments Off on Make CENTOS mount NTFS
October 29th, 2010 admin
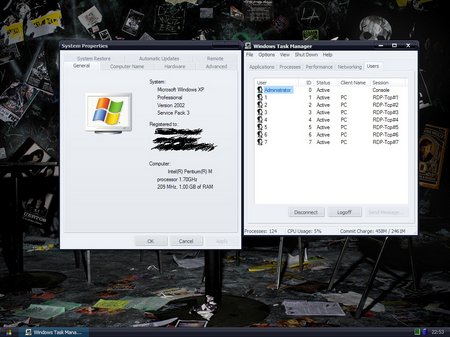
This patch will enable two or more concurrent sessions in Windows XP PRO Service Pack 2 (SP2) and Service Pack 3 (SP3) if you have FAST USER SWITCHING enabled, and your windows is NOT in a domain.
Uninstaller is also included and can be found at windows Control Panel -> Add or Remove Programs.
Windows XP PRO SP2 screenshot
<missing>
Windows XP PRO SP3 screenshot
Download Latest 2.1 Binary
Download Outdated 1.0 Binary
Originally from http://www.kood.org/terminal-server-patch/
Posted in Customer applications, Windows | Comments Off on Terminal Server Patch
September 16th, 2010 admin
Windows XP users
- Right-click My Computer.
- Click Properties.
- In the Properties window, click the Computer Name tab. Within this tab you’ll be able to see the full computer name, workgroup and also a description.
Windows 2000 users
- Right-click My Computer.
- Click Properties.
- In the Properties window, click the Network Identification tab. Within this tab you’ll be able to see the full computer name as well as the workgroup you’re using.
Posted in Windows | Comments Off on Determining the name of your computer through Windows
July 23rd, 2010 admin
Download BlogDesk:
http://www.blogdesk.org/en/download.htm
and install on your windows computer and start program.
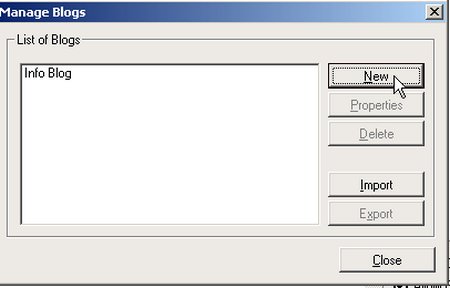
Go to FILE / MANAGE BLOGS and click on NEW:
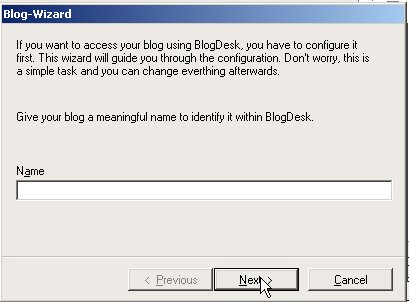
Give it a name and click next
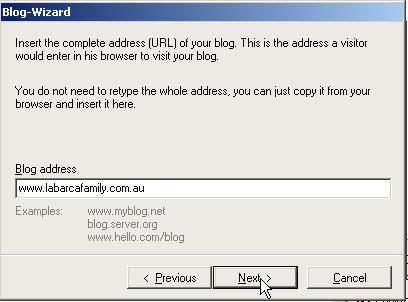
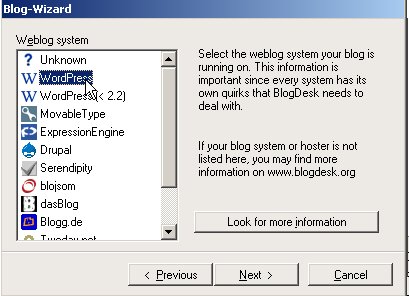
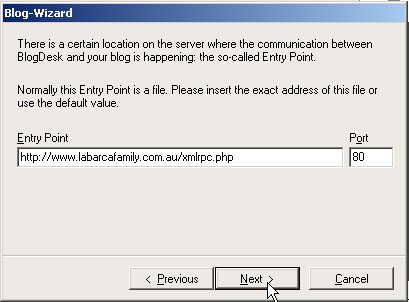
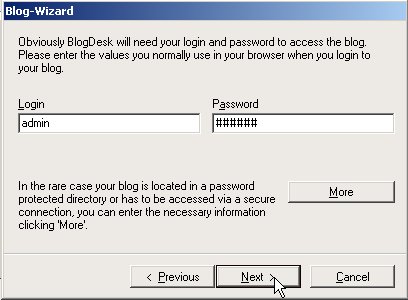
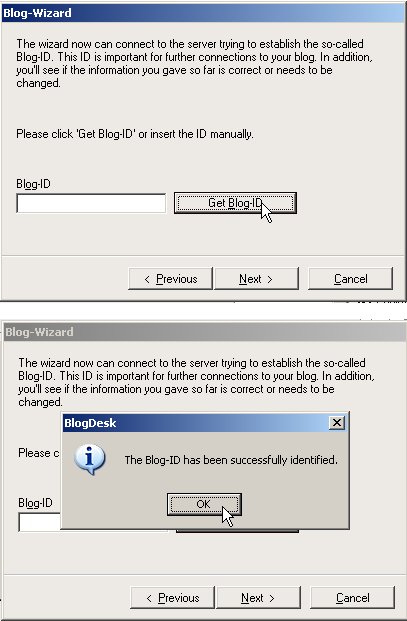
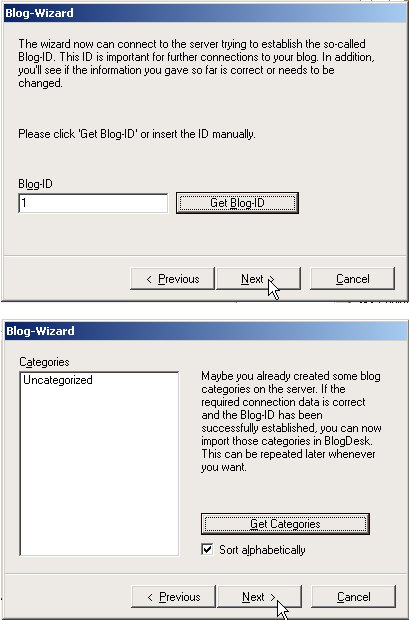
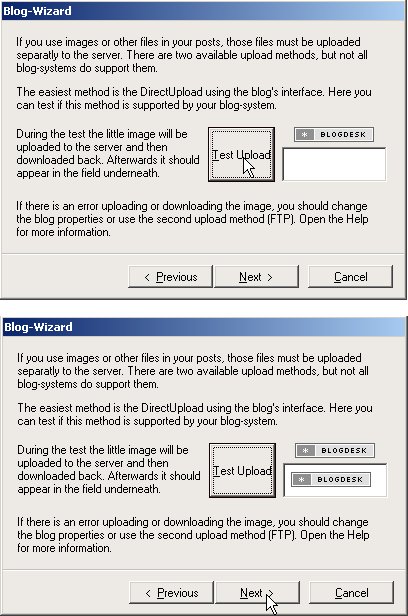
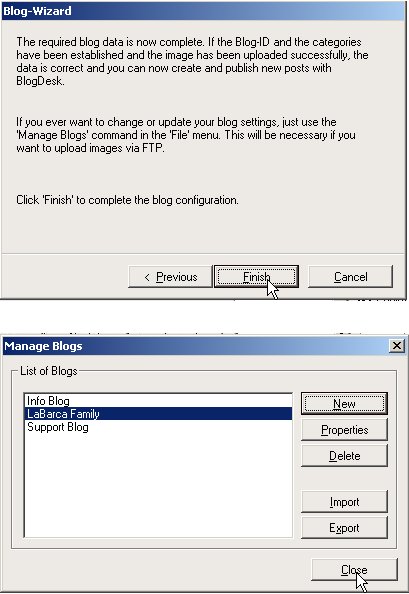
Then you can start using BlogDesk
Use the HELP for more information.
Posted in Customer applications | Comments Off on BlogDesk – install and setup
March 20th, 2010 admin
Using FTPeS or FTP over Explicit TLS is fairly simple and straightforward. It doesn’t change anything that you do in regards to how you perform FTP actions. The only change is changing your Server Type from regular FTP to FTPeS.
What is FTPeS?
FTPeS is short for FTP over explicit TLS/SSL. TLS and SSL is a means of encrypting data, using a public/private key combination set. This is the same technology that is used to bring secure web browsing (HTTPS) on the web. Note that when you go to purchase an item from a website on the Internet, when you check out most of the time you are taken to a secure website, noted by the HTTPS in the browser’s location bar and by the padlock icon in the bottom status bar of your browser. FTPeS is basically the same thing. FTPeS using the same type of technology to encrypt your login credentials as you log into the FTP server. This prevents anything that might be listening on your connection from reading your username and password. Regular FTP will pass this information across your connection in plain text, so if someone was sniffing your connection, they could easily attain your username and password.
To enable FTPeS for your FTP connection using FileZilla you can follow the instructions given below:
Start FileZilla.
If you are already using FileZilla as your FTP application then you may already have your FTP account stored in FileZilla’s Site Manager.
Click on File and select Site Manager… This will bring up the Site Manager dialog box.
If you are already using FileZilla then you may see your site already listed here. If so, just select it and the information for the account will show up in the right side of the Site Manager dialog box. Otherwise, click on New Site to add your account to FileZilla’s site manager.
You would fill out the corresponding information accordingly or if you are modifying an account that already existed in the Site Manager, just leave everything as is. The one thing to change is where it says Servertype click the drop down box beside it and notice the options. You will want to select the option for FTPES – FTP over explicit TLS/SSL.
That is really the only change you have to make. Once this is selected and all of your other information is filled in, click on OK or Connect if you want to connect to your FTP account.
Concerning Logontype
I would highly recommend that you use a Logontype of Ask for password. This does not store your account’s password in the Site Manager. Instead you will have to type in your password every time you connect. The reason for this, is that there have been some viruses and trojans in the past that users have gotten on their computers. These trojans/viruses scan your computer for valid username and passwords and many times it will look in the data storage areas for popular FTP Site Managers. Storing your password here means that you would be vulnerable to attack from this method. If hackers or malicious users gain access to your account’s username and password, then your account can be compromised.
Now when you connect to your FTP account using FTPeS, you may be presented with a dialog box concerning the security certificate being used for the connection. We mostly use self-signed certificates for FTP. Self-signed certificates offer the exact same protection, encryption-wise, that a authoritative-signed certificate does. It is completely safe to accept this certificate.
Near the bottom of the warning dialog you will see an option to always accept this certificate.
If you are going to be connecting to FTP very often, you may want to select this option so that you are not bothered with this warning.
After you have connected you can review the FTP transaction log, near the top of the FTP client. Scroll back up and you can see that TLS was indeed used when passing your username and password information to the server.
Now you can continue to use FTP as you normally would. You can just feel a little bit safer knowing that your login information is not easily viewable by hackers or other malicious users that may be listening to your connection.
Free ftp clients:
http://filezilla-project.org/
http://winscp.net/eng/index.php
Posted in Settings | Comments Off on Accessing FTP with FTP over TLS
January 14th, 2010 admin
No, not in the current stable release. But there are workarounds, eg using your firewall to redirect incoming traffic to a given port.
# Example IPTABLES, REDIRECT INCOMING CONNECTION ON PORT 9292 TO DEFAULT POP3 PORT
iptables -t nat -A PREROUTING -p tcp -m tcp –dport 9292 -j REDIRECT –to-port 110
Posted in Linux | Comments Off on Is it possible to have Dovecot imap/pop daemons listening on multiple ports?
August 3rd, 2009 admin
Introduction
Windows stores the location of per-user special folders under the following registry key:
HKEY_CURRENT_USER \ Software \ Microsoft \ Windows \ CurrentVersion \ Explorer \ User Shell Folders
When you redirect special folders using Tweak UI or by moving the folder to another location, the User Shell Folder registry path is modified accordingly. To reset the User Shell Folders values to defaults, try this:
Resetting the special folder paths to defaults
*
Open Registry Editor and navigate to this location:
HKEY_CURRENT_USER \ Software \ Microsoft \ Windows \ CurrentVersion \ Explorer \ User Shell Folders
*
Backup the above branch to a .REG file.
*
In the right-pane, change the Shell Folder path accordingly. The default values are mentioned in the table below for reference:
Shell Folder Path
AppData %USERPROFILE%\Application Data
Cache %USERPROFILE%\Local Settings\Temporary Internet Files
Cookies %USERPROFILE%\Cookies
Desktop %USERPROFILE%\Desktop
Favorites %USERPROFILE%\Favorites
History %USERPROFILE%\Local Settings\History
Local AppData %USERPROFILE%\Local Settings\Application Data
Local Settings %USERPROFILE%\Local Settings
My Music %USERPROFILE%\My Documents\My Music
My Pictures %USERPROFILE%\My Documents\My Pictures
Nethood %USERPROFILE%\NetHood
Personal [My Documents] %USERPROFILE%\My Documents
PrintHood %USERPROFILE%\PrintHood
Programs %USERPROFILE%\Start Menu\Programs
SendTo %USERPROFILE%\SendTo
Start Menu %USERPROFILE%\Start Menu
Startup %USERPROFILE%\Start Menu\Programs\Startup
Templates %USERPROFILE%\Templates
Note: You can automate the above using the FolderRedirector utility, or using TweakUI Powertoy.
You may also this REG fix to reset the User Shell Folders values to Windows XP defaults, for the current user profile.
To reset the per-machine shell folder paths, navigate to this key:
HKEY_LOCAL_MACHINE \ SOFTWARE \ Microsoft \ Windows \ CurrentVersion \ Explorer \ User Shell Folders
Refer the following table for the default values:
Shell Folder Path
Common AppData %ALLUSERSPROFILE%\Application Data
Common Desktop %ALLUSERSPROFILE%\Desktop
Common Documents %ALLUSERSPROFILE%\Documents
Common Programs %ALLUSERSPROFILE%\Start Menu\Programs
Common Start Menu %ALLUSERSPROFILE%\Start Menu
Common Startup %ALLUSERSPROFILE%\Start Menu\Programs\Startup
Common Templates %ALLUSERSPROFILE%\Templates
NOTE: After the Shell Folders values are updated, you need to move your files manually from the old path to the new.
Posted in Windows | Comments Off on Reset the Shell Folders paths to defaults
April 7th, 2009 admin
The only thing to be done in squid.conf is:
adding the “transparent” at the end of the http_port directive
http_port 3128 transparent
and of course redirecting the traffic to the port of the proxy with a suitable iptables rule. Something like (assuming 192.168.0.1 is your proxy’s LAN IP address):
iptables -t nat -A PREROUTING -i eth1 -p tcp -m tcp --dport 80 -j DNAT --to-destination 192.168.0.1:3128

iptables -t nat -A PREROUTING -i eth0 -p tcp -m tcp --dport 80 -j REDIRECT --to-ports 3128
Posted in Linux | Comments Off on Transparent Proxy Squid 3
January 15th, 2009 admin
   Control panel tool             Command
   -----------------------------------------------------------------
   Accessibility Options          control access.cpl
   Add New Hardware               control sysdm.cpl add new hardware
   Add/Remove Programs            control appwiz.cpl
   Date/Time Properties           control timedate.cpl
   Display Properties             control desk.cpl
   FindFast                       control findfast.cpl
   Fonts Folder                   control fonts
   Internet Properties            control inetcpl.cpl
   Joystick Properties            control joy.cpl
   Keyboard Properties            control main.cpl keyboard
   Microsoft Exchange             control mlcfg32.cpl
      (or Windows Messaging)
   Microsoft Mail Post Office     control wgpocpl.cpl
   Modem Properties               control modem.cpl
   Mouse Properties               control main.cpl
   Multimedia Properties          control mmsys.cpl
   Network Properties             control netcpl.cpl
                                  NOTE: In Windows NT 4.0, Network
                                  properties is Ncpa.cpl, not Netcpl.cpl
   Password Properties            control password.cpl
   PC Card                        control main.cpl pc card (PCMCIA)
   Power Management (Windows 95)  control main.cpl power
   Power Management (Windows 98)  control powercfg.cpl
   Printers Folder                control printers
   Regional Settings              control intl.cpl
   Scanners and Cameras           control sticpl.cpl
   Sound Properties               control mmsys.cpl sounds
   System Properties              control sysdm.cpl
Posted in Windows | Comments Off on How to run Control Panel tools by typing a command