August 20th, 2011 admin
Install dd_rescue (not ddrescue – although that might also work)
copying everything to a file:
dd_rescue /dev/hda1 target-file.img
Mounting the file:
losetup /dev/loop0 target-file.img
mount /dev/loop0 /home/you/dir
or
mount -o loop target-file.img /home/you/dir
Posted in Linux | Comments Off on Recover information from a disk otherwise unreadable or unmountable
August 20th, 2011 admin
Installing s3fs on CentOS 5.6
Assumptions:
- rpmforge yum repo installed
- centos up-to-date – yum -y update
Installation:
- yum -y install python
- yum -y install fuse
- yum -y install libfuse
- yum -y install python-hashlib
- wget ftp://rpmfind.net/linux/epel/5/i386/fuse-python-0.2.1-1.el5.i386.rpm
- rpm -ivh fuse-python-0.2.1-1.el5.i386.rpm
- yum -y install fuse-s3fs
Then you will need to do:
- Make your access details available to the program:
(there are a multitude of ways to do that. This is just one shot for this session. You could also include them in your environment)
export AWS_ACCESS_KEY_ID=<your amazon access key id>
export AWS_SECRET_ACCESS_KEY=<your amazon secret access key>
- Create a bucket:
/usr/bin/s3fs -C -c bucketnameofyourchoice
- Format bucket to be used with this program:
/usr/bin/s3fs -C -f bucketnameofyourchoice
- Mount the bucket to a convenient place:
/usr/bin/s3fs -o bucket=bucketnameofyourchoice /mnt/s3/
Then Amazon S3 behaves as if it is part of your file system and you can copy to and from and rsync to and from it. Ideal for backup.
Posted in Linux | Comments Off on Installing s3fs on CentOS 5.6
July 28th, 2011 admin
Please review this video for instructions to how to change your POP3 email password:
http://support.blue.net.au/video/pop3-email-user-password-change.swf
Posted in Customer applications | Comments Off on Changing POP3 email password
July 8th, 2011 admin
Set up the first account with the supplied setup facility. That is the easiest. However these instructions will also work for the first account
In windows go into: Control Panel / mail / email accounts
Click on New…
and you get
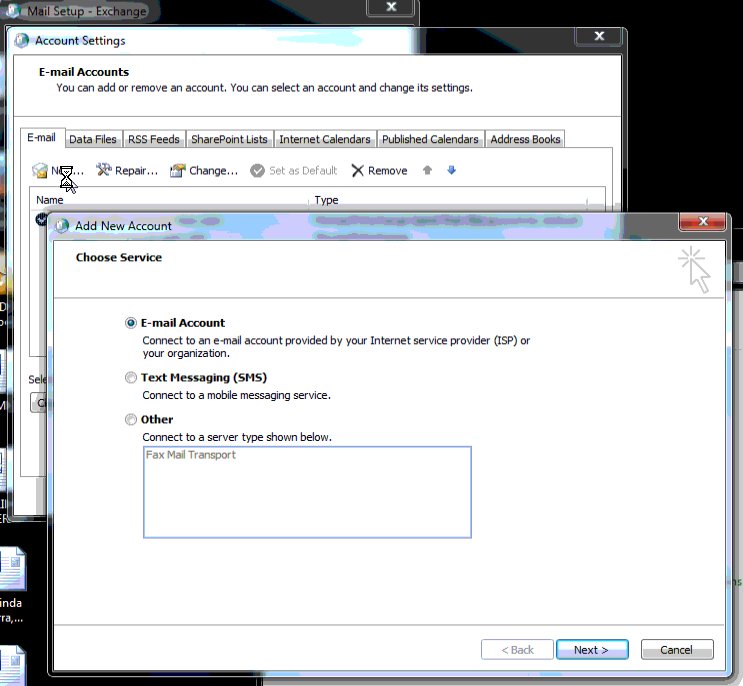
Click next
The select “Manually configure…..
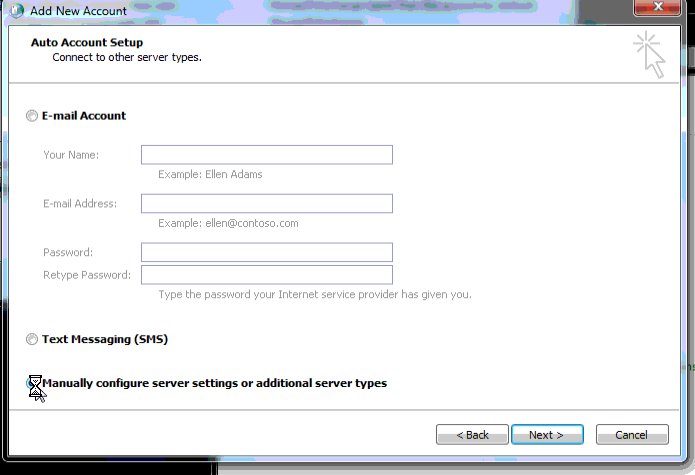
Then Next
And select “Microsoft Exchange or compatible service”
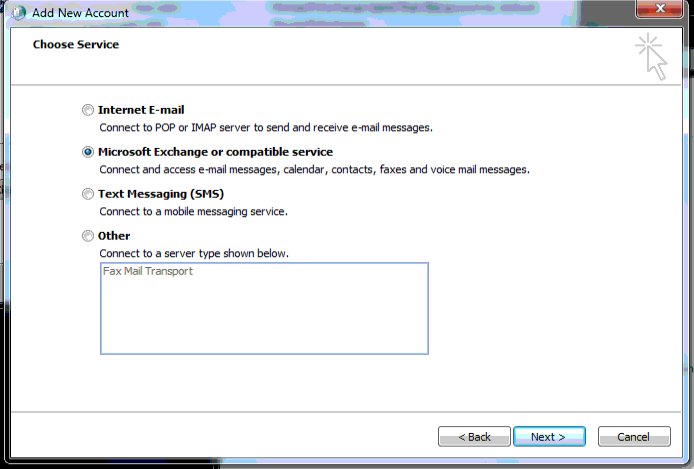
then Next
And enter the right server and username:
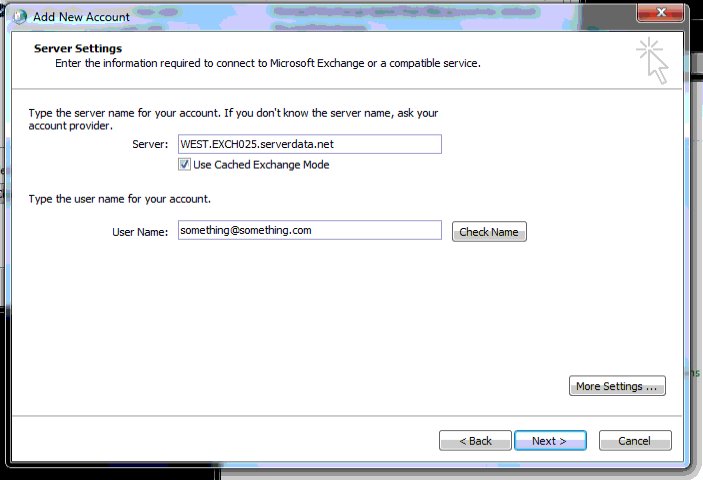
The click “More Settings”
And in the “Connections” tab down the bottom select “Connect to Microsoft Exchange using HTTP”
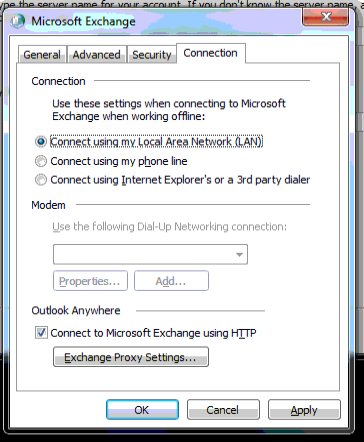
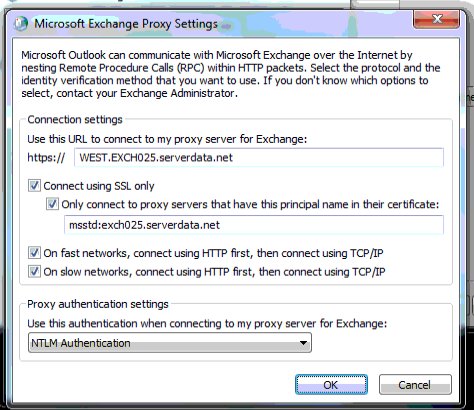
Then click “Exchange Proxy Settings…”
And fill the page in as appropriate (server names might be different to these)
Then OK and OK and Next
Then you will have to log in with the right username and password and the setup of the second account is complete.
Posted in Exchange Hosting, Windows | Comments Off on Setting up multiple hosted exchange accounts in one Outlook 2010 on Windows 7
June 15th, 2011 admin
Posted in Windows | Comments Off on How to Take a Screenshot in Microsoft Windows
June 8th, 2011 admin
put this code:
# Compress content
AddOutputFilterByType DEFLATE text/html text/plain text/xml application/xml application/xhtml+xml text/javascript text/css application/x-javascript
BrowserMatch ^Mozilla/4 gzip-only-text/html
BrowserMatch ^Mozilla/4.0[678] no-gzip
BrowserMatch bMSIE !no-gzip !gzip-only-text/html
into the .htaccess file in the root of your site and see it load faster.
Posted in Web design | Comments Off on Speed up web page loading from the server
March 25th, 2011 admin
A list of most common issues that you will encounter and how to fix them:
The internet on your PC is not working:
Restart your PC.
Everybodies internet is not working:
Restart the data/internet router.
The buttons on your phone have turned orange:
Power cycle the phone.
The buttons on everybodies phones have turned orange:
Restart the VoIP router (usually labled V) and power cycle all the phones.
Phone is displaying “Checking DNS”:
Restart the VoIP router (usually labled V).
Microphone button on the phone has turned red:
Check the network cable at the back of the phone(the one with the square tip). Unplug it and plug it back in.
Posted in Hardware | Comments Off on Troubleshooting Common Internet and VoIP Problems
March 25th, 2011 admin
I beleive this only works with Outlook 2007 and later.
To attach a data file to existing email/personal folders in Outlook:
Tools>Account Options/Settings>Data Files..
Find the one you want and check where it is located
Go to:
File>Open>Data file…
Navigate to directory that we found in the step above, select the data file (or .pst file) and and click open
This will load it on the left along with your personal folder and inboxes.
__________________________________________________________
If you are trying to do this on an earlier version of Outlook, there is another way to do this.
Go to Control Panel>Mail
Click the Data Files button
When the window pops up click on ‘Add…’
Navigate to directory that we found in window that popped up before, select the data file (or .pst file) and and click open
This should have the same result as above and is a bit quicker.
OG
Posted in Customer applications, Windows | Comments Off on How to open/view archived Outlook .PST and Data Files for all versions
March 22nd, 2011 admin
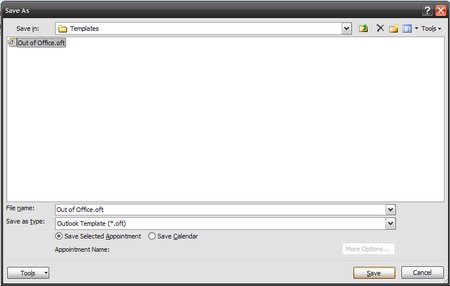
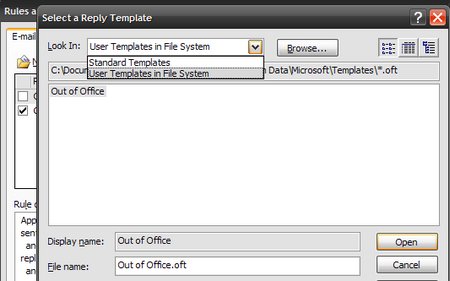
Firstly you will need to create a new email and write whatever you want your Out Of Office reply to say. When you are happy with it, save it as a a .oft template. (see image for reference)
Then go to:
-Tools
-Rules and Alerts
-New Rule
-Select ‘Check messages when they arrive’ under the Start from a blank rule category at the very bottom of the list.
-Next
-Tick ‘sent only to me’
-Next
Select whether you want it forwarded to someone else or moved to a folder. Select ‘reply using a specific template’. Click the link and navigate to ‘User Templates in File System’ (see image for reference).
-Open
-Next
-Finish
That should do it. Test to make sure it is working fine and make sure you untick it when not out of the office.
Posted in Exchange Hosting | Comments Off on Out of Office reply using Outlook Rules
March 1st, 2011 admin
- Download the latest stable version of the PhpMyAdmin software.
- Extract the archive file on your computer. Then upload the extracted files and folders through an FTP Client.
- Place them at the exact location where you would like to access the software. If you want to open it directly through http://www.yourdomainname.com/PhpMyAdmin you should place the content of the extracted directory straight under the an appropriately named folder eg, PhpMyAdmin under your account. Substitute www.yourdomainname.com with your actual domain name.
- Request from your web hosting supplier a MySQL database, user name and password with sufficient privileges or use existing privilege
- Load the PhpMyAdmin page using the corresponding URL (for example http://www.yourdomainname.com/PhpMyAdmin, where you should substitute www.yourdomainname.com with your actual domain name).
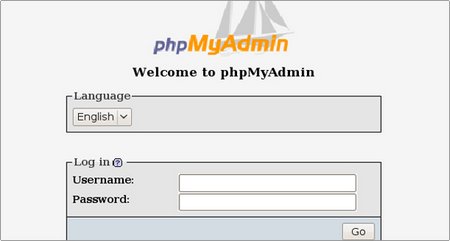
- Enter the database username and the corresponding password. In this way you will be able to manage all the databases for which the database user has privileges. Click on the Go button to log in.
- Now you can proceed with the databases management.
Posted in Web design | Comments Off on Manual PhpMyAdmin Installation